| Author |
Message |
|
|
| |
Post subject: |
Re: Pomeranian Rahschlup 1846 – 1/160 scale – Baltic trader |
 |
|
I managed to eek out a bit of time for the workshop between travels and addressed myself to the Parcel HatchThe ’parcel hatch’ is a common feature of such trading-smack type vessels and proved access to the cargo hold before the mast. As the name indicates, this space was typically used to store general cargo, while the main hold was used for bulk loads, such as bricks or coal, or grain in sacks. 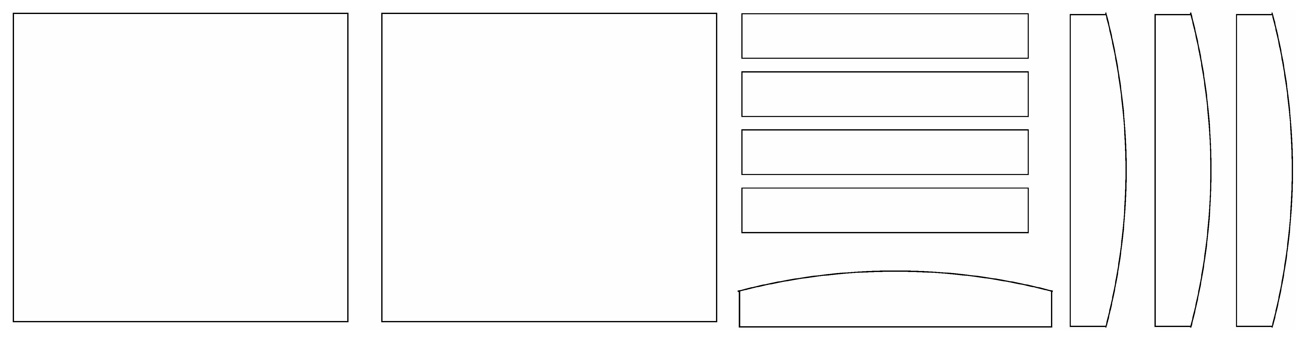 The laser-cutting template for the parcel hatch lid The laser-cutting template for the parcel hatch lidThis hatch will be shown closed and therefore a ‘core’ (the actual hatch including the coamings) was milled from a piece of acrylic, while the lid was built up from laser-cut parts. I could have milled the two parts in one piece, but milling the camber of the lid would have required a more complex set-up. On the real thing lid was made to fit over hatch like the lid on a box. 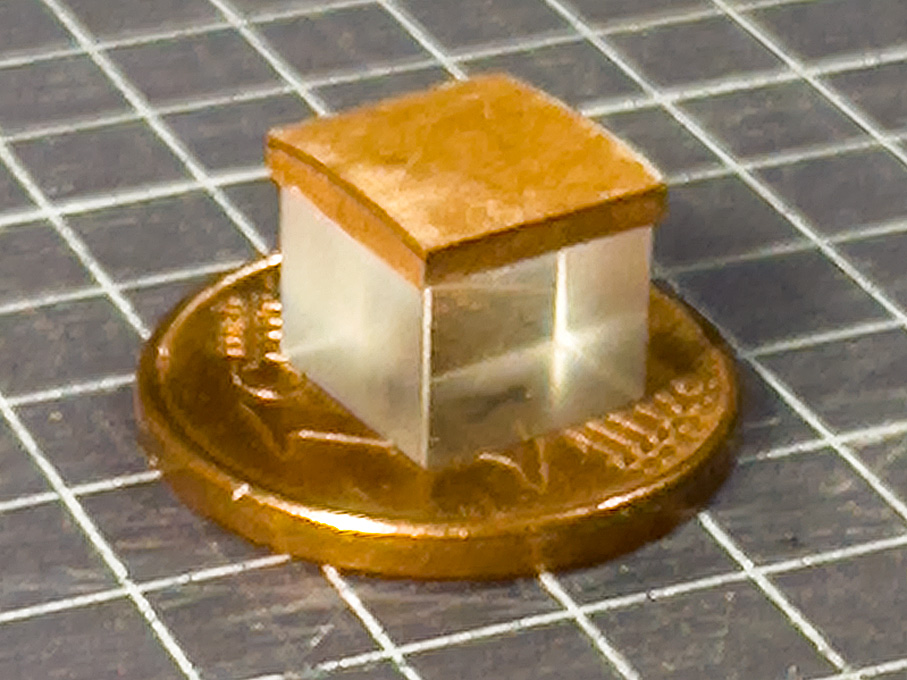 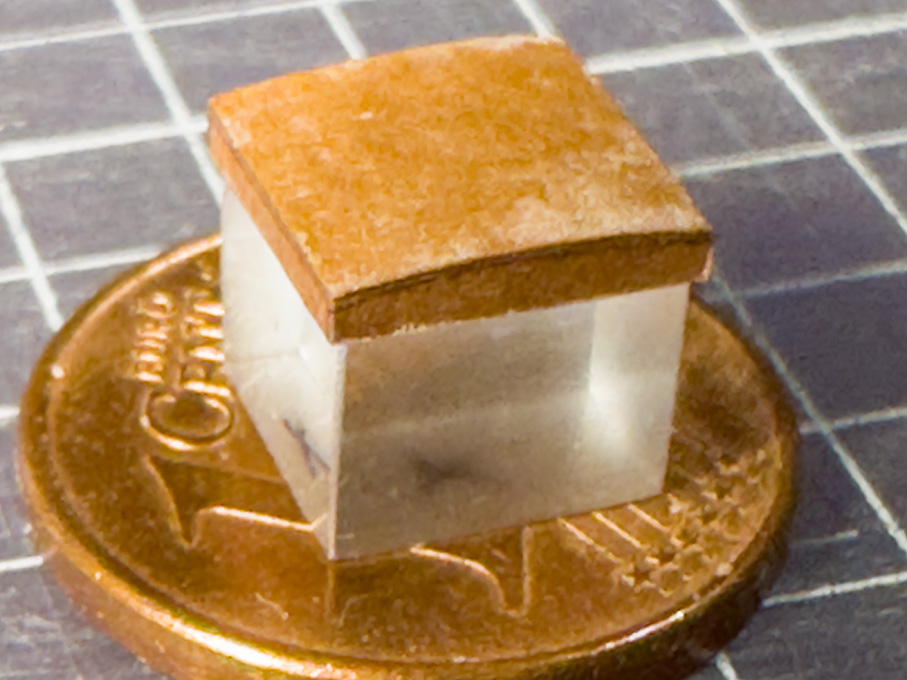 These hatch lid was tied down with two iron straps, the ends of which slipped over eye-bolts in the deck, to be secured to them with cotter-pins presumably. As these parts will be painted in a different colour from that of the hatch and have to fit tightly, they will be made and fitted later, once the hatch is installed. 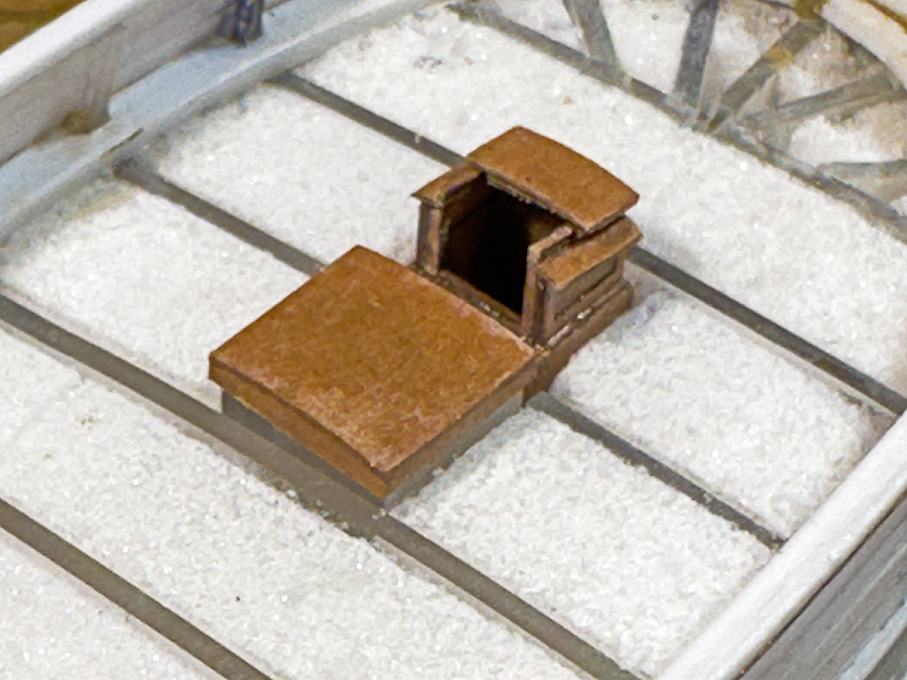 The parcel hatch and crew companionway provisionally deployedTo be continued … The parcel hatch and crew companionway provisionally deployedTo be continued …I managed to eek out a bit of time for the workshop between travels and addressed myself to the
[b]Parcel Hatch[/b]
The ’parcel hatch’ is a common feature of such trading-smack type vessels and proved access to the cargo hold before the mast. As the name indicates, this space was typically used to store general cargo, while the main hold was used for bulk loads, such as bricks or coal, or grain in sacks.
[img]https://www.maritima-et-mechanika.org/maritime/models/Rahschlup/model/Kistluke-parts.jpg[/img]
[b][i]The laser-cutting template for the parcel hatch lid[/i][/b]
This hatch will be shown closed and therefore a ‘core’ (the actual hatch including the coamings) was milled from a piece of acrylic, while the lid was built up from laser-cut parts. I could have milled the two parts in one piece, but milling the camber of the lid would have required a more complex set-up. On the real thing lid was made to fit over hatch like the lid on a box.
[img]https://www.maritima-et-mechanika.org/maritime/models/Rahschlup/model/Rahschlup-063.jpg[/img]
[img]https://www.maritima-et-mechanika.org/maritime/models/Rahschlup/model/Rahschlup-064.jpg[/img]
These hatch lid was tied down with two iron straps, the ends of which slipped over eye-bolts in the deck, to be secured to them with cotter-pins presumably. As these parts will be painted in a different colour from that of the hatch and have to fit tightly, they will be made and fitted later, once the hatch is installed.
[img]https://www.maritima-et-mechanika.org/maritime/models/Rahschlup/model/Rahschlup-065.jpg[/img]
[b][i]The parcel hatch and crew companionway provisionally deployed[/i][/b]
[i]To be continued …[/i]
|
|
|
 |
Posted: Mon Jul 07, 2025 1:35 pm |
|
|
 |
|
|
| |
Post subject: |
Re: Pomeranian Rahschlup 1846 – 1/160 scale – Baltic trader |
|
|
In spite of a week's absence due to some business travel I managed to do something: ******************* The Main HatchThe main hatch will be shown closed, so I could revert to my usual technique of milling it from a solid piece of acrylic glass. In fact, the piece forms a core and as sharp corners for the recess into which the hatch covers fit is needed, around it strips of 1 mm acrylic glass were cemented. This arrangement was milled to size and shape as shown previously. To make it visually more interesting a quarter-round cove was milled into the outer edge with a 0.5 mm ball-burr. In real life, this would also prevent the wood from splintering, when hit by something during loading.  Milling a quarter-round cove into the coaming of the main-hatch Milling a quarter-round cove into the coaming of the main-hatchThe cover was assumed to be in three parts, each planked with short lengths of plank. The cover is made from a tight-fitting piece of bakelite paper into which the planks were engraved, as was done for the deck-planks. Making hatch and cover in separate pieces allows to paint it with sharp edges. The cover will be simulated to be natural wood. 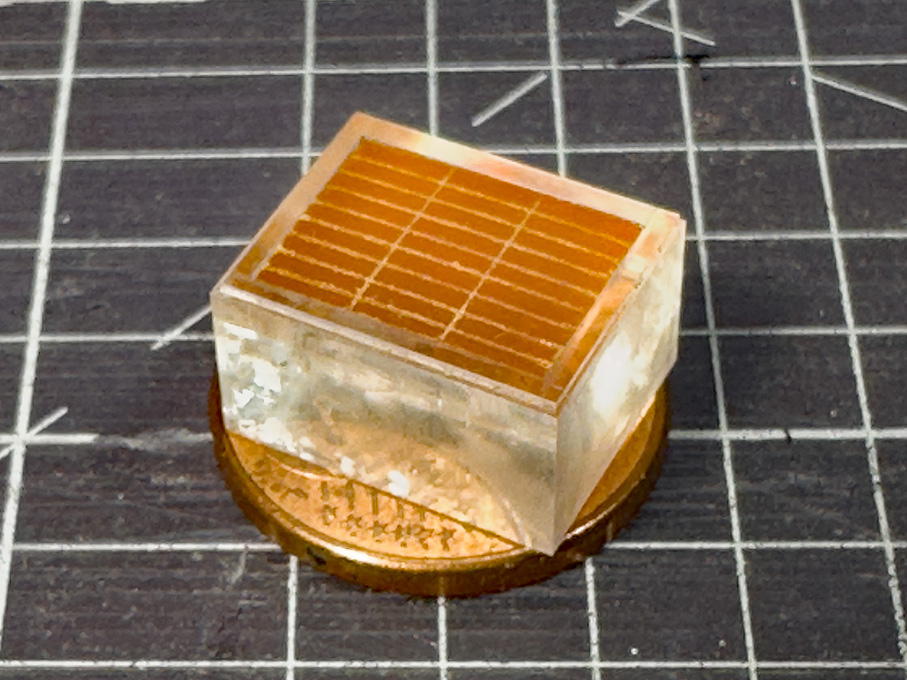 The main-hatch with the cover inserted The main-hatch with the cover insertedEventually, the hatch will be fitted with clamps for the battens to tie-down the canvas cover. That will be done at a later stage to avoid damage during fitting the part into the deck. To be continued …In spite of a week's absence due to some business travel I managed to do something:
*******************
[b]The Main Hatch[/b]
The main hatch will be shown closed, so I could revert to my usual technique of milling it from a solid piece of acrylic glass. In fact, the piece forms a core and as sharp corners for the recess into which the hatch covers fit is needed, around it strips of 1 mm acrylic glass were cemented. This arrangement was milled to size and shape as shown previously. To make it visually more interesting a quarter-round cove was milled into the outer edge with a 0.5 mm ball-burr. In real life, this would also prevent the wood from splintering, when hit by something during loading.
[img]https://www.maritima-et-mechanika.org/maritime/models/Rahschlup/model/Rahschlup-061.jpg[/img]
[b][i]Milling a quarter-round cove into the coaming of the main-hatch[/i][/b]
The cover was assumed to be in three parts, each planked with short lengths of plank. The cover is made from a tight-fitting piece of bakelite paper into which the planks were engraved, as was done for the deck-planks. Making hatch and cover in separate pieces allows to paint it with sharp edges. The cover will be simulated to be natural wood.
[img]https://www.maritima-et-mechanika.org/maritime/models/Rahschlup/model/Rahschlup-062.jpg[/img]
[b][i]The main-hatch with the cover inserted[/i][/b]
Eventually, the hatch will be fitted with clamps for the battens to tie-down the canvas cover. That will be done at a later stage to avoid damage during fitting the part into the deck.
[i]To be continued …[/i]
|
|
|
|
Posted: Sun Jun 29, 2025 8:28 am |
|
|
|
|
|
| |
Post subject: |
Re: Pomeranian Rahschlup 1846 – 1/160 scale – Baltic trader |
|
|
Wow, that really is another hobby in its own right! Fantastic!  Wow, that really is another hobby in its own right! Fantastic! :worship_1:
|
|
|
|
Posted: Tue Jun 24, 2025 7:04 am |
|
|
|
|
|
| |
Post subject: |
Re: Pomeranian Rahschlup 1846 – 1/160 scale – Baltic trader |
|
|
|
Thanks, Marijn!
Well, it's a vintage milling machine that never was: [url]https://www.maritima-et-mechanika.org/tools/micromill/micromill.html[/url]. The key mechanical parts came from antique watchmaking lathes.
[img]https://www.maritima-et-mechanika.org/tools/micromill/MF-134.jpg[/img]
[url]https://www.maritima-et-mechanika.org/tools/micromill/MF-V1.mp4[/url]
The miniature vice is shop-made: [url]https://www.maritima-et-mechanika.org/tools/attachments/attachments.html#Micro_vice[/url]
|
|
|
|
Posted: Wed Jun 18, 2025 4:01 am |
|
|
|
|
|
| |
Post subject: |
Re: Pomeranian Rahschlup 1846 – 1/160 scale – Baltic trader |
|
|
Beautiful precise scratchbuilding!  And with very interesting techniques too! That milling machine looks beautiful. Is it some kind of vintage watchmakers machine? Beautiful precise scratchbuilding! :thumbs_up_1: :thumbs_up_1: :thumbs_up_1:
And with very interesting techniques too!
That milling machine looks beautiful. Is it some kind of vintage watchmakers machine?
|
|
|
|
Posted: Wed Jun 18, 2025 3:27 am |
|
|
|
|
|
| |
Post subject: |
Re: Pomeranian Rahschlup 1846 – 1/160 scale – Baltic trader |
|
|
Thank you very much for your kind comments! In between business-related absences from home, I managed to progress here a bit ... **************** Cabin SkylightAs noted previously, the cabin skylight is a somewhat perilous position, but nevertheless contemporary drawings and some old models indicated, that they were of relatively lightweight construction. The actual construction is somewhat conjectural, but it seems that the hatch was covered by frame into which glass-panes were insert. Over this, there is a shallow roof-like structure with protective iron bars. In this arrangement, the glass-panes are not actually insert into the roof-like structure, but are at some distance below. The effect is, that even in the event that the iron bars are bent, the glass would not be touched. It also conceivable, that in the Baltic not real glass was used, but rather muscovite, which would be obtained by trade from Russia. In the event of very bad weather, the roof-like grille presumably could be replaced by a plain hatch cover.  Milling to shape of the acrylic glass core for the cabin skylight Milling to shape of the acrylic glass core for the cabin skylightThis structure was built up in my preferred way, that is around a core of acrylic glass. It was milled to size from scrap piece of acrylic glass. For the ‘glass’ surface, I was able to use one of the original - as manufactured - surfaces, so no polishing was required. The high-speed milling with a fly-cutter a low feed-rate left almost transparent surfaces.  Milling to shape of the acrylic glass core for the cabin skylight Milling to shape of the acrylic glass core for the cabin skylight Milling of the recesses for the laser-cut frame parts Milling of the recesses for the laser-cut frame partsThe parts for the roof-like structure were produced again with the laser-cutter from Canson paper. The structure was to be designed in two parts, namely the frame attached to acrylic core and the two roof halves with the grilles, to allow painting. During painting the horizontal pane will be masked off and the roof halves painted separately. In order to ensure equal spacing of the ‘bars’, the roof was built up from three layers with the middle layers having notches. This layer was lacquered onto one of the outer layers and the ‘bars’ attached with drops of varnish – quite a fiddly bit of work and I am not entirely satisfied with the result. In the past, I made such parts from surface-etched brass and this seems to have worked better, but I didn’t want to set up everything for etching just a couple of small parts.  Basic structure of the skylight, waiting to be painted and finally assembled Basic structure of the skylight, waiting to be painted and finally assembledI prefer to defer painting to the late stages of the building process in order to avoid handling the painted parts as much as possible, so construction of the skylight stops here for the moment. To be continued …Thank you very much for your kind comments!
In between business-related absences from home, I managed to progress here a bit ...
****************
[b]Cabin Skylight[/b]
As noted previously, the cabin skylight is a somewhat perilous position, but nevertheless contemporary drawings and some old models indicated, that they were of relatively lightweight construction. The actual construction is somewhat conjectural, but it seems that the hatch was covered by frame into which glass-panes were insert. Over this, there is a shallow roof-like structure with protective iron bars. In this arrangement, the glass-panes are not actually insert into the roof-like structure, but are at some distance below. The effect is, that even in the event that the iron bars are bent, the glass would not be touched. It also conceivable, that in the Baltic not real glass was used, but rather muscovite, which would be obtained by trade from Russia. In the event of very bad weather, the roof-like grille presumably could be replaced by a plain hatch cover.
[img]https://www.maritima-et-mechanika.org/maritime/models/Rahschlup/model/Rahschlup-057.jpg[/img]
[b][i]Milling to shape of the acrylic glass core for the cabin skylight[/i][/b]
This structure was built up in my preferred way, that is around a core of acrylic glass. It was milled to size from scrap piece of acrylic glass. For the ‘glass’ surface, I was able to use one of the original - as manufactured - surfaces, so no polishing was required. The high-speed milling with a fly-cutter a low feed-rate left almost transparent surfaces.
[img]https://www.maritima-et-mechanika.org/maritime/models/Rahschlup/model/Rahschlup-058.jpg[/img]
[b][i]Milling to shape of the acrylic glass core for the cabin skylight[/i][/b]
[img]https://www.maritima-et-mechanika.org/maritime/models/Rahschlup/model/Rahschlup-059.jpg[/img]
[b][i]Milling of the recesses for the laser-cut frame parts[/i][/b]
The parts for the roof-like structure were produced again with the laser-cutter from Canson paper. The structure was to be designed in two parts, namely the frame attached to acrylic core and the two roof halves with the grilles, to allow painting. During painting the horizontal pane will be masked off and the roof halves painted separately.
In order to ensure equal spacing of the ‘bars’, the roof was built up from three layers with the middle layers having notches. This layer was lacquered onto one of the outer layers and the ‘bars’ attached with drops of varnish – quite a fiddly bit of work and I am not entirely satisfied with the result. In the past, I made such parts from surface-etched brass and this seems to have worked better, but I didn’t want to set up everything for etching just a couple of small parts.
[img]https://www.maritima-et-mechanika.org/maritime/models/Rahschlup/model/Rahschlup-060.jpg[/img]
[b][i]Basic structure of the skylight, waiting to be painted and finally assembled[/i][/b]
I prefer to defer painting to the late stages of the building process in order to avoid handling the painted parts as much as possible, so construction of the skylight stops here for the moment.
[i]To be continued …[/i]
|
|
|
|
Posted: Sun Jun 15, 2025 5:37 am |
|
|
|
|
|
| |
Post subject: |
Re: Pomeranian Rahschlup 1846 – 1/160 scale – Baltic trader |
|
|
Hello, I just viewed this post. Wonderful ! An advanced research of documents and an excellent start of work. Best wishes  Hello,
I just viewed this post. Wonderful ! An advanced research of documents and an excellent start of work.
Best wishes :wave_1:
|
|
|
|
Posted: Fri Jun 06, 2025 2:39 pm |
|
|
|
|
|
| |
Post subject: |
Re: Pomeranian Rahschlup 1846 – 1/160 scale – Baltic trader |
|
|
Cabin companionway and binnacleThe layout of the access to the stern cabin is somewhat puzzling, even taking into consideration that accommodation in this kind of vessel was spartanic and cramped. There seems to be a skylight over the cabin that was most probably protected by a grille. However, it is just in the area over which the business end of tiller sweeps. The helmsman would have to pay attention, where he puts his feet. Rather close in front of it seems to be the companionway that leads down into the cabin. Unlike for the other deck openings no coamings are drawn. Normally, there would have been a movable binnacle behind the companionway, so that the helmsman has a good view. The binnacle at that time was constructed like a cabinet and would be lashed down to the deck. However, the space between the skylight and the companionway seems to be too narrow to accommodate this kind of cabinet.  Details of the stern arrangements, original drawing by Möller (1846) Details of the stern arrangements, original drawing by Möller (1846)By looking through contemporary paintings and drawings of similar vessels, I chanced upon a somewhat naïve watercolour of a local painter from Trondheim, that shows a combination of binnacle and companionway. It also opens in a somewhat unusual fashion, where a segment of the roof is hinged to flip backward – rather than the usual sliding cover. Not sure how this would behave in any kind of stronger wind. Not all the details and the perspective in the watercolour seem to be right, but overall, it looks credible. The whole arrangement is actually quite similar to that of the original drawing, also with the skylight right under the tiller, which actually is worked quite casually with ropes by the gentleman with straw(?)-hat sitting on the port stern rail. Anyway, I opted for this solution as it is unusual and solves the space problem. As a bonus I don’t need to worry about rendering the lashings of the binnacle. 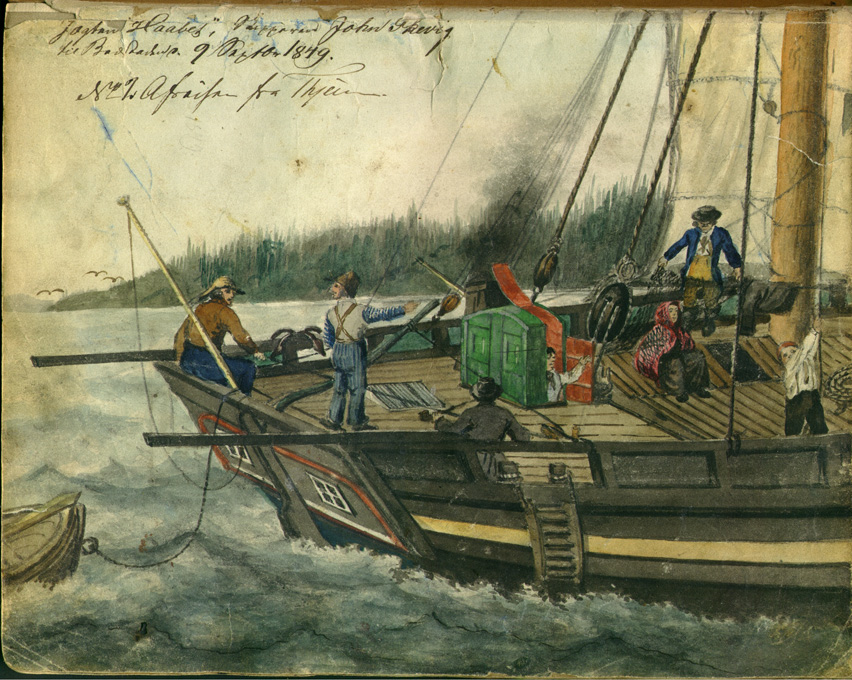 The Norwegian jægt HAABET (1849). Source: Town archives of Trondheim - https://www.flickr.com/photos/trondheim_byarkiv/3539132719. The Norwegian jægt HAABET (1849). Source: Town archives of Trondheim - https://www.flickr.com/photos/trondheim_byarkiv/3539132719.The companionway-binnacle combination was again built from laminations of laser-cut pieces. The main objective was to show the panelling. So, each side was built up from three layers, the outer ones simulating the frames with the cut-outs for the panels. The profiled coamings were simulated by adding two further layers.      The collection of parts for laser-cutting The collection of parts for laser-cuttingAssembly of all those parts was a bit of fiddling and I prefer my usual method of assembling companionways etc. around a solid core milled from a piece of acrylic glass, but this obviously only works, when they are shown closed. To be continued …
[b]Cabin companionway and binnacle[/b]
The layout of the access to the stern cabin is somewhat puzzling, even taking into consideration that accommodation in this kind of vessel was spartanic and cramped. There seems to be a skylight over the cabin that was most probably protected by a grille. However, it is just in the area over which the business end of tiller sweeps. The helmsman would have to pay attention, where he puts his feet. Rather close in front of it seems to be the companionway that leads down into the cabin. Unlike for the other deck openings no coamings are drawn. Normally, there would have been a movable binnacle behind the companionway, so that the helmsman has a good view. The binnacle at that time was constructed like a cabinet and would be lashed down to the deck. However, the space between the skylight and the companionway seems to be too narrow to accommodate this kind of cabinet.
[img]https://www.maritima-et-mechanika.org/maritime/models/Rahschlup/MOELLER-Kabine-Ausschnitt.jpg[/img]
[b][i]Details of the stern arrangements, original drawing by Möller (1846)[/i][/b]
By looking through contemporary paintings and drawings of similar vessels, I chanced upon a somewhat naïve watercolour of a local painter from Trondheim, that shows a combination of binnacle and companionway. It also opens in a somewhat unusual fashion, where a segment of the roof is hinged to flip backward – rather than the usual sliding cover. Not sure how this would behave in any kind of stronger wind. Not all the details and the perspective in the watercolour seem to be right, but overall, it looks credible.
The whole arrangement is actually quite similar to that of the original drawing, also with the skylight right under the tiller, which actually is worked quite casually with ropes by the gentleman with straw(?)-hat sitting on the port stern rail.
Anyway, I opted for this solution as it is unusual and solves the space problem. As a bonus I don’t need to worry about rendering the lashings of the binnacle.
[img]https://www.maritima-et-mechanika.org/maritime/models/Rahschlup/HAABET-1849-jagt-StadtarchivBergen-72.jpg[/img]
[i][b]The Norwegian jægt HAABET (1849)[/b]. Source: Town archives of Trondheim - [url]https://www.flickr.com/photos/trondheim_byarkiv/3539132719[/url].[/i]
The companionway-binnacle combination was again built from laminations of laser-cut pieces. The main objective was to show the panelling. So, each side was built up from three layers, the outer ones simulating the frames with the cut-outs for the panels. The profiled coamings were simulated by adding two further layers.
[img]https://www.maritima-et-mechanika.org/maritime/models/Rahschlup/model/Rahschlup-053.jpg[/img]
[img]https://www.maritima-et-mechanika.org/maritime/models/Rahschlup/model/Rahschlup-054.jpg[/img]
[img]https://www.maritima-et-mechanika.org/maritime/models/Rahschlup/model/Rahschlup-055.jpg[/img]
[img]https://www.maritima-et-mechanika.org/maritime/models/Rahschlup/model/Rahschlup-056.jpg[/img]
[img]https://www.maritima-et-mechanika.org/maritime/models/Rahschlup/model/Cabin-Companionway-parts.jpg[/img]
[b][i]The collection of parts for laser-cutting[/i][/b]
Assembly of all those parts was a bit of fiddling and I prefer my usual method of assembling companionways etc. around a solid core milled from a piece of acrylic glass, but this obviously only works, when they are shown closed.
[i]To be continued …[/i]
|
|
|
|
Posted: Thu Jun 05, 2025 3:01 pm |
|
|
|
|
|
| |
Post subject: |
Re: Pomeranian Rahschlup 1846 – 1/160 scale – Baltic trader |
|
|
|
Thanks, Marijn, I am aware of this, but they are like ploughing furrows actually. I only need a very narrow incision to hold some pigmented ink. The lines will be narrower than what can be drawn reasonably with an old-fashioned drafting pen or led alone a marker pen.
Thanks, Marijn, I am aware of this, but they are like ploughing furrows actually. I only need a very narrow incision to hold some pigmented ink. The lines will be narrower than what can be drawn reasonably with an old-fashioned drafting pen or led alone a marker pen.
|
|
|
|
Posted: Fri May 30, 2025 2:37 am |
|
|
|
|
|
| |
Post subject: |
Re: Pomeranian Rahschlup 1846 – 1/160 scale – Baltic trader |
|
|
Beautiful work Eberhart! Evergreen makes grooved styrene sheets (usually advertised as railcar siding or V-groove siding): https://evergreenscalemodels.com/collec ... car-sidinghttps://evergreenscalemodels.com/collec ... r-siding-1https://evergreenscalemodels.com/collec ... ove-sidinghttps://evergreenscalemodels.com/collec ... ove-sidingThere are three thicknesses (0,5 mm, 0,75 mm and 1 mm), and can be very useful for wooden decks, as the grooving is very crisp and regular. There is a nice range of 'plank' widths to choose from. Beautiful work Eberhart!
Evergreen makes grooved styrene sheets (usually advertised as railcar siding or V-groove siding):
https://evergreenscalemodels.com/collections/freight-car-siding
https://evergreenscalemodels.com/collections/freight-car-siding-1
https://evergreenscalemodels.com/collections/020-50mm-opaque-white-v-groove-siding
https://evergreenscalemodels.com/collections/040-1-0mm-opaque-white-polystyrene-v-groove-siding
There are three thicknesses (0,5 mm, 0,75 mm and 1 mm), and can be very useful for wooden decks, as the grooving is very crisp and regular. There is a nice range of 'plank' widths to choose from.
|
|
|
|
Posted: Fri May 30, 2025 2:28 am |
|
|
|
|
|
| |
Post subject: |
Re: Pomeranian Rahschlup 1846 – 1/160 scale – Baltic trader |
|
|
Crew companionwayThe deck of the Rahschlup was flush, no raised quarterdeck or any deckhouses as such. Only companionways gave access to the crew quarters and the after cabin respectively. All in all, a very spartanic arrangement.  Companionway on the reconstruction project for the galeas FÖRLIG WIND, Skeppsholmen, Stockholm (https://www.arbeitskreis-historischer-s ... ppsholmen/) Companionway on the reconstruction project for the galeas FÖRLIG WIND, Skeppsholmen, Stockholm (https://www.arbeitskreis-historischer-s ... ppsholmen/)The length of the companionways and of the hatches can be taken from the side elevation drawing, but their width has to be inferred from common practice of the time. Likewise, their construction had to be inspired by photographs of appropriate restoration projects. A typical construction method seems to have been panelled sides. Other examples include simple vertical or horizontal staves that fill the space between the corner posts. Two narrow doors give access, together with a sliding roof section. The rails on which this cover slides seems to have been of varying degrees of complexity.  I usually built such companionways around a core in Plexiglas that has been milled to shape. For this project, however, I wanted to show them open with some interior details, so that a construction method somewhat closer to the prototype had to be chosen.  The different parts were drawn and cut out with the laser-cutter from 0.1 thick Canson paper. Each side was laminated from three layers for the actual companionway and two more layers for the coamings using Zapon varnish. The roof and the sliding cover were built up from two layers. The sliding rails were constructed from narrow laser-cut strips. The doors are also built up from three layers.  Unlike on the prototype, the companionways and ‘coamings’ reach down to a horizontal layer in the hull in order to provide a reference for their height above the deck, when installed.  As with all such parts, they may look a bit rough in the close-up pictures, but once painted and from a normal viewing distance they look very good (hopefully …). To be continued …
[b]Crew companionway[/b]
The deck of the Rahschlup was flush, no raised quarterdeck or any deckhouses as such. Only companionways gave access to the crew quarters and the after cabin respectively. All in all, a very spartanic arrangement.
[img]https://www.maritima-et-mechanika.org/maritime/models/Rahschlup/236033-72.jpg[/img]
[b][i]Companionway on the reconstruction project for the galeas FÖRLIG WIND, Skeppsholmen, Stockholm[/i][/b] [i](https://www.arbeitskreis-historischer-schiffbau.de/mitglieder/ontour/bootsbauplatz-skeppsholmen/)[/i]
The length of the companionways and of the hatches can be taken from the side elevation drawing, but their width has to be inferred from common practice of the time. Likewise, their construction had to be inspired by photographs of appropriate restoration projects. A typical construction method seems to have been panelled sides. Other examples include simple vertical or horizontal staves that fill the space between the corner posts. Two narrow doors give access, together with a sliding roof section. The rails on which this cover slides seems to have been of varying degrees of complexity.
[img]https://www.maritima-et-mechanika.org/maritime/models/Rahschlup/model/Rahschlup-049.jpg[/img]
I usually built such companionways around a core in Plexiglas that has been milled to shape. For this project, however, I wanted to show them open with some interior details, so that a construction method somewhat closer to the prototype had to be chosen.
[img]https://www.maritima-et-mechanika.org/maritime/models/Rahschlup/model/Rahschlup-050.jpg[/img]
The different parts were drawn and cut out with the laser-cutter from 0.1 thick Canson paper. Each side was laminated from three layers for the actual companionway and two more layers for the coamings using Zapon varnish. The roof and the sliding cover were built up from two layers. The sliding rails were constructed from narrow laser-cut strips. The doors are also built up from three layers.
[img]https://www.maritima-et-mechanika.org/maritime/models/Rahschlup/model/Rahschlup-051.jpg[/img]
Unlike on the prototype, the companionways and ‘coamings’ reach down to a horizontal layer in the hull in order to provide a reference for their height above the deck, when installed.
[img]https://www.maritima-et-mechanika.org/maritime/models/Rahschlup/model/Rahschlup-052.jpg[/img]
As with all such parts, they may look a bit rough in the close-up pictures, but once painted and from a normal viewing distance they look very good (hopefully …).
[i]To be continued …[/i]
|
|
|
|
Posted: Wed May 14, 2025 3:23 pm |
|
|
|
|
|
| |
Post subject: |
Re: Pomeranian Rahschlup 1846 – 1/160 scale – Baltic trader |
|
|
Thanks to Jim and all the other visitors of this log ********************************************************* Fitting the deckThe deck is made from 0.4 mm thick Bakelite-paper. I find it easier to engrave the deck-seams consistently into this harder material with my tools, then into the softer styrene sheet. Perhaps I should get some day one of those hooked engraving tools the plastic modellers use (I have the suspicion these are the same tools as dentists use to scrape of ‘plaque’ – I have one of those and perhaps should have tried). I first printed out the deck-drawing, cut out the shape and fitted it to the ship. Using the paper template, the shape was cut from the Bakelite with a small margin. This then was fitted very carefully in an evening’s session. Fitting started from the stern working forward, taking off material with a diamond nail-file while checking the fit after a couple of strokes. A tight fit is important, as the whole idea is to paint the deck off-ship to avoid a complex masking exercise. Also, the painting process (as described in the build-log for SMS WESPE) would be difficult to exercise within the constraints of the bulwark.  Tools used for engraving the deck seams Tools used for engraving the deck seamsThe fitted deck was taped to a printout of the deck with the planks marked as guidance for engraving. A heavy steel ruler ensured straight lines. First, the plank seam was marked with a scalpel to provide some ‘tooth’ for the graver. Then a narrow engraver’s graver was run twice along the ‘seam’ to clean out the shallow groove. Once the engraving was completed, the whole deck was thoroughly brushed with a rotary bristle-brush to remove burrs. I ended up doing this three times, as in the first two attempts I lost count and cut a skewed seam. This is unrepairable, so I had to start all over again. However, the first fitted deck provided a good template, speeding up the fitting process: after scoring the material with a scalpel around the edges of the template, one can break the new deck out of the bakelite sheet. Only comparatively little fitting was required then.  In fact, scoring the bakelite-paper with a scalpel twice and then breaking along the line is a quick and clean way of getting straight cuts that just require a bit of sanding with a diamond file. The next step would be to cut out the openings for the companionways and hatches. However, these have to be tight fits to them and it will be easier to first build those and then file out the openings – back to the drawing-board for some time. To be continued …Thanks to Jim and all the other visitors of this log :thumbs_up_1:
*********************************************************
[b]Fitting the deck[/b]
The deck is made from 0.4 mm thick Bakelite-paper. I find it easier to engrave the deck-seams consistently into this harder material with my tools, then into the softer styrene sheet. Perhaps I should get some day one of those hooked engraving tools the plastic modellers use (I have the suspicion these are the same tools as dentists use to scrape of ‘plaque’ – I have one of those and perhaps should have tried).
I first printed out the deck-drawing, cut out the shape and fitted it to the ship. Using the paper template, the shape was cut from the Bakelite with a small margin. This then was fitted very carefully in an evening’s session. Fitting started from the stern working forward, taking off material with a diamond nail-file while checking the fit after a couple of strokes.
A tight fit is important, as the whole idea is to paint the deck off-ship to avoid a complex masking exercise. Also, the painting process (as described in the build-log for SMS WESPE) would be difficult to exercise within the constraints of the bulwark.
[img]https://www.maritima-et-mechanika.org/maritime/models/Rahschlup/model/Rahschlup-047.jpg[/img]
[b][i]Tools used for engraving the deck seams[/i][/b]
The fitted deck was taped to a printout of the deck with the planks marked as guidance for engraving. A heavy steel ruler ensured straight lines. First, the plank seam was marked with a scalpel to provide some ‘tooth’ for the graver. Then a narrow engraver’s graver was run twice along the ‘seam’ to clean out the shallow groove. Once the engraving was completed, the whole deck was thoroughly brushed with a rotary bristle-brush to remove burrs.
I ended up doing this three times, as in the first two attempts I lost count and cut a skewed seam. This is unrepairable, so I had to start all over again. However, the first fitted deck provided a good template, speeding up the fitting process: after scoring the material with a scalpel around the edges of the template, one can break the new deck out of the bakelite sheet. Only comparatively little fitting was required then.
[img]https://www.maritima-et-mechanika.org/maritime/models/Rahschlup/model/Rahschlup-048.jpg[/img]
In fact, scoring the bakelite-paper with a scalpel twice and then breaking along the line is a quick and clean way of getting straight cuts that just require a bit of sanding with a diamond file.
The next step would be to cut out the openings for the companionways and hatches. However, these have to be tight fits to them and it will be easier to first build those and then file out the openings – back to the drawing-board for some time.
[i]To be continued …[/i]
|
|
|
|
Posted: Sun Apr 20, 2025 1:24 pm |
|
|
|
|
|
| |
Post subject: |
Re: Pomeranian Rahschlup 1846 – 1/160 scale – Baltic trader |
|
|
That is neat tool making with the chisel blade cut out.... Th result is really good! JIM B That is neat tool making with the chisel blade cut out....
Th result is really good!
:thumbs_up_1:
JIM B
|
|
|
|
Posted: Mon Apr 14, 2025 2:57 am |
|
|
|
|
|
| |
Post subject: |
Re: Pomeranian Rahschlup 1846 – 1/160 scale – Baltic trader |
|
|
Thanks, much appreciated ***************************************** Fitting the railsThe rails are 0.75 mm x 1.50 mm styrene strips on top of the bulwark and a 0.75 mm x 2.00 mm strip over the stern. The edges of the strips are rounded.  To this end I cut a scraper from a piece of razor-blade which is held in a short pin-vice. The strip is held in a simple jig made from cardboard. Strips of cardboard were cut with clean and vertical edges and glued to a cardboard-base so that styrene strips of 0.25 mm, 0.50, and 0.75 mm thickness can be wedged into the resulting notch, holding it straight and vertical.  In this way a clean and uniform profile of the styrene strip can be achieved quickly.  The styrene strips then were pre-bend, holding them lightly in round-nosed pliers and by ‘massaging’ them around my thumb to make them conform to the sheer-line as closely as possible. They then were glued onto the stanchions and the top bulwark strake using styrene-cement. 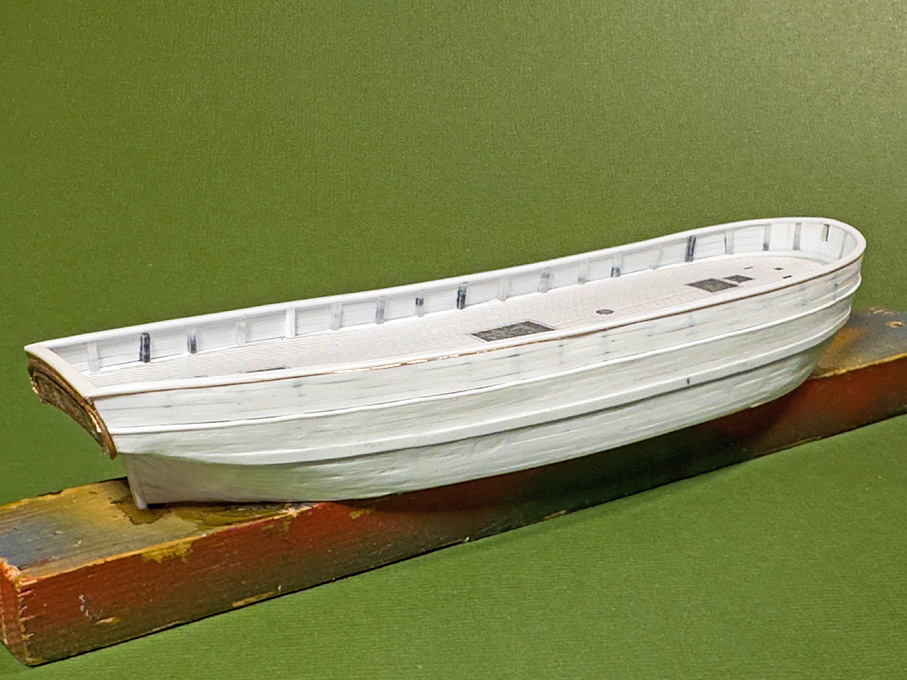 As can be seen from the cross-section shown in the previous post, the profile of the rail may be even more sophisticated with some cornice planed in. I simulated this my lacquering a 0.1 mm copper wire into the outboard corner under the rail.  The next step will be puttying up any small gaps that have developed during the planking process. 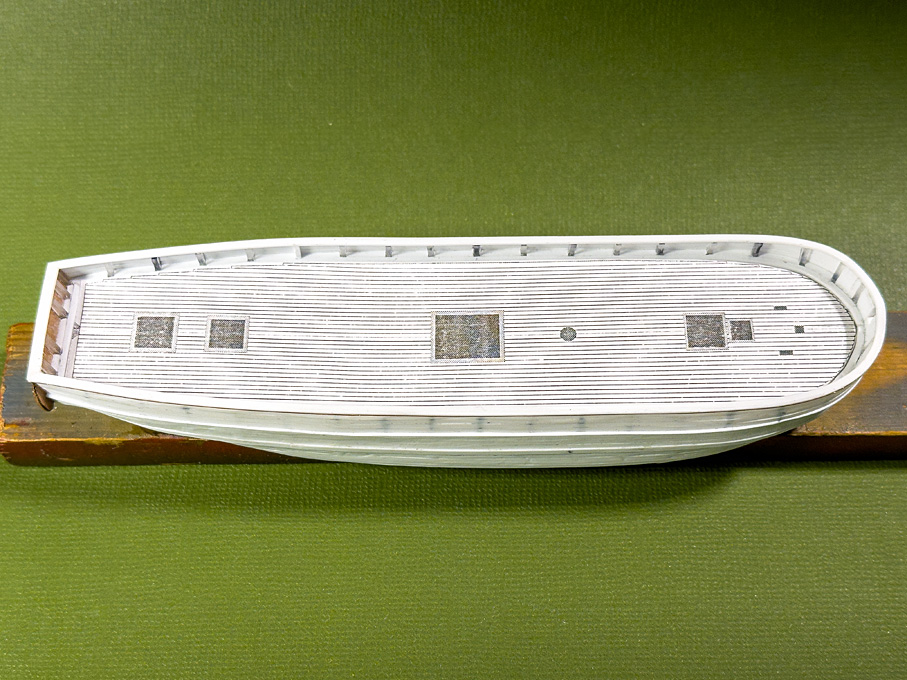 As one can see on the pictures, I also started to work on the deck by making a paper template for it. To be continued … Thanks, much appreciated :thumbs_up_1:
*****************************************
[b]Fitting the rails[/b]
The rails are 0.75 mm x 1.50 mm styrene strips on top of the bulwark and a 0.75 mm x 2.00 mm strip over the stern. The edges of the strips are rounded.
[img]https://www.maritima-et-mechanika.org/maritime/models/Rahschlup/model/Rahschlup-041.jpg[/img]
To this end I cut a scraper from a piece of razor-blade which is held in a short pin-vice. The strip is held in a simple jig made from cardboard. Strips of cardboard were cut with clean and vertical edges and glued to a cardboard-base so that styrene strips of 0.25 mm, 0.50, and 0.75 mm thickness can be wedged into the resulting notch, holding it straight and vertical.
[img]https://www.maritima-et-mechanika.org/maritime/models/Rahschlup/model/Rahschlup-042.jpg[/img]
In this way a clean and uniform profile of the styrene strip can be achieved quickly.
[img]https://www.maritima-et-mechanika.org/maritime/models/Rahschlup/model/Rahschlup-043.jpg[/img]
The styrene strips then were pre-bend, holding them lightly in round-nosed pliers and by ‘massaging’ them around my thumb to make them conform to the sheer-line as closely as possible. They then were glued onto the stanchions and the top bulwark strake using styrene-cement.
[img]https://www.maritima-et-mechanika.org/maritime/models/Rahschlup/model/Rahschlup-044.jpg[/img]
As can be seen from the cross-section shown in the previous post, the profile of the rail may be even more sophisticated with some cornice planed in. I simulated this my lacquering a 0.1 mm copper wire into the outboard corner under the rail.
[img]https://www.maritima-et-mechanika.org/maritime/models/Rahschlup/model/Rahschlup-045.jpg[/img]
The next step will be puttying up any small gaps that have developed during the planking process.
[img]https://www.maritima-et-mechanika.org/maritime/models/Rahschlup/model/Rahschlup-046.jpg[/img]
As one can see on the pictures, I also started to work on the deck by making a paper template for it.
[i]To be continued … [/i]
|
|
|
|
Posted: Sun Apr 13, 2025 12:54 pm |
|
|
|
|
|
| |
Post subject: |
Re: Pomeranian Rahschlup 1846 – 1/160 scale – Baltic trader |
|
|
Looking good--and much " boatier " than before.... JB Looking good--and much " boatier " than before....
:thumbs_up_1: :thumbs_up_1:
JB
|
|
|
|
Posted: Tue Apr 01, 2025 4:29 pm |
|
|
|
|
|
| |
Post subject: |
Re: Pomeranian Rahschlup 1846 – 1/160 scale – Baltic trader |
|
|
Planking the bulwarksThe planking of the bulwarks follows the same procedure as that for the hull, but had to be handled much more careful, as the inside will be visible and there will by no adjustments possible by sanding or scraping. The main reason for the latter is, that the planks are of scale thickness (0.25 mm) and profiled. 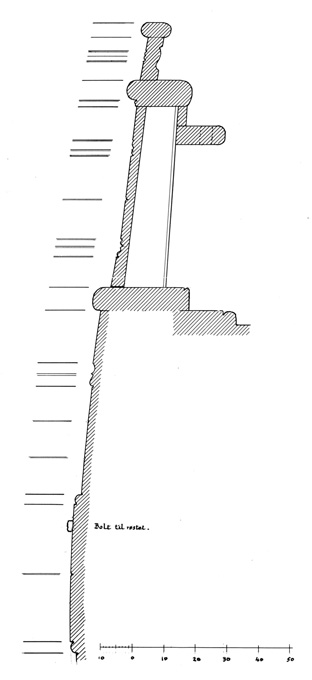 Section through a bulwark drawn by Friis-Pedersen (1980) Section through a bulwark drawn by Friis-Pedersen (1980)As can be seen from the two images above and below, it was not uncommon to give the edges of the planks a decorative profile by using an appropriate profile plane.  Bulwark of a Swedish jagt, photographed in November 2023 in Stockholm Bulwark of a Swedish jagt, photographed in November 2023 in StockholmI had been exploring various ideas for creating these profiles on tiny 1 mm x 0.25 mm styrene ‘planks’ uniformly and consistently close to the edges. In the end I decided on a simple and rather makeshift solution: a steel ruler was taped to a small cutting-mat to serve as guide for the very flexible strips. The chosen tool is an old-style ruling pen, of which I have several knocking about in my drawer of draughting utensils. This was set so that it creates a groove close to the opposite edge, when run along the edge of the strip. This works only for strips of uniform width.  It was important to prevent the styrene strips from softening too much during gluing, therefore only tiny drops of liquid styrene cement were applied to each stanchion.  Somehow the alignment of the bulkheads was not as perfect as I was hoping for, resulting in some bulges. I hope I will be able to correct/hide this somehow. Another problem is that the styrene strips of scale thickness are rather floppy, so that edge-alignment is rather difficult. I hope that I can also sort this out. Once the planks were on, I installed the hawse-timbers between the stem and the cant-frames in the bow.  Next on will be the rails. To be continued …
[b]Planking the bulwarks[/b]
The planking of the bulwarks follows the same procedure as that for the hull, but had to be handled much more careful, as the inside will be visible and there will by no adjustments possible by sanding or scraping. The main reason for the latter is, that the planks are of scale thickness (0.25 mm) and profiled.
[img]https://www.maritima-et-mechanika.org/maritime/models/Rahschlup/Friis-PedersenP43b.JPG[/img]
[b][i]Section through a bulwark drawn by Friis-Pedersen (1980)[/i][/b]
As can be seen from the two images above and below, it was not uncommon to give the edges of the planks a decorative profile by using an appropriate profile plane.
[img]https://www.maritima-et-mechanika.org/maritime/models/Rahschlup/235920-72.jpg[/img]
[b][i]Bulwark of a Swedish jagt, photographed in November 2023 in Stockholm[/i][/b]
I had been exploring various ideas for creating these profiles on tiny 1 mm x 0.25 mm styrene ‘planks’ uniformly and consistently close to the edges. In the end I decided on a simple and rather makeshift solution: a steel ruler was taped to a small cutting-mat to serve as guide for the very flexible strips. The chosen tool is an old-style ruling pen, of which I have several knocking about in my drawer of draughting utensils. This was set so that it creates a groove close to the opposite edge, when run along the edge of the strip. This works only for strips of uniform width.
[img]https://www.maritima-et-mechanika.org/maritime/models/Rahschlup/model/Rahschlup-037.jpg[/img]
It was important to prevent the styrene strips from softening too much during gluing, therefore only tiny drops of liquid styrene cement were applied to each stanchion.
[img]https://www.maritima-et-mechanika.org/maritime/models/Rahschlup/model/Rahschlup-038.jpg[/img]
Somehow the alignment of the bulkheads was not as perfect as I was hoping for, resulting in some bulges. I hope I will be able to correct/hide this somehow.
Another problem is that the styrene strips of scale thickness are rather floppy, so that edge-alignment is rather difficult. I hope that I can also sort this out.
Once the planks were on, I installed the hawse-timbers between the stem and the cant-frames in the bow.
[img]https://www.maritima-et-mechanika.org/maritime/models/Rahschlup/model/Rahschlup-039.jpg[/img]
Next on will be the rails.
[i]To be continued … [/i]
|
|
|
|
Posted: Tue Apr 01, 2025 3:51 pm |
|
|
|
|
|
| |
Post subject: |
Re: Pomeranian Rahschlup 1846 – 1/160 scale – Baltic trader |
|
|
Planking the hullIn principle planking this hull with styrene strips is not very different from planking with strips of wood. The styrene strips have the advantage that they can be more easily bent across the breadth. One can also shape them like metal by stretching and compressing until they conform to the shape of the solid hull. A disadvantage is that they are less stiff than wood and easily ‘sag’ in, say in thicknesses of les than 0.5 mm, but it also depends on the distance between the frames. 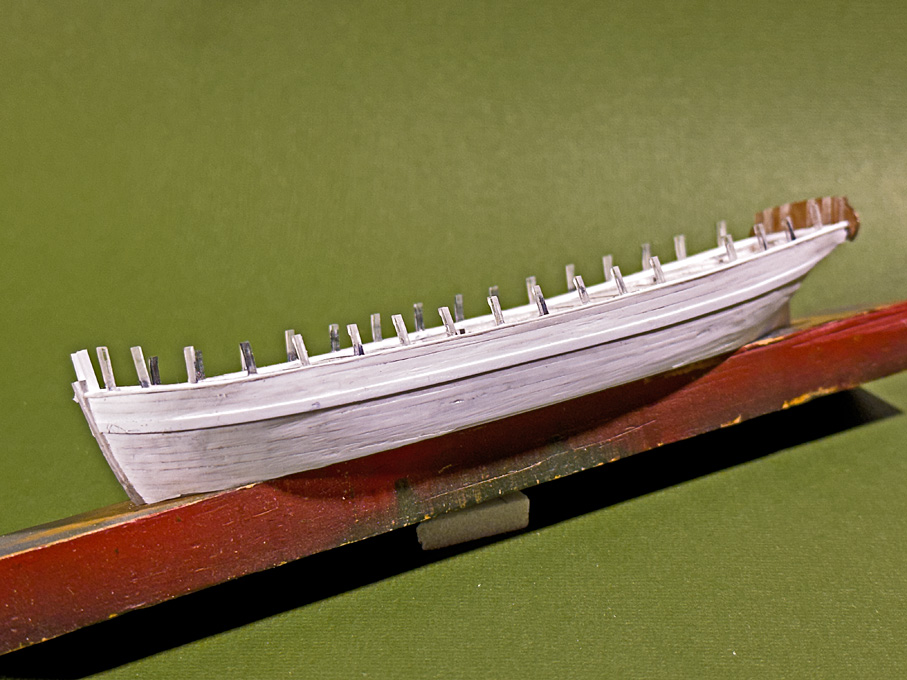 Planking proceeded up and down from the wales and down from the covering board. The Evergreen styrene strips are sawn from sheets as is evidenced by saw-marks on the narrow sides. This results in slight variations of their width, typically up to 0.1 mm wider for a 1 mm wide strip. This has to be considered, when planning the plank layout. In the end, I didn’t actually use my new plank-clamp much. It was easier to hold the strips short with the edges upright and to scrape the edge with a scalpel to reduce the width in a controlled fashion. There was not much need to bevel the edges. The styrene cement, of course, softens or dissolves the material, which allows it to be pushed together closely, obviating the need for bevelling at least for material of 0.5 mm thickness or less. 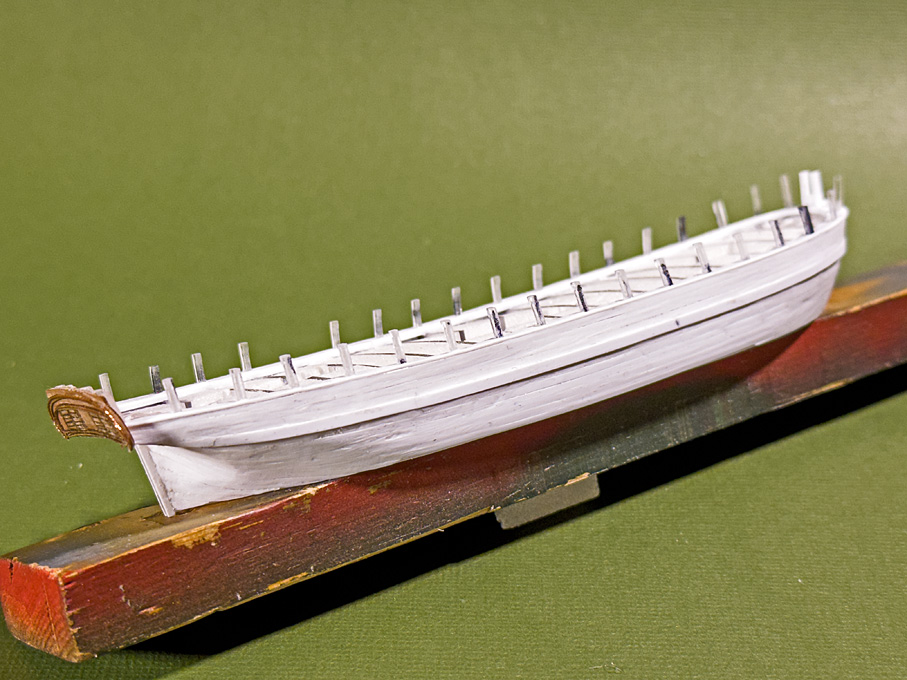 Unlike for woodworking, not many specialised tools are needed. I use a scalpel, the tools that in the old days was used to rub-on lettering comes handy to press on the strips, a large diamond nail-file for thinning down strips, and cutting-tweezers as watchmakers use them for shortening strips to length. The latter have the cutting edge bevelled only on one side, allowing for clean cuts without squashing the material. I also made small scrapers from a piece of razor-blade, held in a pin-vise. Steel-wool of various grades helps to blend-in parts or lightly round edges. 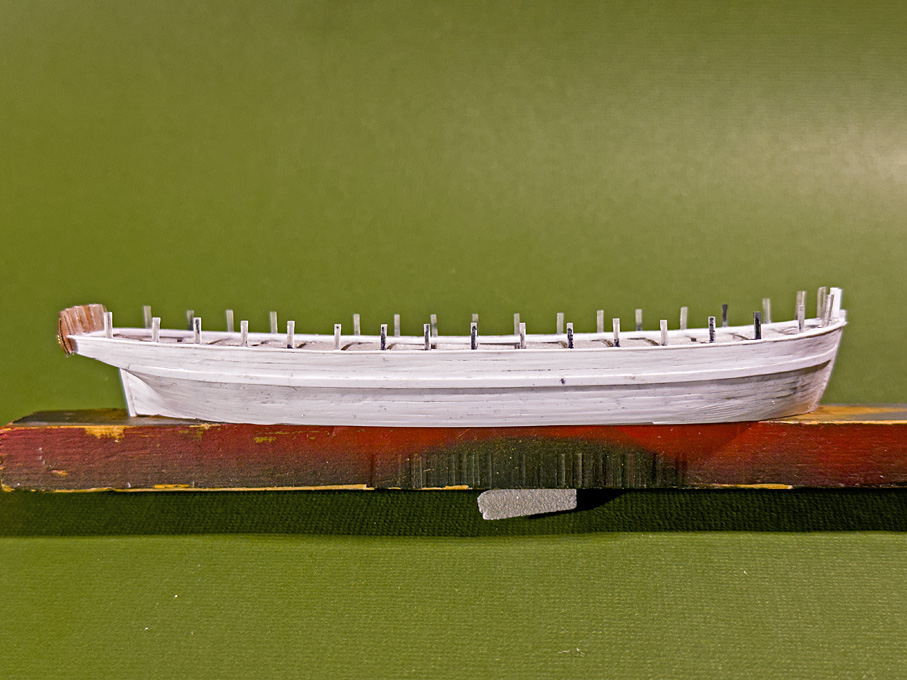 The pictures show the planking after cleaning up by sanding and scraping, but before puttying any gaps that may have occurred. I went for some slight irregularity of the surface, as may be observed in a well-used older wooden ship. This livens up an otherwise somewhat sterile styrene surface. To be continued …
[b]Planking the hull[/b]
In principle planking this hull with styrene strips is not very different from planking with strips of wood. The styrene strips have the advantage that they can be more easily bent across the breadth. One can also shape them like metal by stretching and compressing until they conform to the shape of the solid hull. A disadvantage is that they are less stiff than wood and easily ‘sag’ in, say in thicknesses of les than 0.5 mm, but it also depends on the distance between the frames.
[img]https://www.maritima-et-mechanika.org/maritime/models/Rahschlup/model/Rahschlup-034.jpg[/img]
Planking proceeded up and down from the wales and down from the covering board. The Evergreen styrene strips are sawn from sheets as is evidenced by saw-marks on the narrow sides. This results in slight variations of their width, typically up to 0.1 mm wider for a 1 mm wide strip. This has to be considered, when planning the plank layout.
In the end, I didn’t actually use my new plank-clamp much. It was easier to hold the strips short with the edges upright and to scrape the edge with a scalpel to reduce the width in a controlled fashion. There was not much need to bevel the edges. The styrene cement, of course, softens or dissolves the material, which allows it to be pushed together closely, obviating the need for bevelling at least for material of 0.5 mm thickness or less.
[img]https://www.maritima-et-mechanika.org/maritime/models/Rahschlup/model/Rahschlup-035.jpg[/img]
Unlike for woodworking, not many specialised tools are needed. I use a scalpel, the tools that in the old days was used to rub-on lettering comes handy to press on the strips, a large diamond nail-file for thinning down strips, and cutting-tweezers as watchmakers use them for shortening strips to length. The latter have the cutting edge bevelled only on one side, allowing for clean cuts without squashing the material. I also made small scrapers from a piece of razor-blade, held in a pin-vise. Steel-wool of various grades helps to blend-in parts or lightly round edges.
[img]https://www.maritima-et-mechanika.org/maritime/models/Rahschlup/model/Rahschlup-036.jpg[/img]
The pictures show the planking after cleaning up by sanding and scraping, but before puttying any gaps that may have occurred. I went for some slight irregularity of the surface, as may be observed in a well-used older wooden ship. This livens up an otherwise somewhat sterile styrene surface.
[i]To be continued … [/i]
|
|
|
|
Posted: Tue Mar 18, 2025 4:19 pm |
|
|
|
|
|
| |
Post subject: |
Re: Pomeranian Rahschlup 1846 – 1/160 scale – Baltic trader |
|
|
Installing the walesIt was fortunate that the upper edge of the wale was marked in the original drawings. I had transferred this to the bulkheads and cut appropriate notches. Somehow, however, these notches turned out to be not very useful as I would have to score the whole core of the hull accordingly, which would have been messy. In the end, I ignored them, though used their upper edge as guidance for placing the wales. I have no information on their dimension, but thought that a width of 240 mm = 1.5 mm looked about right on the hull. They would have been probably composed of two thick planks. For the thickness I choose 0.75 mm, as the hull-planking will be 0.5 mm thick. Contemporary pictures and naval construction books show both options, smooth hulls, where the thicker wales are not visible and step-changes in thickness. I think smooth hulls became fashionable around the middle of the 19th century, but in the Baltic they were always lagging a bit behind, so I went for the stepped design.  Perhaps this is a problem of building up the planking around a solid core, but the way how the wales run against the gilling at the stern caused me some head-scratching. The point where the upper edge of the wale touches the gilling is marked in the original drawings, but it is not clear, where the lower edge touches it. While the wales have an easy run all along the ship, at this point some twisting is needed. 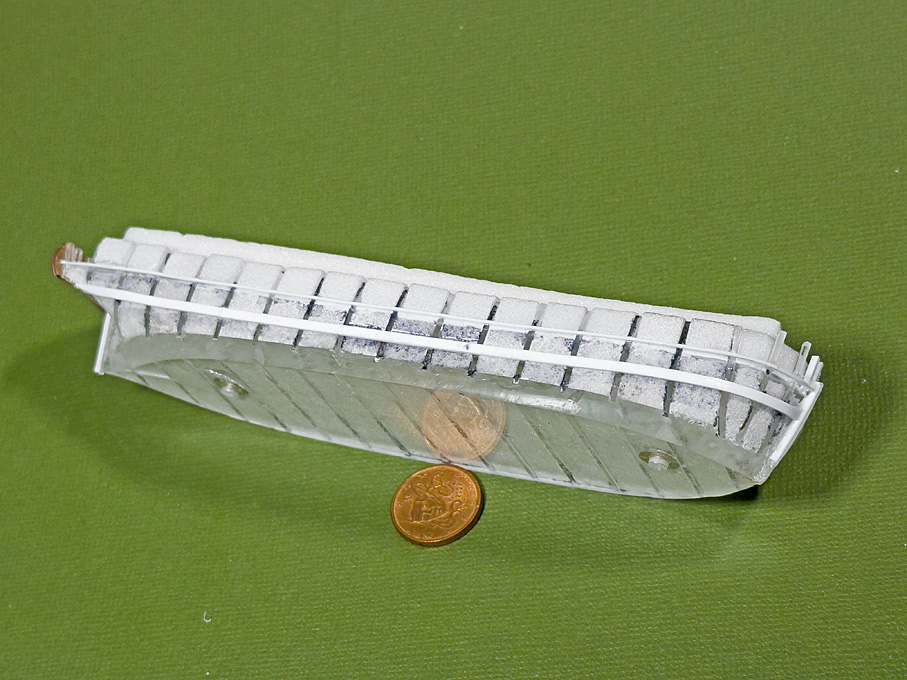 I had not done any planking with styrene before. It turned out to be quite simple: unlike wood, it does not have grain of course and strips can be easily bent and twisted even across the long sides. Pulling the strips around a round piece of e.g. steel causes the strips to curl and one can thus achieve a nice pre-bending without the need of much clamping force, when cementing them on.  Nevertheless, the wales were attached with the recently discovered artificial nail cement, that is a mixture of light-curing acrylic cement and cyanoacrylate. It sets fast, but not so fast that no adjustment would be possible. I let it seep under the wales attached to the hull with Sellotape. Hereby I worked from the more complicated stern forward in more or less long sections, depending on the curvature. 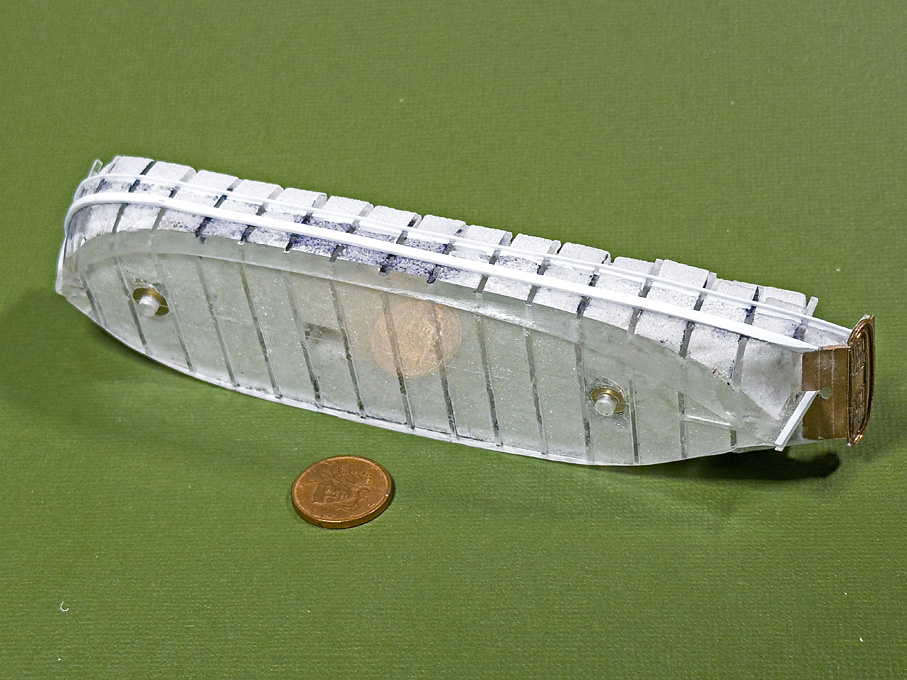 Final clean-up will be done, once the rest of the planking has gone onto the full, with the view to blend everything nicely together. To be continued ...
[b]Installing the wales[/b]
It was fortunate that the upper edge of the wale was marked in the original drawings. I had transferred this to the bulkheads and cut appropriate notches. Somehow, however, these notches turned out to be not very useful as I would have to score the whole core of the hull accordingly, which would have been messy. In the end, I ignored them, though used their upper edge as guidance for placing the wales. I have no information on their dimension, but thought that a width of 240 mm = 1.5 mm looked about right on the hull. They would have been probably composed of two thick planks. For the thickness I choose 0.75 mm, as the hull-planking will be 0.5 mm thick. Contemporary pictures and naval construction books show both options, smooth hulls, where the thicker wales are not visible and step-changes in thickness. I think smooth hulls became fashionable around the middle of the 19th century, but in the Baltic they were always lagging a bit behind, so I went for the stepped design.
[img]https://www.maritima-et-mechanika.org/maritime/models/Rahschlup/model/Rahschlup-030.jpg[/img]
Perhaps this is a problem of building up the planking around a solid core, but the way how the wales run against the gilling at the stern caused me some head-scratching. The point where the upper edge of the wale touches the gilling is marked in the original drawings, but it is not clear, where the lower edge touches it. While the wales have an easy run all along the ship, at this point some twisting is needed.
[img]https://www.maritima-et-mechanika.org/maritime/models/Rahschlup/model/Rahschlup-033.jpg[/img]
I had not done any planking with styrene before. It turned out to be quite simple: unlike wood, it does not have grain of course and strips can be easily bent and twisted even across the long sides. Pulling the strips around a round piece of e.g. steel causes the strips to curl and one can thus achieve a nice pre-bending without the need of much clamping force, when cementing them on.
[img]https://www.maritima-et-mechanika.org/maritime/models/Rahschlup/model/Rahschlup-031.jpg[/img]
Nevertheless, the wales were attached with the recently discovered artificial nail cement, that is a mixture of light-curing acrylic cement and cyanoacrylate. It sets fast, but not so fast that no adjustment would be possible. I let it seep under the wales attached to the hull with Sellotape. Hereby I worked from the more complicated stern forward in more or less long sections, depending on the curvature.
[img]https://www.maritima-et-mechanika.org/maritime/models/Rahschlup/model/Rahschlup-032.jpg[/img]
Final clean-up will be done, once the rest of the planking has gone onto the full, with the view to blend everything nicely together.
[i]To be continued ...[/i]
|
|
|
|
Posted: Sun Mar 09, 2025 12:28 pm |
|
|
|
|
|
| |
Post subject: |
Re: Pomeranian Rahschlup 1846 – 1/160 scale – Baltic trader |
|
|
Digression 3As the start of the planking is imminent, I had to think about a way to shape thin, narrow and long strips of styrene. A clamp is needed that can hold strips down to 1 mm width, 0.25 mm thickness and 150 mm length securely. In addition, the strips have to be held in a way that allows to slightly bevel the edges, if needed. The idea was to clamp the material between to flat metal bars of sufficient stiffness. 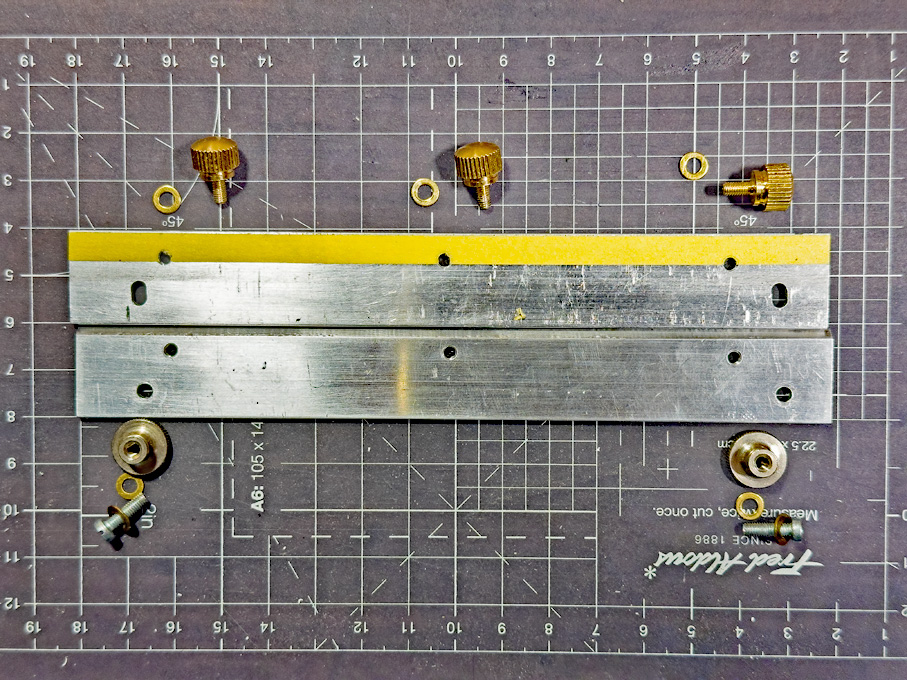 I happened to have to matching aluminium bars of 20 mm width and 3 mm thickness that once formed part of a jig and could be repurposed. The two bars were tightly clamped together and milled flat on the top so that they abut with sharp edges. Then, one edge was bevelled to 45° to give clearance for bevelling the styrene (or wood for that matter) strips. Unfortunately, the table travel of my mill is not long enough to do the milling in one set-up and I could not clamp the whole length of the bars in the vice, which resulted in some chatter marks. Not beautiful, but still functional. 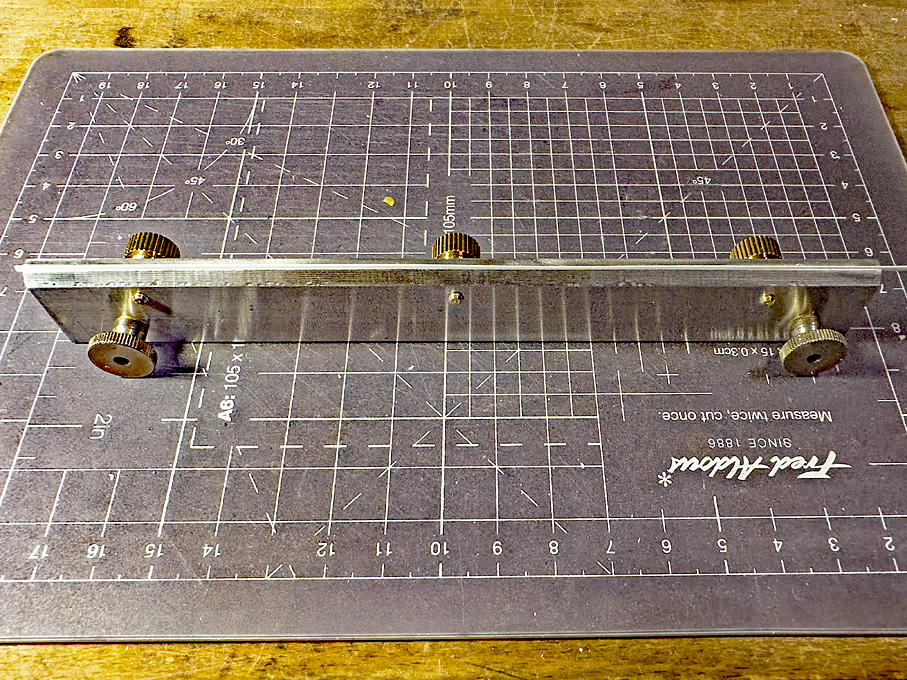 The clamping action is exerted by three thumb-screws for which holes were drilled and tapped. I stuck a strip of Tamiya masking-tape at about 0.5 mm distance from the top edge in order provide a stop for very thin and narrow material. 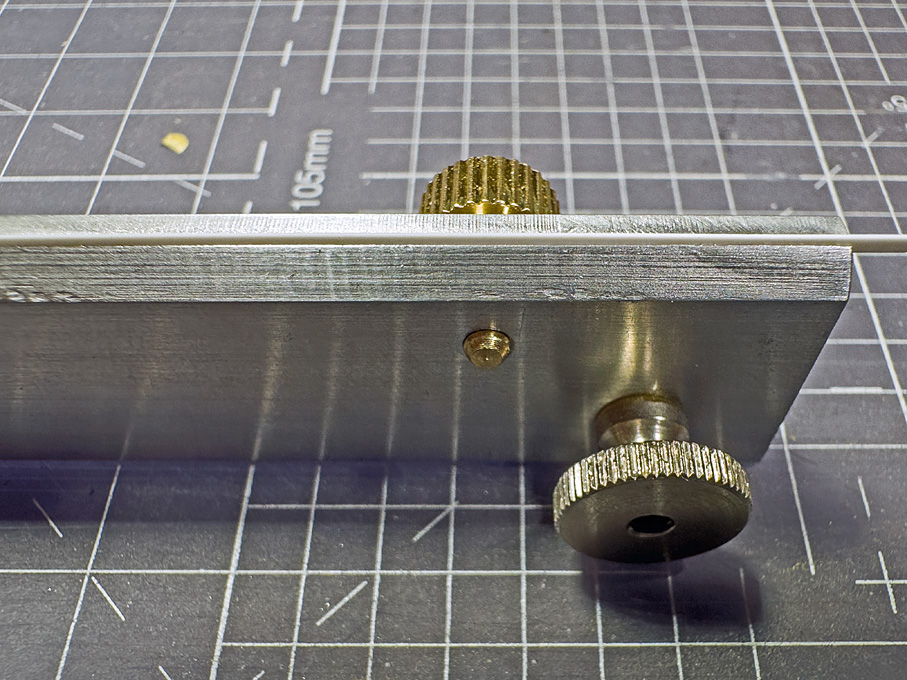 Now the clamp has to be tested in anger, to see, whether it really proves useful – not all of my home-made tools that felt like a good idea, really turned out to be that practical. Building log to be resumed soon …
[b]Digression 3[/b]
As the start of the planking is imminent, I had to think about a way to shape thin, narrow and long strips of styrene. A clamp is needed that can hold strips down to 1 mm width, 0.25 mm thickness and 150 mm length securely. In addition, the strips have to be held in a way that allows to slightly bevel the edges, if needed. The idea was to clamp the material between to flat metal bars of sufficient stiffness.
[img]https://www.maritima-et-mechanika.org/tools/longclamp/LongClamp-1.jpg[/img]
I happened to have to matching aluminium bars of 20 mm width and 3 mm thickness that once formed part of a jig and could be repurposed.
The two bars were tightly clamped together and milled flat on the top so that they abut with sharp edges. Then, one edge was bevelled to 45° to give clearance for bevelling the styrene (or wood for that matter) strips. Unfortunately, the table travel of my mill is not long enough to do the milling in one set-up and I could not clamp the whole length of the bars in the vice, which resulted in some chatter marks. Not beautiful, but still functional.
[img]https://www.maritima-et-mechanika.org/tools/longclamp/LongClamp-2.jpg[/img]
The clamping action is exerted by three thumb-screws for which holes were drilled and tapped.
I stuck a strip of Tamiya masking-tape at about 0.5 mm distance from the top edge in order provide a stop for very thin and narrow material.
[img]https://www.maritima-et-mechanika.org/tools/longclamp/LongClamp-3.jpg[/img]
Now the clamp has to be tested in anger, to see, whether it really proves useful – not all of my home-made tools that felt like a good idea, really turned out to be that practical.
[i]Building log to be resumed soon …[/i]
|
|
|
|
Posted: Sat Mar 08, 2025 3:51 pm |
|
|
|
|
|
| |
Post subject: |
Re: Pomeranian Rahschlup 1846 – 1/160 scale – Baltic trader |
|
|
|
Thankss !
Actually no, the deck will go in later, as it will be painted wood-simulation (as for SMS WESPE) and I have to complete all other paintwork first. At least that is the current plan.
Thankss !
Actually no, the deck will go in later, as it will be painted wood-simulation (as for SMS WESPE) and I have to complete all other paintwork first. At least that is the current plan.
|
|
|
|
Posted: Fri Mar 07, 2025 3:55 am |
|
|
|
|
