| Author |
Message |
|
|
| |
Post subject: |
Re: HOW-to : the parafilm for masking |
 |
|
|
Thank for the hints again. It seems a bit complicated but it can work. I´ll definitely give it a try once I get that far with USS Vincennes, my next project with a rather complex camo.
Thank for the hints again. It seems a bit complicated but it can work. I´ll definitely give it a try once I get that far with USS Vincennes, my next project with a rather complex camo.
|
|
|
 |
Posted: Sat Jul 26, 2025 8:50 am |
|
|
 |
|
|
| |
Post subject: |
Re: HOW-to : the parafilm for masking |
|
|
|
Hello Vladi,
I understand your problem... I'm a rivet counter, 1:700 addict too.
About 15 years ago I tried this trick which worked fine at 1:700 for a 1942 splotch pattern.
This also works currently well for some markings/ lettering on 1:144 to 1:72 aircraft:
1- I design the most accurate possible pattern on a piece of Tamiya tape, temporarily stuck on an Evergreen sheet
2- I take the tape out and stick it onto a piece of carbon paper (of course glued onto the paper side, not the carbon!)
3- I cover the ship side with Parafilm
4- I present the tap + carbon paper onto the Parafilm, secure it at both end and middle, but I DON'T press it against the Parafilm.
5- With a sharp ball pen I "report" the lines onto the Parafilm. I DON'T draw continuous lines as Parafilm would then stick to the carbon paper: I just draw doted lines which are enough to find back the original contours. A dot about every mm or half mm in some places can do the job.
6- I carefully take the tape+carbon paper template out by slowly pulling it tangential to the surface with one hand and progressively press again the Parafilm with the other.
7- I'm now ready to freely and accurately cut the Parafilm by joining the printed dots.
For step 1 I've used alternatively two tricks:
- Report a printed original patern onto the tape with the carbon paper method
- Stick the Tamiya tape onto a transparent sheet for retro-projection, then print directly on the tape using "thick paper" setup for the printer: this last is the most accurate and works for inkjet printers and laser one, although for the laser experiment may be necessary not to damage the printer.
Bruno
|
|
|
|
Posted: Sat Jul 26, 2025 7:53 am |
|
|
|
|
|
| |
Post subject: |
Re: HOW-to : the parafilm for masking |
|
|
Hello Bruno, thanks for your detailed reply, I really apreciate your help! I don´t think I can do the cutting on the model as you suggest because I can´t imagine a method how to transfer the exact shapes to the model other than having the mas pre-cut and then transfered it to the model. I should have perhaps been more specific about my prerequisites: - I´m working in 1/700 - my period of interest is summer 1942, so I´m speaking about Ms12R(mod) camouflages that were a lot fancier and more irregularly shaped than 1943/44 dazzle schemes - I´am a rivet counter  , so I aspire to depict the reality as close as posible - this is an example of what I wish to achieve (ok, this is quite an extreme one, but she´s on my list) Anyway, Parafilm appears to be an alternative for masking the deck, especially in case you either don´t use PE railings at all or you add the PE railings after creating the mask. I can imagine some possible glitches like CA glue leaking under the mask or less durable glue adhesion if you attach the railings over the painted deck, but there may be ways to overcome this. It definitely looks great for masking aircraft etc.! Thanks again! Hello Bruno,
thanks for your detailed reply, I really apreciate your help! I don´t think I can do the cutting on the model as you suggest because I can´t imagine a method how to transfer the exact shapes to the model other than having the mas pre-cut and then transfered it to the model. I should have perhaps been more specific about my prerequisites:
- I´m working in 1/700
- my period of interest is summer 1942, so I´m speaking about Ms12R(mod) camouflages that were a lot fancier and more irregularly shaped than 1943/44 dazzle schemes
- I´am a rivet counter :heh: , so I aspire to depict the reality as close as posible
- this is [url=https://en.wikipedia.org/wiki/USS_Buchanan_%28DD-484%29#/media/File:USS_Buchanan_(DD-484)_underway_at_sea,_circa_in_August_1942_(80-G-K-417).jpg]an example[/url] of what I wish to achieve (ok, this is quite an extreme one, but she´s on my list)
Anyway, Parafilm appears to be an alternative for masking the deck, especially in case you either don´t use PE railings at all or you add the PE railings after creating the mask. I can imagine some possible glitches like CA glue leaking under the mask or less durable glue adhesion if you attach the railings over the painted deck, but there may be ways to overcome this. It definitely looks great for masking aircraft etc.!
Thanks again!
|
|
|
|
Posted: Sat Jul 26, 2025 6:02 am |
|
|
|
|
|
| |
Post subject: |
Re: HOW-to : the parafilm for masking |
|
|
That sounds like an interesting idea. Never thought of Parafilms for masking, though I used it a lot in the lab back in the 1980s.  That sounds like an interesting idea. Never thought of Parafilms for masking, though I used it a lot in the lab back in the 1980s. :thumbs_up_1:
|
|
|
|
Posted: Sat Jul 26, 2025 4:15 am |
|
|
|
|
|
| |
Post subject: |
Re: HOW-to : the parafilm for masking |
|
|
an happy victim  Thanks Bgire for these explanations an happy victim :)
Thanks Bgire for these explanations :)
|
|
|
|
Posted: Sat Jul 26, 2025 2:45 am |
|
|
|
|
|
| |
Post subject: |
Re: HOW-to : the parafilm for masking |
|
|
Vladi wrote: ...One important question: do you think parafilm can be useful to create masks for dazzle-type camouflage (where keeping the exact shape is desirable)? The way I´ve done it with the usual orange masking tape (Tamiya) is that I drew or print the pattern on paper, then stick the tape over it and cut using an exacto blade. Then I tranfer the required parts to the model and airbrush. What I´m asking about is whether parafilm would keep the camo shapes unskewed as it seems it may be easy to stretch the film in an unwanted fashion while removing it from the paper pattern. Hello Vladi, I've been using Parafilm for mask painting since 1995 (30 years!) and completely dropped Tamiya tape since. No, Parafilm won't keep its shape when transfering from a paper to the model, but cutting it "in place" is sooooo easy compared to Tamiya tape that it's worth to use it. I usually lay Parafilm on the model, then I carefully draw the lines to be cut with a dotted line drawn with a fine tip soft marker. When dry I directly cut the lines with a scalpel with a NEW no11 blade (not a cutter, we need a blade as sharp as possible). No need to press as only the weight of the scalpel is enough to cut through this extremely thin film. The cutting edge of the blade must be kept as tangent as possible to the surface and the cuts are made always by pulling the scalpel. This ensures you can cut continuous and regular curve as well as straight lines just by free hand (no guide rule needed). One can reach this only after a 1-2hour trial. Below are example of what can be done In 1996 I did experiments on an ol' Tamiya 1:700 kit of Enterprise. That was my second attempt so far: 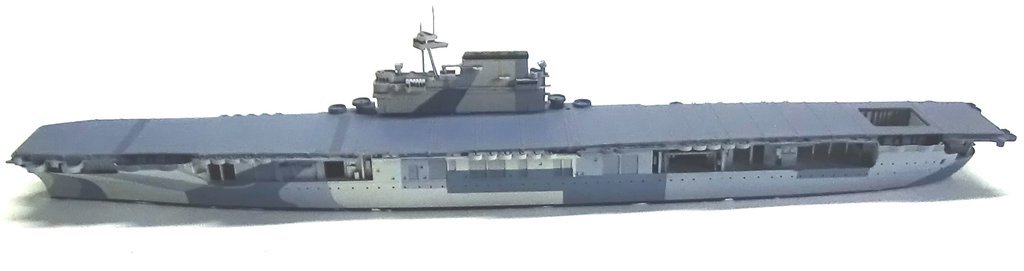 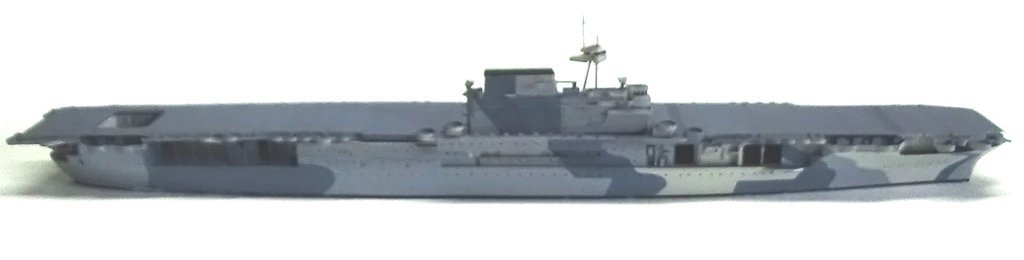 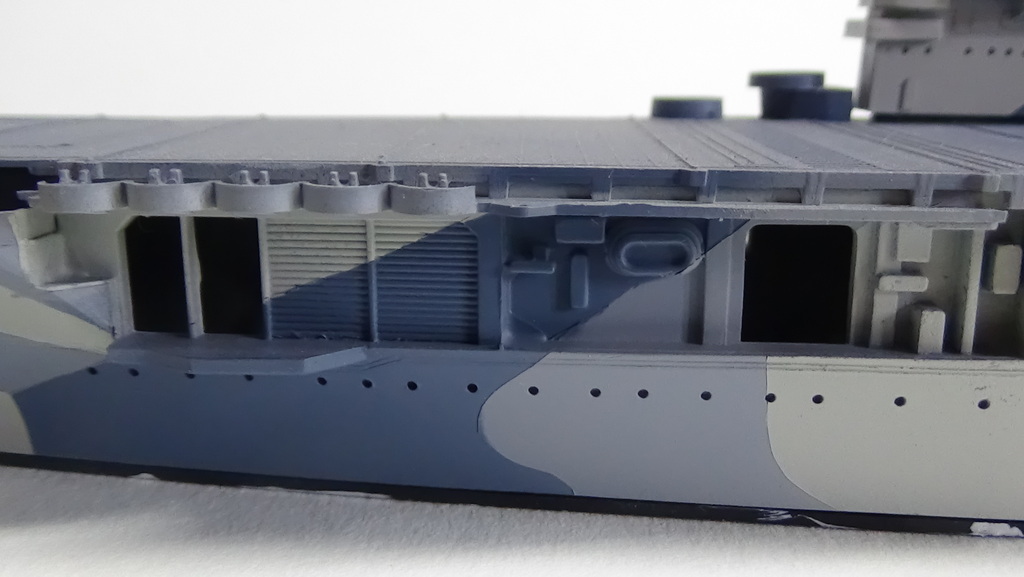 In 1997 two kids from my club (11 and 13 years old respectively) used Parafilm to paint their builds. I only drew the lines to be cut and they did the cuttings and airbrush paint themselves. In foreground this a 1:350 Tamiya Fletcher, middle is a 1:400 Heller Richelieu and in the background is a 1:350 Tamiya Prince of Wales: 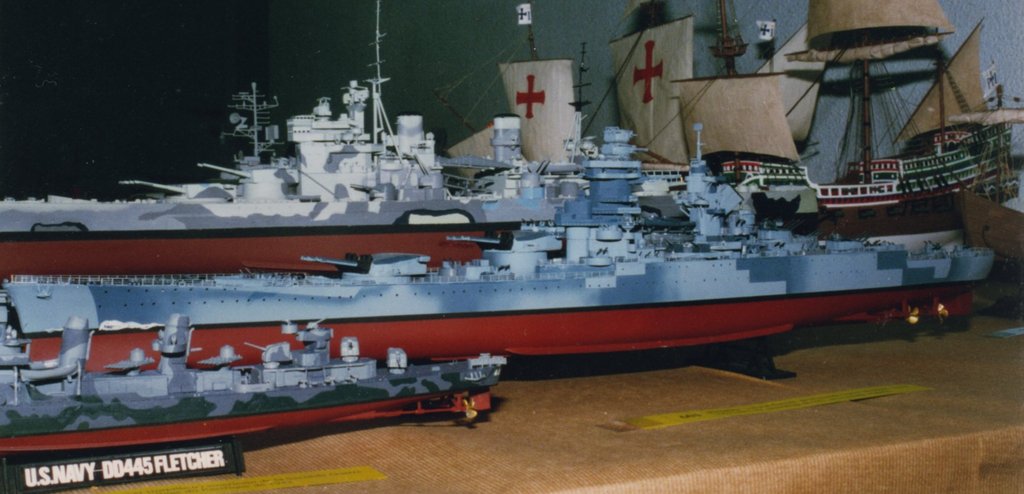 Since that period I've been strongly advocating the use of Parafilm... my last victim was Yuth _Bruno [quote="Vladi"]...One important question: do you think parafilm can be useful to create masks for dazzle-type camouflage (where keeping the exact shape is desirable)? The way I´ve done it with the usual orange masking tape (Tamiya) is that I drew or print the pattern on paper, then stick the tape over it and cut using an exacto blade. Then I tranfer the required parts to the model and airbrush. What I´m asking about is whether parafilm would keep the camo shapes unskewed as it seems it may be easy to stretch the film in an unwanted fashion while removing it from the paper pattern.[/quote]
Hello Vladi,
I've been using Parafilm for mask painting since 1995 (30 years!) and completely dropped Tamiya tape since.
[u]No, Parafilm won't keep its shape when transfering from a paper to the model[/u], but cutting it "in place" is sooooo easy compared to Tamiya tape that it's worth to use it.
I usually lay Parafilm on the model, then I carefully draw the lines to be cut with a dotted line drawn with a fine tip soft marker.
When dry I directly cut the lines with a [u]scalpel [/u]with a NEW no11 blade (not a cutter, we need a blade as sharp as possible). No need to press as only the weight of the scalpel is enough to cut through this extremely thin film.
The cutting edge of the blade must be kept as tangent as possible to the surface and the cuts are made always by pulling the scalpel. This ensures you can cut continuous and regular curve as well as straight lines just by free hand (no guide rule needed).
One can reach this only after a 1-2hour trial.
Below are example of what can be done
In 1996 I did experiments on an ol' Tamiya 1:700 kit of Enterprise. That was my second attempt so far:
[url=https://www.casimages.com/i/cAxFUb-Camo-Enterprise-hasegawa-01.jpg.html][img]https://nsm09.casimages.com/img/2025/07/25//cAxFUb-Camo-Enterprise-hasegawa-01.jpg[/img][/url]
[url=https://www.casimages.com/i/bAxFUb-Camo-Enterprise-hasegawa-02.jpg.html][img]https://nsm09.casimages.com/img/2025/07/25//bAxFUb-Camo-Enterprise-hasegawa-02.jpg[/img][/url]
[url=https://www.casimages.com/i/bAxFUb-Camo-Enterprise-hasegawa-03.jpg.html][img]https://nsm09.casimages.com/img/2025/07/25//bAxFUb-Camo-Enterprise-hasegawa-03.jpg[/img][/url]
In 1997 two kids from my club (11 and 13 years old respectively) used Parafilm to paint their builds. I only drew the lines to be cut and they did the cuttings and airbrush paint themselves.
In foreground this a 1:350 Tamiya Fletcher, middle is a 1:400 Heller Richelieu and in the background is a 1:350 Tamiya Prince of Wales:
[url=https://www.casimages.com/i/cAxFUb-Camo-Richelieu.jpg.html][img]https://nsm09.casimages.com/img/2025/07/25//cAxFUb-Camo-Richelieu.jpg[/img][/url]
Since that period I've been strongly advocating the use of Parafilm... my last victim was Yuth :heh:
_Bruno
|
|
|
|
Posted: Fri Jul 25, 2025 2:05 pm |
|
|
|
|
|
| |
Post subject: |
Re: HOW-to : the parafilm for masking |
|
|
|
Hello, this is definitely interesting, thanks for publishing the guide! One important question: do you think parafilm can be useful to create masks for dazzle-type camouflage (where keeping the exact shape is desirable)? The way I´ve done it with the usual orange masking tape (Tamiya) is that I drew or print the pattern on paper, then stick the tape over it and cut using an exacto blade. Then I tranfer the required parts to the model and airbrush. What I´m asking about is whether parafilm would keep the camo shapes unskewed as it seems it may be easy to stretch the film in an unwanted fashion while removing it from the paper pattern.
Hello, this is definitely interesting, thanks for publishing the guide! One important question: do you think parafilm can be useful to create masks for dazzle-type camouflage (where keeping the exact shape is desirable)? The way I´ve done it with the usual orange masking tape (Tamiya) is that I drew or print the pattern on paper, then stick the tape over it and cut using an exacto blade. Then I tranfer the required parts to the model and airbrush. What I´m asking about is whether parafilm would keep the camo shapes unskewed as it seems it may be easy to stretch the film in an unwanted fashion while removing it from the paper pattern.
|
|
|
|
Posted: Fri Jul 25, 2025 8:41 am |
|
|
|
|
|
| |
Post subject: |
HOW-to : the parafilm for masking |
|
|
Hello friends, Here's a tutorial produced by our friend Bgire and co-written with him https://www.laroyale-modelisme.net/t190 ... aerographeBgire wrote: I'm trying to show here the advantages of Parafilm over 'Kabuki' type adhesive (Tamiya masking tape):
- Much thinner,
- Very easy to apply (just press down with your fingers or a porous tool)
- The film is stretchable and conforms to curved surfaces in 3 dimensions. Ideal for waterlines under the stern of ships.
- The film hugs details in relief or in hollows: you "force" it with your finger, fingernail or a porous tool, such as the end of a balsa stick (made of end grain wood)
- It's transparent, so you can see all the details underneath, which makes it easy to guide the cut of the areas to be uncovered
- The stretched film is so thin (just a few microns) that the simple weight of a new scalpel blade is enough to cut into it: the cut made in this way does not mark the plastic, and if you have to cut along a moulded line, the film naturally serves as a guide (remember that given the extreme thinness of the film, you don't need to press the blade: the gesture is smoother and you can almost work freehand, even for straight lines).
- The film can be left in place for a very long time (my record is 15 months) without tearing off the paint underneath when you remove it.
The contraindications to using this film are that the substrate must be non-porous and the tools must be porous (it adheres to non-porous surfaces).
It adheres very well to plastics, resins (see video), metal, glass and wood, provided the latter has been varnished.
The tools used must be porous so that it doesn't wash away on contact: wooden chopsticks, rulers cut from extruded foam and, of course, bare hands So I'm going to start work on the Parafilmyama, an Oyodo-class command ship commanded by Isoroku Parafilmoto The tools I use at my humble level: 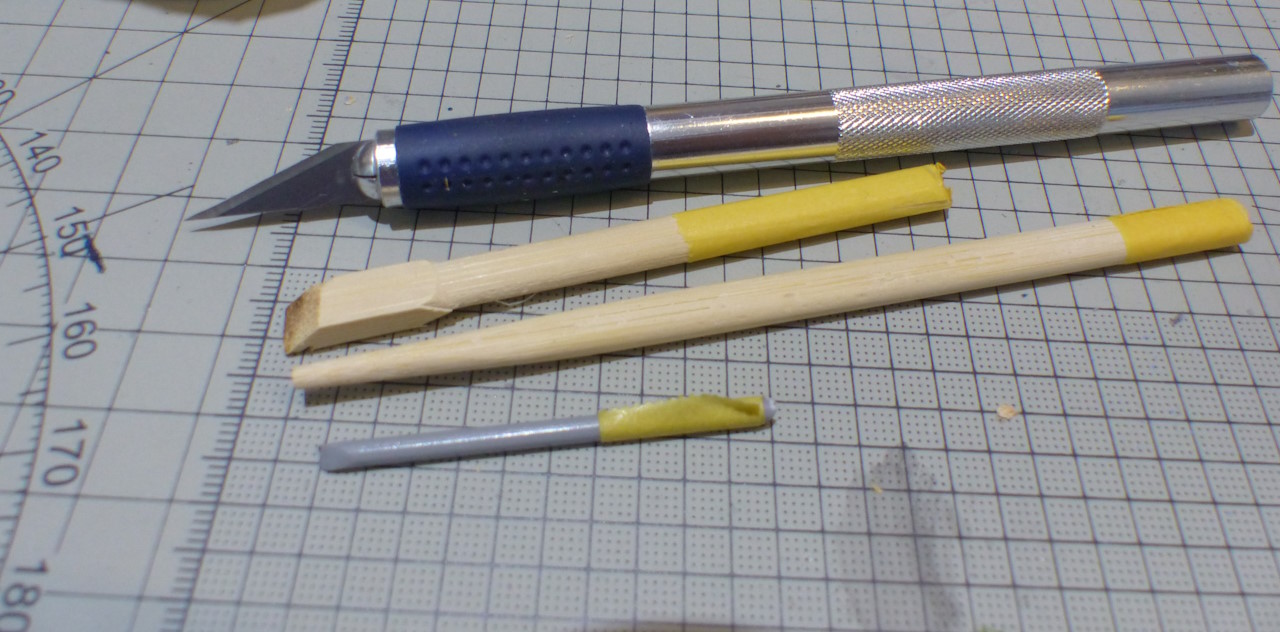 The parafilm used :  available here : https://amzn.to/3tBYRq7With his friend the scalpel, which has a NEW blade (we can't stress this enough) 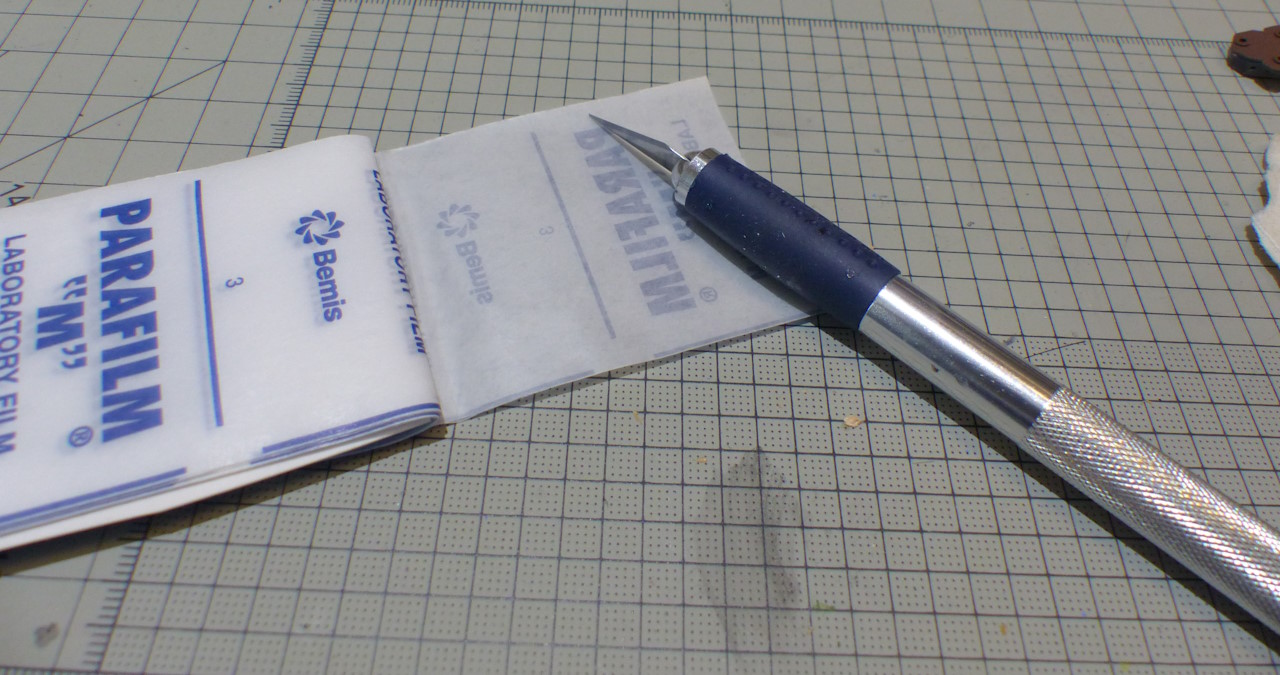 1st step 1st step, you start painting. I usually use a primer, but in our example, I did without one. Similarly, I prefer to start with the horizontal parts, which are easier to mask. 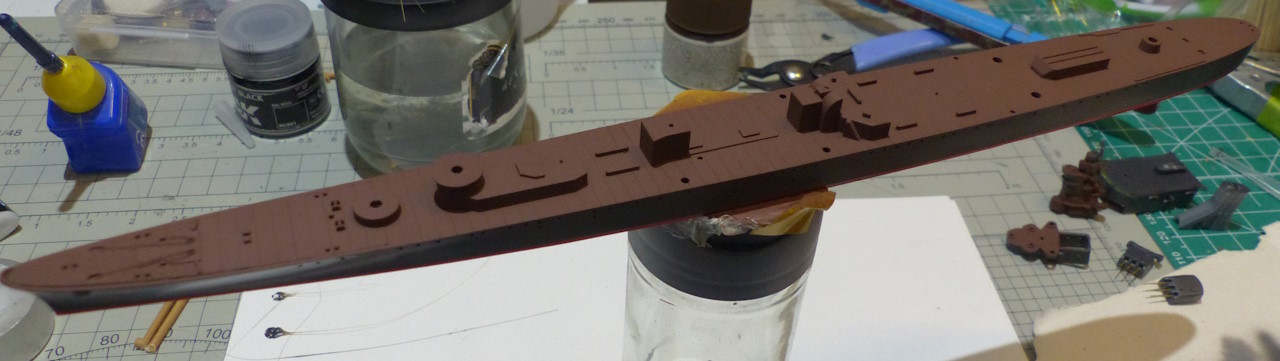   2nd step 2nd step : We cut a portion of the parafilm. I usually cut along the perpendicular blue bars. The portion must not be too small, because it would be complicated to remove the film and complicated to activate it, or too large, because again activation would be complicated. As the thickness of the film is measured in microns, there is no need to worry about overlapping it. The parafilm is then activated by stretching it. Without activation, there's absolutely no point. 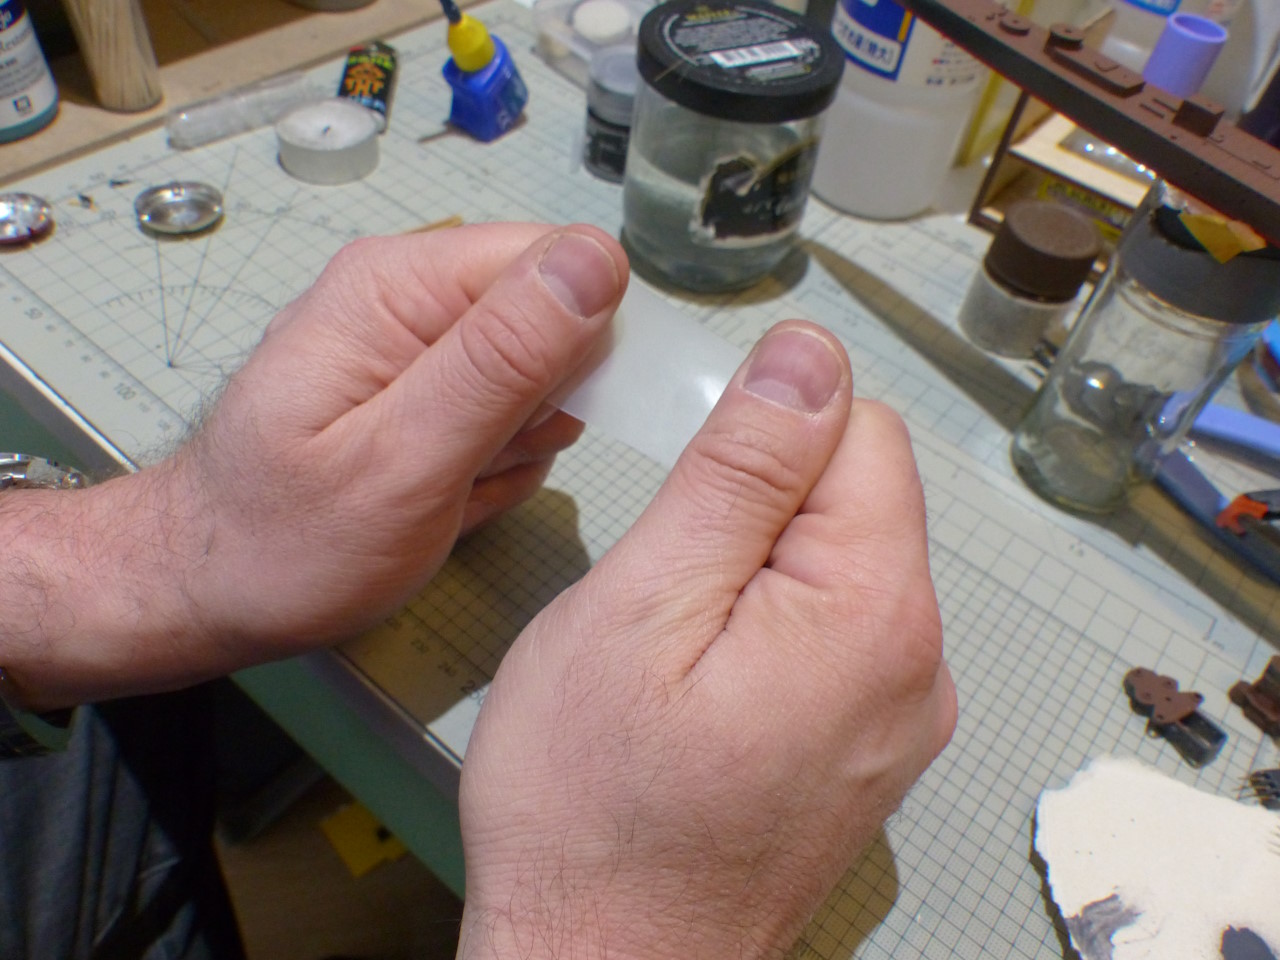  We cut off the "inactive" ends, which can be activated to provide small pieces (for the bridges of the footbridge in our example). 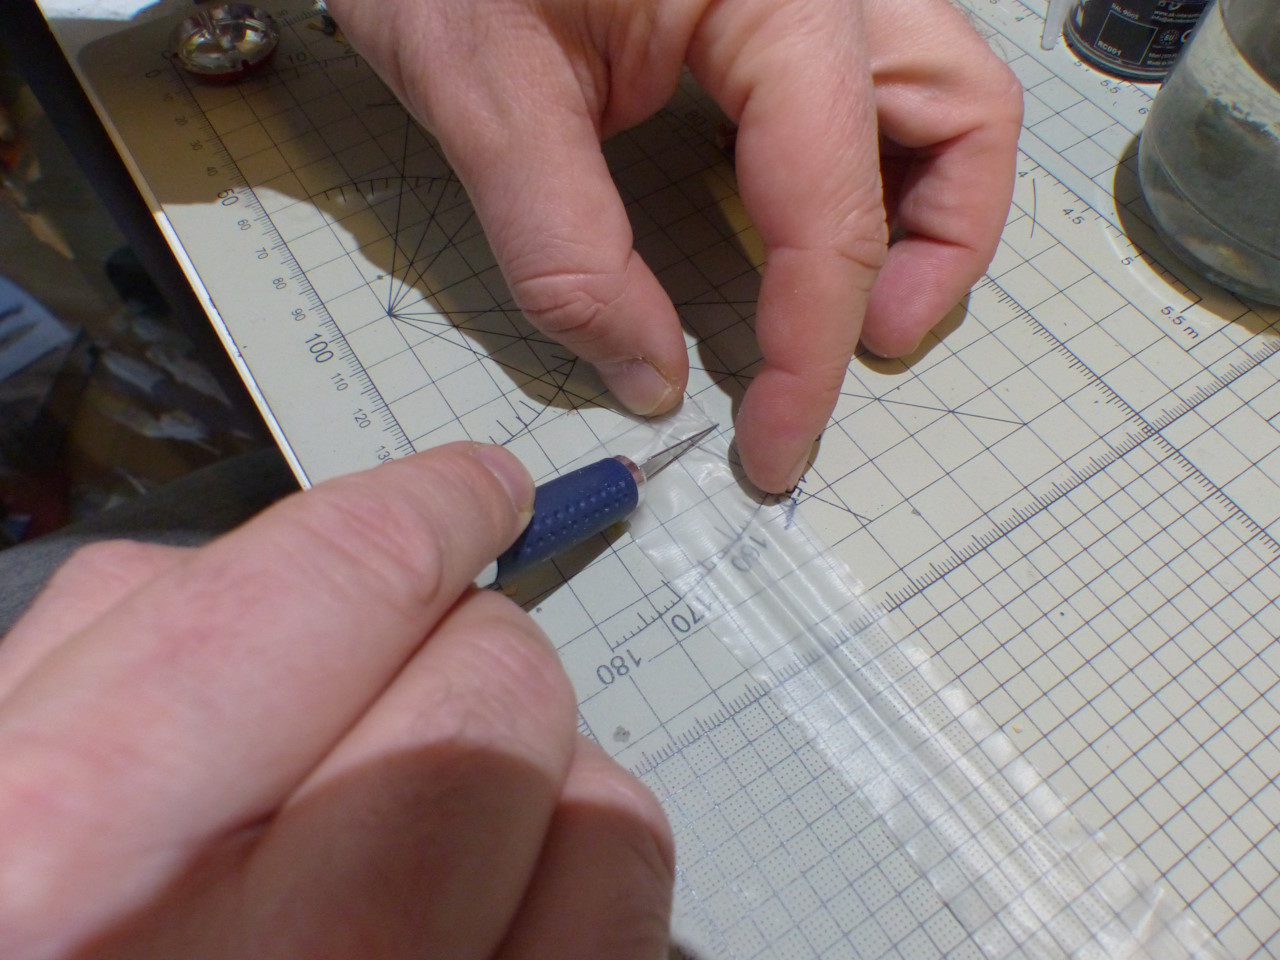 3rd step 3rd step : we begin to apply the parafilm, taking care to apply it with..... the pad of a finger or a porous tool. Then, using a scalpel, cut at a sharp angle and very lightly.  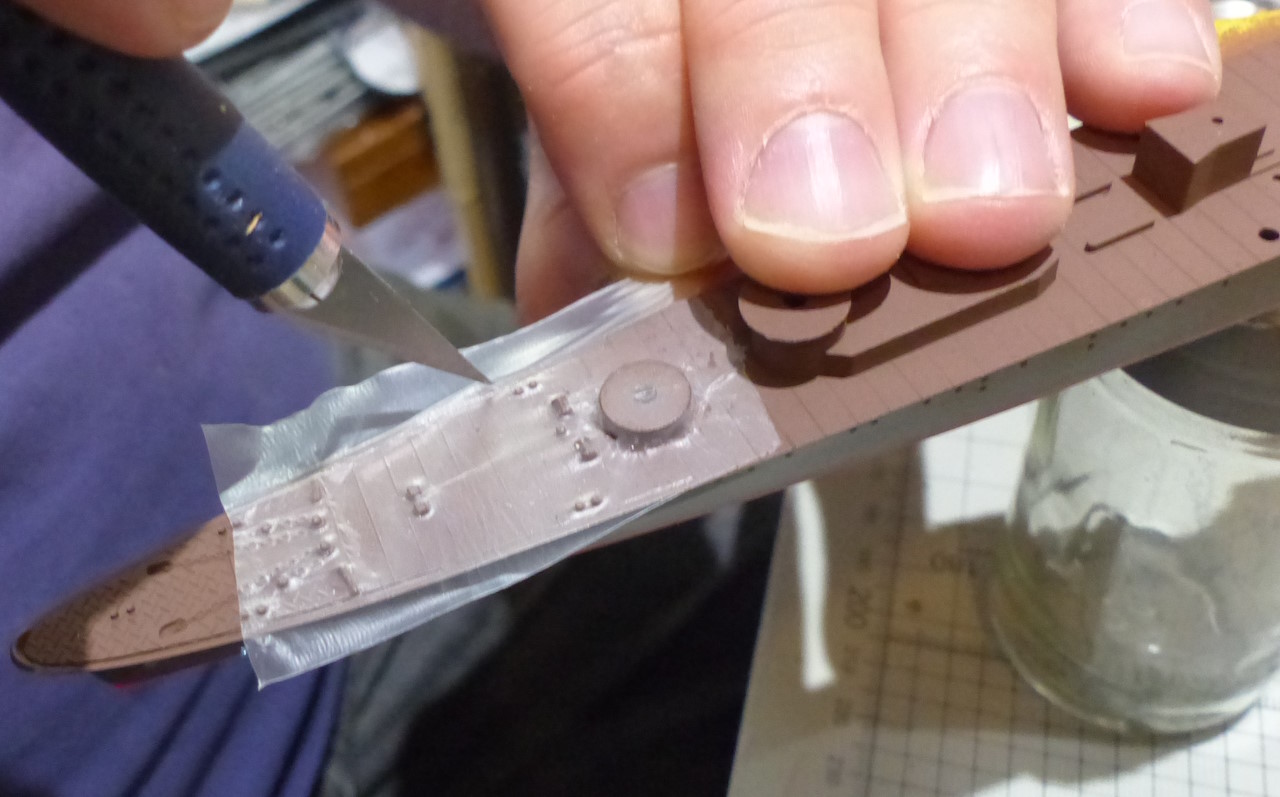 and we continue all the way across the bridge: 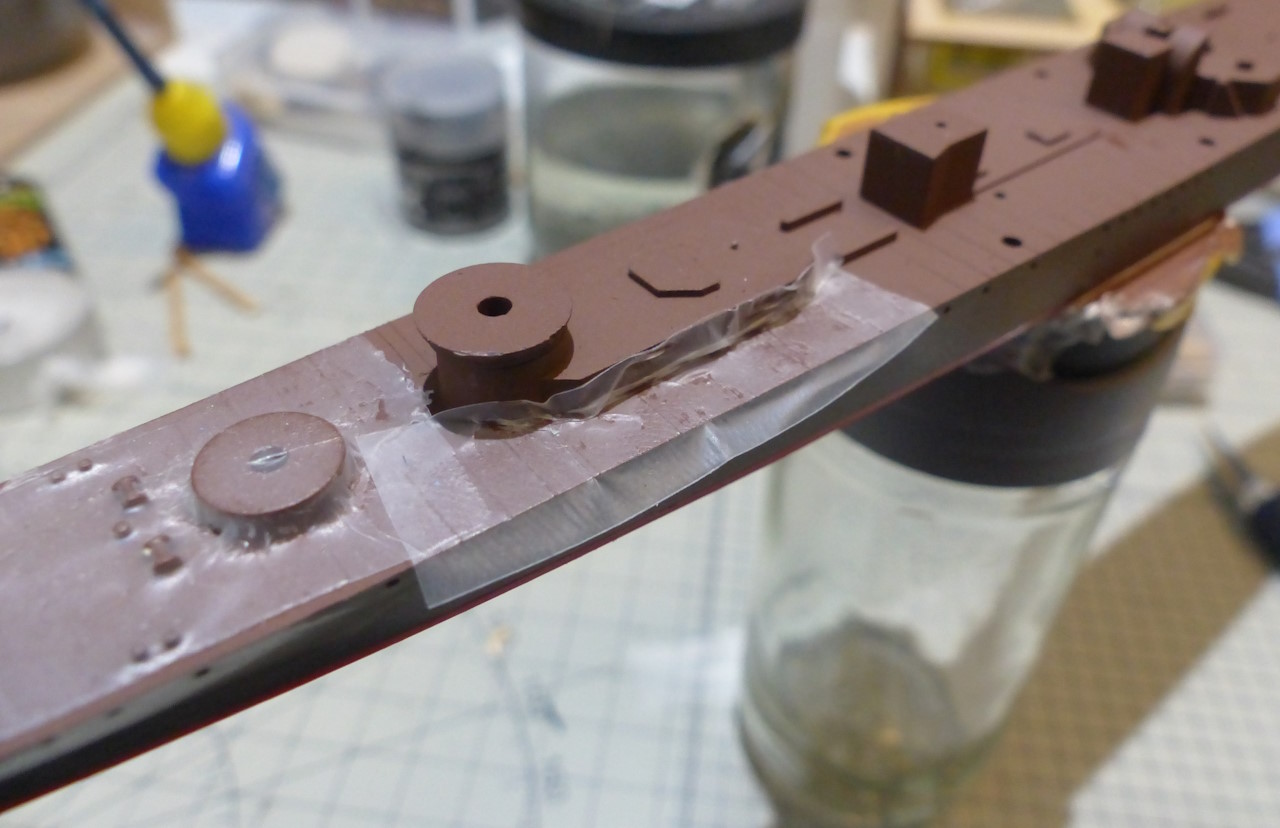 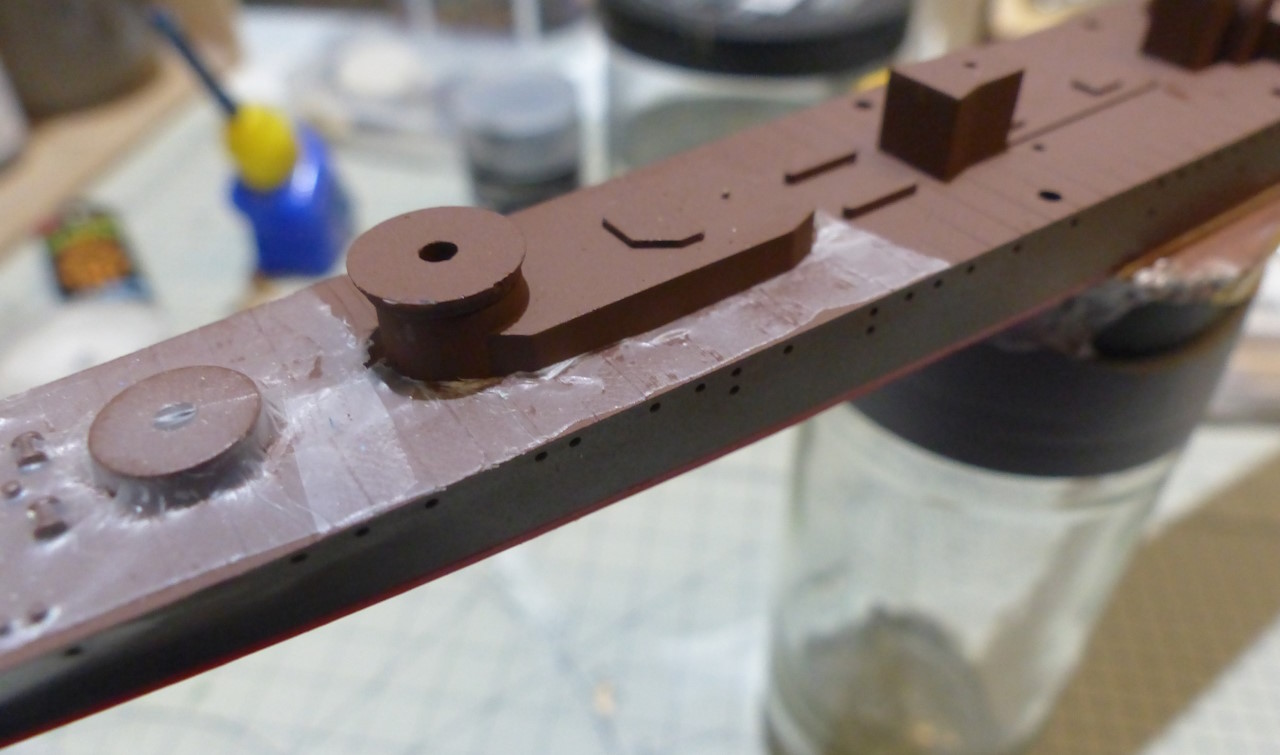  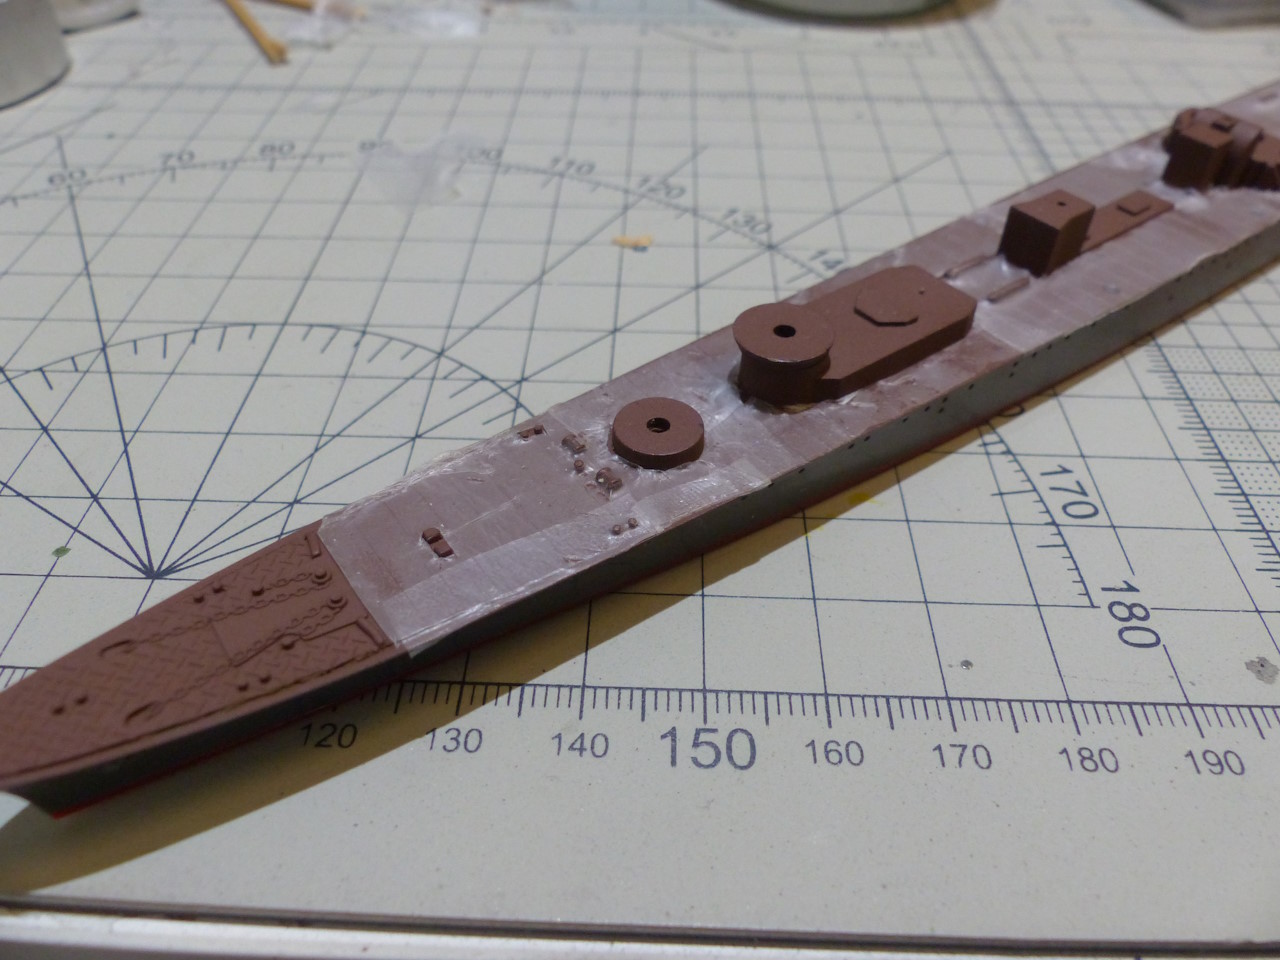  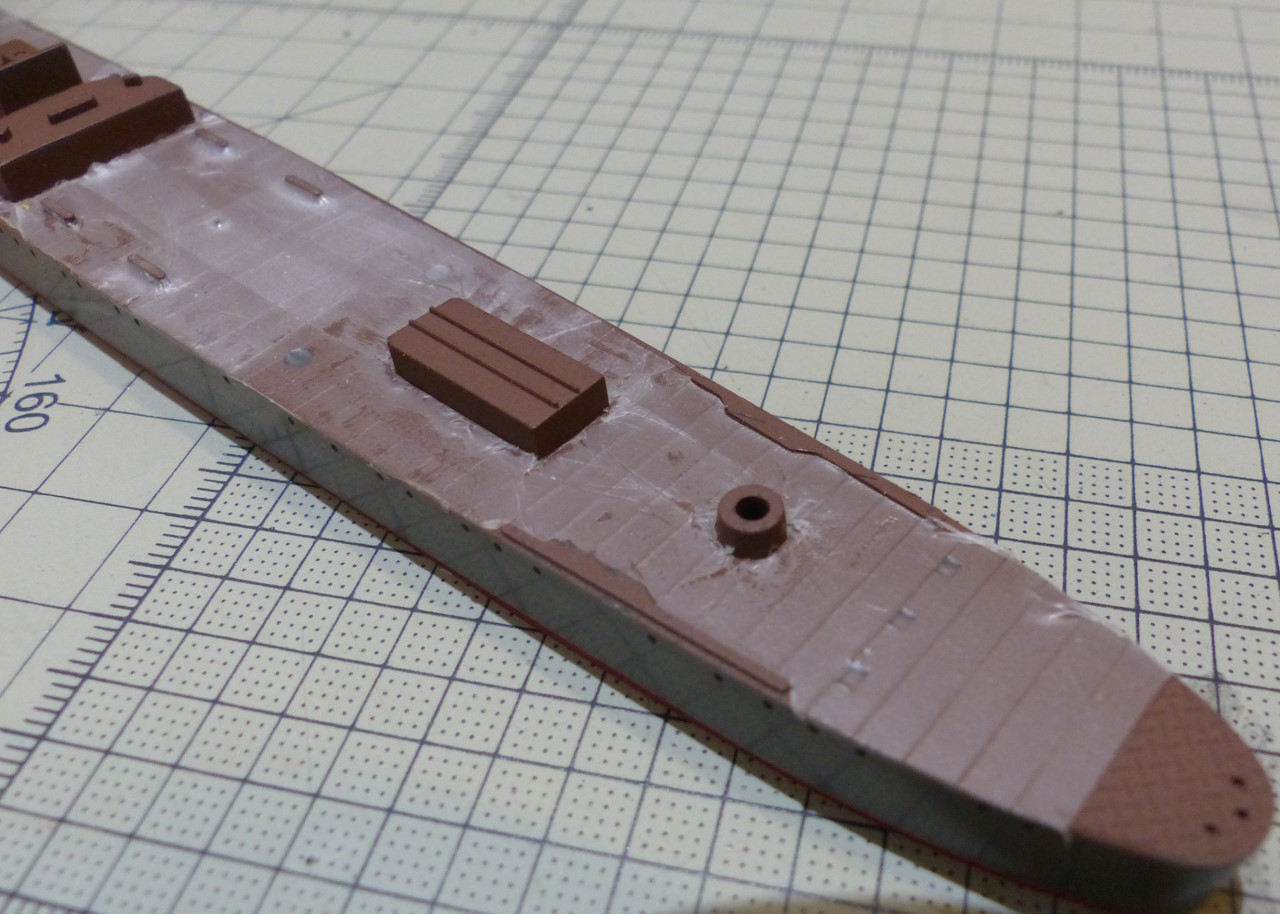 Then paint with Kure grey and unmask: 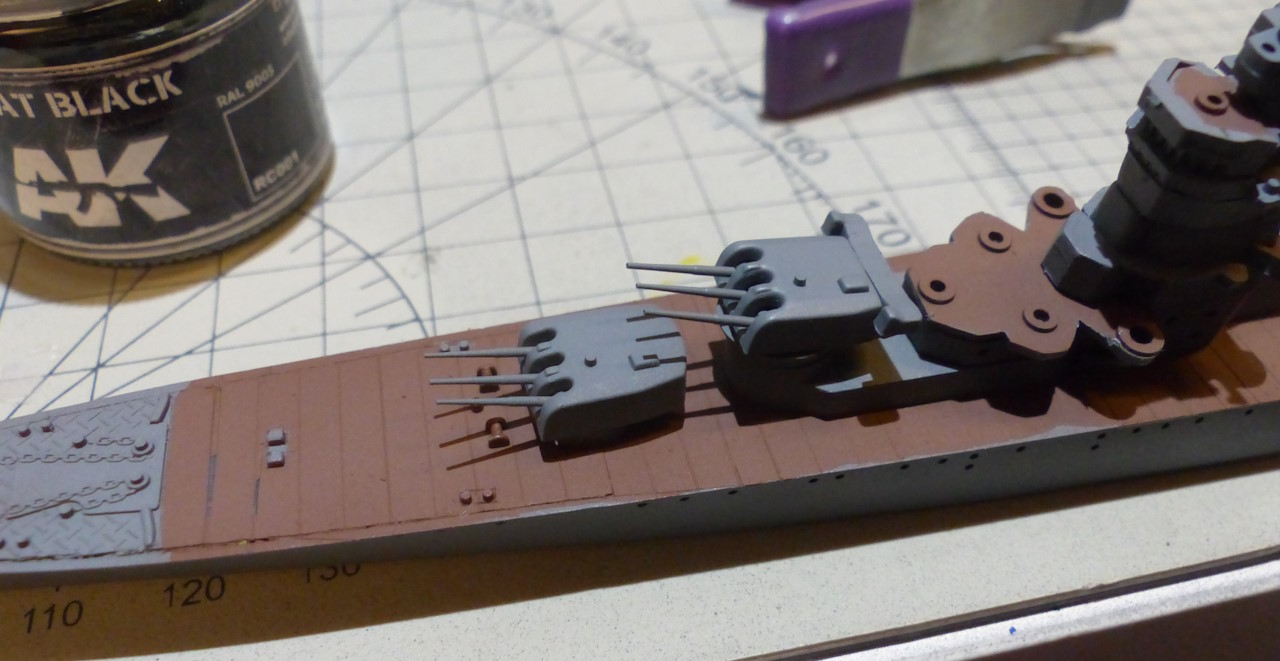 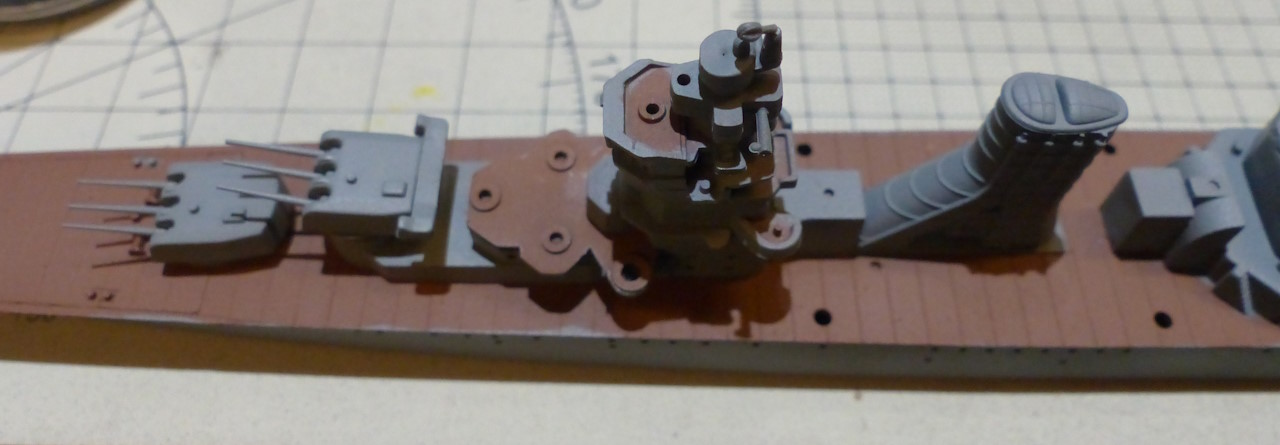 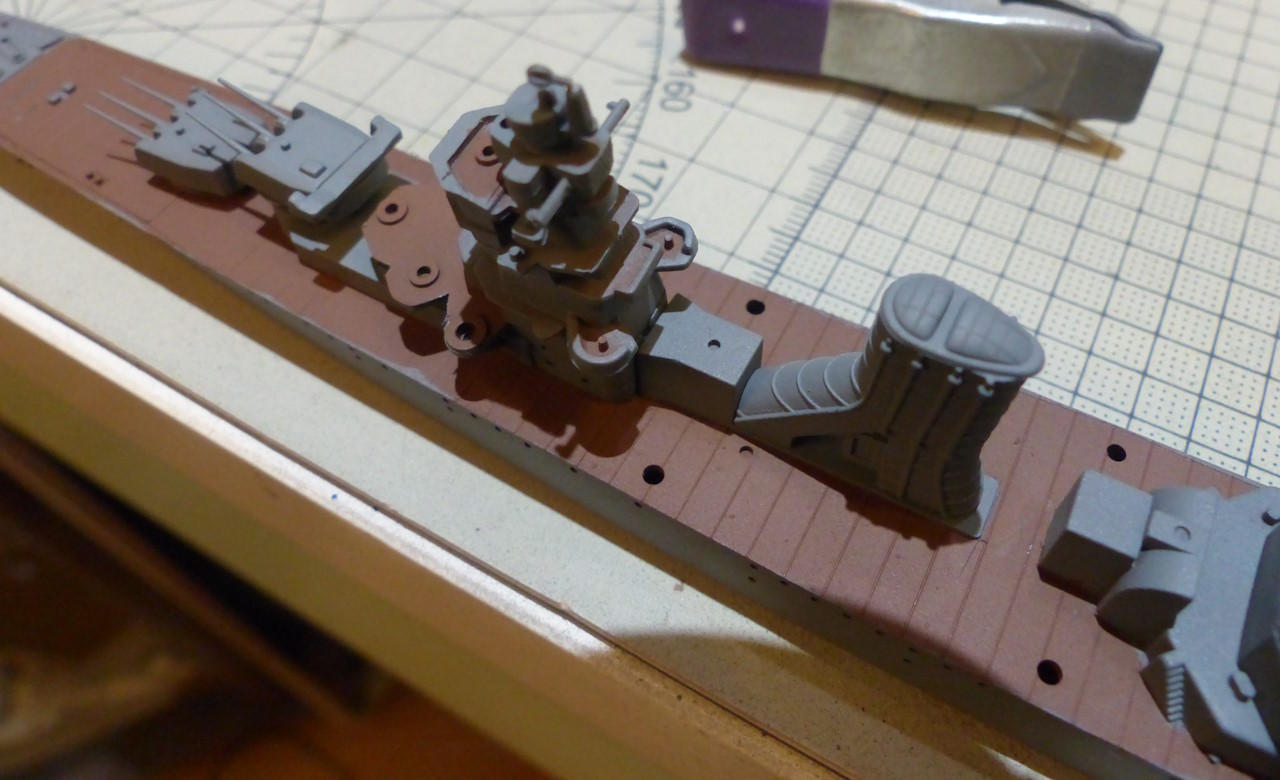 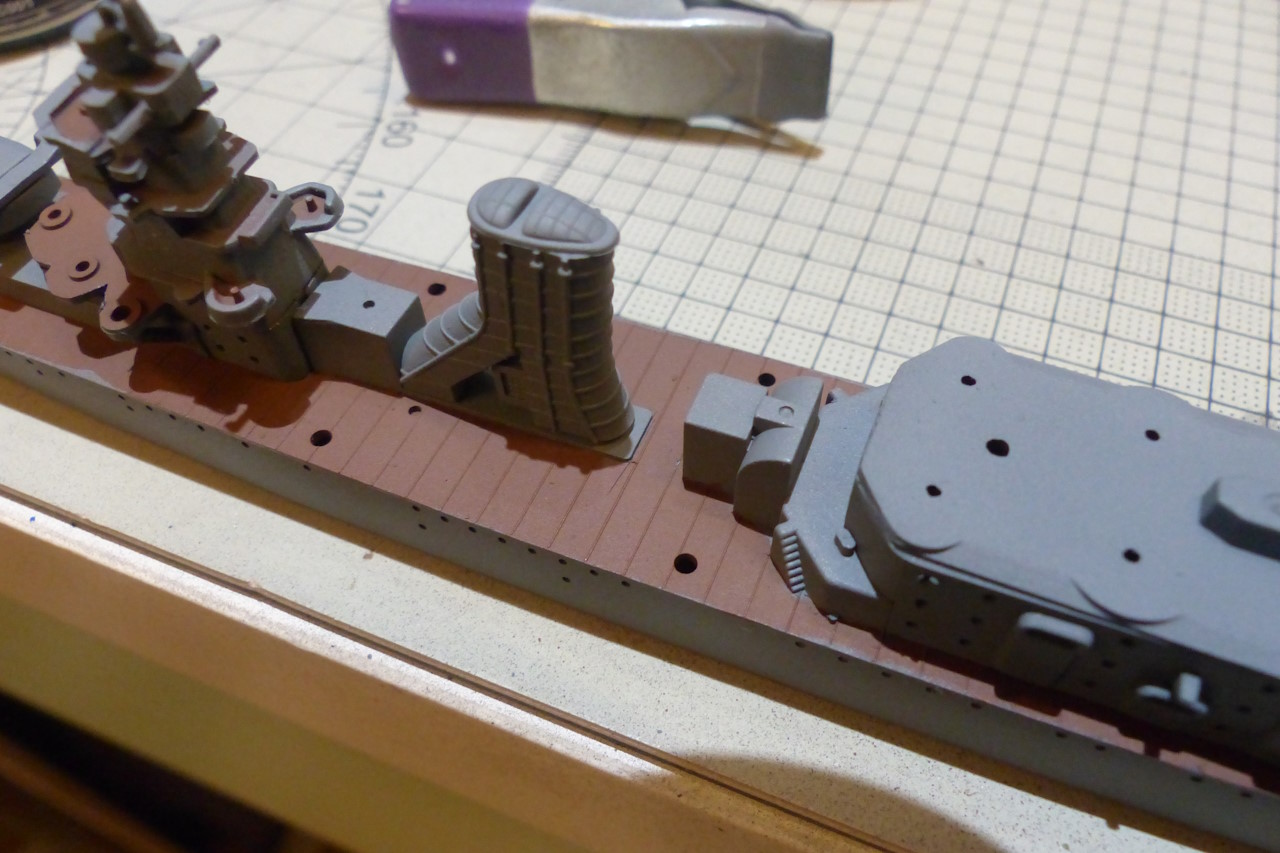 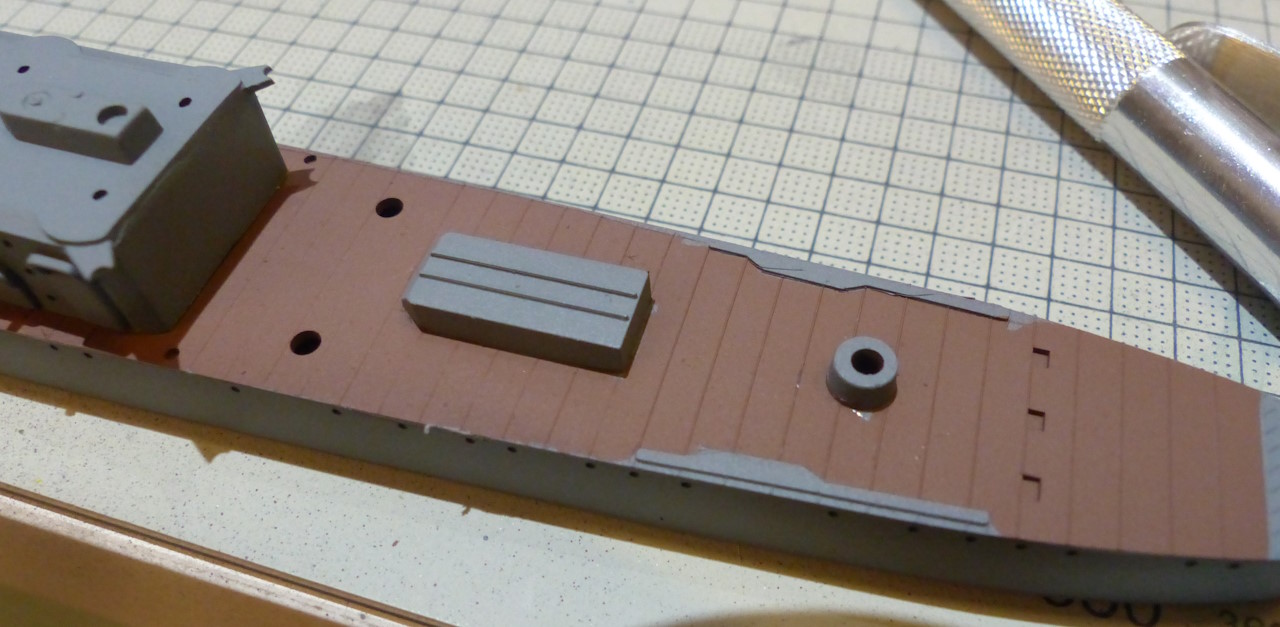  Total time for the operation: just 20 minutes for masking. To try it is to adopt it Hello friends,
Here's a tutorial produced by our friend Bgire and co-written with him
https://www.laroyale-modelisme.net/t19091-tuto-masquage-au-parafilm-pour-peinture-a-l-aerographe
[quote="Bgire"]I'm trying to show here the advantages of Parafilm over 'Kabuki' type adhesive (Tamiya masking tape):
- Much thinner,
- Very easy to apply (just press down with your fingers or a porous tool)
- The film is stretchable and conforms to curved surfaces in 3 dimensions. Ideal for waterlines under the stern of ships.
- The film hugs details in relief or in hollows: you "force" it with your finger, fingernail or a porous tool, such as the end of a balsa stick (made of end grain wood)
- It's transparent, so you can see all the details underneath, which makes it easy to guide the cut of the areas to be uncovered
- The stretched film is so thin (just a few microns) that the simple weight of a new scalpel blade is enough to cut into it: the cut made in this way does not mark the plastic, and if you have to cut along a moulded line, the film naturally serves as a guide (remember that given the extreme thinness of the film, you don't need to press the blade: the gesture is smoother and you can almost work freehand, even for straight lines).
- The film can be left in place for a very long time (my record is 15 months) without tearing off the paint underneath when you remove it.
The contraindications to using this film are that the substrate must be non-porous and the tools must be porous (it adheres to non-porous surfaces).
It adheres very well to plastics, resins (see video), metal, glass and wood, provided the latter has been varnished.
The tools used must be porous so that it doesn't wash away on contact: wooden chopsticks, rulers cut from extruded foam and, of course, bare hands[/quote]
So I'm going to start work on the Parafilmyama, an Oyodo-class command ship commanded by Isoroku Parafilmoto :)
The tools I use at my humble level:
[url=https://servimg.com/view/17603515/5019][img]https://i.servimg.com/u/f37/17/60/35/15/parafi14.jpg[/img][/url]
The parafilm used :
[url=https://servimg.com/view/17603515/5020][img]https://i.servimg.com/u/f37/17/60/35/15/parafi15.jpg[/img][/url]
available here : https://amzn.to/3tBYRq7
With his friend the scalpel, which has a NEW blade (we can't stress this enough)
[url=https://servimg.com/view/17603515/5021][img]https://i.servimg.com/u/f37/17/60/35/15/parafi16.jpg[/img][/url]
[b]1st step[/b], you start painting. I usually use a primer, but in our example, I did without one. Similarly, I prefer to start with the horizontal parts, which are easier to mask.
[url=https://servimg.com/view/17603515/5022][img]https://i.servimg.com/u/f37/17/60/35/15/parafi17.jpg[/img][/url]
[url=https://servimg.com/view/17603515/5024][img]https://i.servimg.com/u/f37/17/60/35/15/parafi19.jpg[/img][/url]
[url=https://servimg.com/view/17603515/5023][img]https://i.servimg.com/u/f37/17/60/35/15/parafi18.jpg[/img][/url]
[b]2nd step[/b] : We cut a portion of the parafilm.
I usually cut along the perpendicular blue bars. The portion must not be too small, because it would be complicated to remove the film and complicated to activate it, or too large, because again activation would be complicated. As the thickness of the film is measured in microns, there is no need to worry about overlapping it.
The parafilm is then [b]activated[/b] by stretching it. Without activation, there's absolutely no point.
[url=https://servimg.com/view/17603515/5025][img]https://i.servimg.com/u/f37/17/60/35/15/parafi20.jpg[/img][/url]
[url=https://servimg.com/view/17603515/5026][img]https://i.servimg.com/u/f37/17/60/35/15/parafi21.jpg[/img][/url]
We cut off the "inactive" ends, which can be activated to provide small pieces (for the bridges of the footbridge in our example).
[url=https://servimg.com/view/17603515/5027][img]https://i.servimg.com/u/f37/17/60/35/15/parafi22.jpg[/img][/url]
[b]3rd step [/b]: we begin to apply the parafilm, taking care to apply it with..... the pad of a finger or a porous tool.
Then, using a scalpel, cut at a sharp angle and very lightly.
[url=https://servimg.com/view/17603515/5028][img]https://i.servimg.com/u/f37/17/60/35/15/parafi23.jpg[/img][/url]
[url=https://servimg.com/view/17603515/5029][img]https://i.servimg.com/u/f37/17/60/35/15/parafi24.jpg[/img][/url]
and we continue all the way across the bridge:
[url=https://servimg.com/view/17603515/5030][img]https://i.servimg.com/u/f37/17/60/35/15/parafi25.jpg[/img][/url]
[url=https://servimg.com/view/17603515/5031][img]https://i.servimg.com/u/f37/17/60/35/15/parafi26.jpg[/img][/url]
[url=https://servimg.com/view/17603515/5032][img]https://i.servimg.com/u/f37/17/60/35/15/parafi27.jpg[/img][/url]
[url=https://servimg.com/view/17603515/5033][img]https://i.servimg.com/u/f37/17/60/35/15/parafi28.jpg[/img][/url]
[url=https://servimg.com/view/17603515/5034][img]https://i.servimg.com/u/f37/17/60/35/15/parafi29.jpg[/img][/url]
[url=https://servimg.com/view/17603515/5035][img]https://i.servimg.com/u/f37/17/60/35/15/parafi30.jpg[/img][/url]
Then paint with Kure grey and unmask:
[url=https://servimg.com/view/17603515/5036][img]https://i.servimg.com/u/f37/17/60/35/15/parafi31.jpg[/img][/url]
[url=https://servimg.com/view/17603515/5037][img]https://i.servimg.com/u/f37/17/60/35/15/parafi32.jpg[/img][/url]
[url=https://servimg.com/view/17603515/5038][img]https://i.servimg.com/u/f37/17/60/35/15/parafi33.jpg[/img][/url]
[url=https://servimg.com/view/17603515/5039][img]https://i.servimg.com/u/f37/17/60/35/15/parafi34.jpg[/img][/url]
[url=https://servimg.com/view/17603515/5040][img]https://i.servimg.com/u/f37/17/60/35/15/parafi35.jpg[/img][/url]
[url=https://servimg.com/view/17603515/5041][img]https://i.servimg.com/u/f37/17/60/35/15/parafi36.jpg[/img][/url]
Total time for the operation: just 20 minutes for masking.
To try it is to adopt it :)
|
|
|
|
Posted: Sun Jul 13, 2025 11:43 am |
|
|
|
|


_underway_at_sea,_circa_in_August_1942_(80-G-K-417).jpg)