| Author |
Message |
|
|
| |
Post subject: |
Re: To HMS Victory and beyond |
 |
|
Thank you SG! And I was also finally able to finish the capstans. All the parts had been in the making since well into last year, but I never really had the chance to finish them. Basic programming strictly according to plan is always done quickly, but until the look of the printout refreshes my eyes and heart in terms of model making, it takes a few more rounds of printing, tinkering and improving, version #15 is the normal case here. Here is an intermediate version, the brass tubes have now been replaced. Still mising are the bevels on the wedges below the ribs, which allow the rope to slide smoothly from round to pentagonal or hexagonal. I take such pre-prints for color samples, and lo and behold, it looked stupid in this color scheme.  Here is the penultimate version. [Note to self: HOPEFULLY!] Good enough for a prototype. [Note to self: HOPEFULLY!] And what do I always say? Before applying the aging, a clean base coat must be applied. Here you go.   And then life gets in: The wood starts to show at all the rubbing points of the rope on the drums. After several tests, I decided on a non-covering drybrush, which gets across most of what I would have liked to show.  And someone else has bombed into the picture: The capstan bars ...  ... to match the capstan.  I made a template for alignment, using corrugated cardboard as a base to sink the upper part of the drum into and bring the spars to paper height ...  ... bars inserted into the capstan and the capstan inserted upside down ...  ... bars aligned and glued.  Then the swifter is pulled in and that's it.   And here are the individual parts, the middle piece is available in two heights, depending on how the battery deck is fitted with gratings.   XXXDAn Thank you SG!
And I was also finally able to finish the capstans.
All the parts had been in the making since well into last year, but I never really had the chance to finish them. Basic programming strictly according to plan is always done quickly, but until the look of the printout refreshes my eyes and heart in terms of model making, it takes a few more rounds of printing, tinkering and improving, version #15 is the normal case here.
Here is an intermediate version, the brass tubes have now been replaced. Still mising are the bevels on the wedges below the ribs, which allow the rope to slide smoothly from round to pentagonal or hexagonal. I take such pre-prints for color samples, and lo and behold, it looked stupid in this color scheme.
[img]https://www.mediaharmonists.de/bilder/Sammler42/Victory-capstan-250720_2287.jpg[/img]
Here is the penultimate version. [Note to self: HOPEFULLY!] Good enough for a prototype. [Note to self: HOPEFULLY!]
And what do I always say? Before applying the aging, a clean base coat must be applied. Here you go.
[img]https://www.mediaharmonists.de/bilder/Sammler42/Victory-capstan-250723_2355.jpg[/img]
[img]https://www.mediaharmonists.de/bilder/Sammler42/Victory-capstan-250723_2356.jpg[/img]
And then life gets in: The wood starts to show at all the rubbing points of the rope on the drums. After several tests, I decided on a non-covering drybrush, which gets across most of what I would have liked to show.
[img]https://www.mediaharmonists.de/bilder/Sammler42/Victory-capstan-250723_2403.jpg[/img]
And someone else has bombed into the picture: The capstan bars ...
[img]https://www.mediaharmonists.de/bilder/Sammler42/Victory-capstan-250723_2412.jpg[/img]
... to match the capstan.
[img]https://www.mediaharmonists.de/bilder/Sammler42/Victory-capstan-250723_2419.jpg[/img]
I made a template for alignment, using corrugated cardboard as a base to sink the upper part of the drum into and bring the spars to paper height ...
[img]https://www.mediaharmonists.de/bilder/Sammler42/Victory-capstan-250723_2424.jpg[/img]
... bars inserted into the capstan and the capstan inserted upside down ...
[img]https://www.mediaharmonists.de/bilder/Sammler42/Victory-capstan-250723_2426.jpg[/img]
... bars aligned and glued.
[img]https://www.mediaharmonists.de/bilder/Sammler42/Victory-capstan-250723_2427.jpg[/img]
Then the swifter is pulled in and that's it.
[img]https://www.mediaharmonists.de/bilder/Sammler42/Victory-capstan-250723_2430.jpg[/img]
[img]https://www.mediaharmonists.de/bilder/Sammler42/Victory-capstan-250723_2431.jpg[/img]
And here are the individual parts, the middle piece is available in two heights, depending on how the battery deck is fitted with gratings.
[img]https://www.mediaharmonists.de/bilder/Sammler42/Victory-capstan-250723_2462.jpg[/img]
[img]https://www.mediaharmonists.de/bilder/Sammler42/Victory-capstan-250723_2463.jpg[/img]
XXXDAn
|
|
|
 |
Posted: Fri Jun 27, 2025 1:17 pm |
|
|
 |
|
|
| |
Post subject: |
Re: To HMS Victory and beyond |
|
|
So good of you Dafi!  So good of you Dafi! :cool_2:
|
|
|
|
Posted: Fri Jun 27, 2025 9:49 am |
|
|
|
|
|
| |
Post subject: |
Re: To HMS Victory and beyond |
|
|
And the pumps were also due. First the elm tree pump. There is a protective bracket to protect the handle and the two through-pipes for the two lower decks are also included. In order not to have a pinch-off point, the handle was printed free-flying, diameter 0.5 mm x 0.5 mm. It came out straight, but when washed in acetone it bent uniformly on all prints. It's better to make a connection at the top for the next print in the hope of minimizing warping during washing.   Therefore, a glass of hot water, briefly dipped in ...  ... kept in shape while cooling down and - tata ! - everything is straight again   Here is the comparison picture. So never cold bend resin, it works wonderfully with heat! Then I discovered that I had made a 0.15 mm hole in the 0.5 mm x 0.5 mm handle.  Checked the passage with a wire ...  ... and pulled in a rope. It actually really worked    The wooden clamp is not a standard one but a mini clamp  And the chain pumps have also arrived.   XXXDAn And the pumps were also due.
First the elm tree pump. There is a protective bracket to protect the handle and the two through-pipes for the two lower decks are also included. In order not to have a pinch-off point, the handle was printed free-flying, diameter 0.5 mm x 0.5 mm. It came out straight, but when washed in acetone it bent uniformly on all prints. It's better to make a connection at the top for the next print in the hope of minimizing warping during washing.
[img]https://www.mediaharmonists.de/bilder/Sammler42/Victory-elm-tree-pump-250723_2439.jpg[/img]
[img]https://www.mediaharmonists.de/bilder/Sammler42/Victory-elm-tree-pump-250723_2449.jpg[/img]
Therefore, a glass of hot water, briefly dipped in ...
[img]https://www.mediaharmonists.de/bilder/Sammler42/Victory-elm-tree-pump-250607_2212.jpg[/img]
... kept in shape while cooling down and - tata ! - everything is straight again :-)
[img]https://www.mediaharmonists.de/bilder/Sammler42/Victory-elm-tree-pump-250607_2216.jpg[/img]
Here is the comparison picture. So never cold bend resin, it works wonderfully with heat!
Then I discovered that I had made a 0.15 mm hole in the 0.5 mm x 0.5 mm handle.
[img]https://www.mediaharmonists.de/bilder/Sammler42/Victory-elm-tree-pump-250719_2223.jpg[/img]
Checked the passage with a wire ...
[img]https://www.mediaharmonists.de/bilder/Sammler42/Victory-elm-tree-pump-250719_2233.jpg[/img]
... and pulled in a rope. It actually really worked :-)
[img]https://www.mediaharmonists.de/bilder/Sammler42/Victory-elm-tree-pump-250719_2243.jpg[/img]
[img]https://www.mediaharmonists.de/bilder/Sammler42/Victory-elm-tree-pump-250719_2252.jpg[/img]
[img]https://www.mediaharmonists.de/bilder/Sammler42/Victory-elm-tree-pump-250719_2277.jpg[/img]
The wooden clamp is not a standard one but a mini clamp ;-)
And the chain pumps have also arrived.
[img]https://www.mediaharmonists.de/bilder/Sammler42/Victory-chain-pumps-250723_2371.jpg[/img]
[img]https://www.mediaharmonists.de/bilder/Sammler42/Victory-chain-pumps-250723_2372.jpg[/img]
XXXDAn
|
|
|
|
Posted: Thu Jun 26, 2025 3:50 pm |
|
|
|
|
|
| |
Post subject: |
Re: To HMS Victory and beyond |
|
|
Thank you Dan. I certainly prefer the more unknown look of 1765. XXXDAn Thank you Dan. I certainly prefer the more unknown look of 1765.
;-)
XXXDAn
|
|
|
|
Posted: Wed Jun 25, 2025 1:58 pm |
|
|
|
|
|
| |
Post subject: |
Re: To HMS Victory and beyond |
|
|
|
I somehow missed your prior post. I certainly prefer the more classic look of 1803.
I somehow missed your prior post. I certainly prefer the more classic look of 1803.
|
|
|
|
Posted: Wed Jun 25, 2025 12:53 pm |
|
|
|
|
|
| |
Post subject: |
Re: To HMS Victory and beyond |
|
|
Oh God, now the building report has actually slipped so far down that archaeological excavations were almost necessary to find it again ... A lot of business in the business, vacation, home garden, garden plot and life itself - lots of things that can get in the way and prevent you from tinkering. But a little something did happen. On request, I did a bit of research into the deck accessories. First the riding bitts. Another small kit in itself of 10 parts.   XXXDAn Oh God, now the building report has actually slipped so far down that archaeological excavations were almost necessary to find it again ...
A lot of business in the business, vacation, home garden, garden plot and life itself - lots of things that can get in the way and prevent you from tinkering.
But a little something did happen. On request, I did a bit of research into the deck accessories. First the riding bitts. Another small kit in itself of 10 parts.
[img]https://www.mediaharmonists.de/bilder/Sammler42/Victory-riding-bits-250723_2381.jpg[/img]
[img]https://www.mediaharmonists.de/bilder/Sammler42/Victory-riding-bits-250723_2386.jpg[/img]
XXXDAn
|
|
|
|
Posted: Wed Jun 25, 2025 5:44 am |
|
|
|
|
|
| |
Post subject: |
Re: To HMS Victory and beyond |
|
|
Thank you Dan! It has now been 4.5 months since the big show in Evian. Since then, my ing Beauty has been lying in her box in the camper van, as I haven't had the time to kiss her nor the space on the work table to lay her down gently. This weekend I finally pricked up my lips and gave her a really nice wake-up kiss And I took the opportunity to take a few beauty shots and compare 1803 and 1910  Is this now considered unto be out of box?    I also took the opportunity to take a closer look at the new bow. It was based on the three-deckers built between 1800 and 1805. The bowsprit is now also anchored one deck higher.     One side is still a bit rough Hope you like it! XXXDAn Thank you Dan!
It has now been 4.5 months since the big show in Evian. Since then, my ing Beauty has been lying in her box in the camper van, as I haven't had the time to kiss her nor the space on the work table to lay her down gently.
This weekend I finally pricked up my lips and gave her a really nice wake-up kiss
And I took the opportunity to take a few beauty shots and compare 1803 and 1910
[img]https://www.mediaharmonists.de/bilder/Sammler41/Victory-return-250309_2137.jpg[/img]
Is this now considered unto be out of box?
[img]https://www.mediaharmonists.de/bilder/Sammler41/Victory-Vergleich-1805-1910-250309_2150.jpg[/img]
[img]https://www.mediaharmonists.de/bilder/Sammler41/Victory-Vergleich-1805-1910-250309_2139.jpg[/img]
[img]https://www.mediaharmonists.de/bilder/Sammler41/Victory-Vergleich-1805-1910-250309_2145.jpg[/img]
I also took the opportunity to take a closer look at the new bow. It was based on the three-deckers built between 1800 and 1805. The bowsprit is now also anchored one deck higher.
[img]https://www.mediaharmonists.de/bilder/Sammler41/Victory-1910-head-250221_2072.jpg[/img]
[img]https://www.mediaharmonists.de/bilder/Sammler41/Victory-1910-head-250221_2073.jpg[/img]
[img]https://www.mediaharmonists.de/bilder/Sammler41/Victory-1910-head-250221_2075.jpg[/img]
[img]https://www.mediaharmonists.de/bilder/Sammler41/Victory-1910-head-250221_2078.jpg[/img]
One side is still a bit rough ;-)
Hope you like it!
XXXDAn
|
|
|
|
Posted: Mon Mar 24, 2025 5:50 am |
|
|
|
|
|
| |
Post subject: |
Re: To HMS Victory and beyond |
|
|
|
Continued incredible work.
Continued incredible work.
|
|
|
|
Posted: Wed Feb 05, 2025 12:36 pm |
|
|
|
|
|
| |
Post subject: |
Re: To HMS Victory and beyond |
|
|
Wonderful work Daniel!  This may not have been her most beautiful 'version', but it certainly is an interesting one. And it makes for a very unique model too! Wonderful work Daniel! :thumbs_up_1: :thumbs_up_1: :thumbs_up_1:
This may not have been her most beautiful 'version', but it certainly is an interesting one. And it makes for a very unique model too!
|
|
|
|
Posted: Wed Feb 05, 2025 12:22 pm |
|
|
|
|
|
| |
Post subject: |
Re: To HMS Victory and beyond |
|
|
Just realized that I missed one entry. here it is So I went over the stovepipe outlet cover plate underneath the fore chains. First it was reduced in size according to the source. On closer inspection of the photpgraph, I noticed that the support block could also be a brick. Since the entire shipyard is made of red brick, I took the opportunity to color it.  Here is my comparison picture again. The shoe for the anchor is still far too small, but the rest is slowly coming along  Even more distinct without color.  As the picture is from 1920 and the state I am showing is 10 years earlier I do not know yet how much of the rot I will show. XXXDAn Just realized that I missed one entry. here it is :-)
So I went over the stovepipe outlet cover plate underneath the fore chains. First it was reduced in size according to the source. On closer inspection of the photpgraph, I noticed that the support block could also be a brick. Since the entire shipyard is made of red brick, I took the opportunity to color it.
[img]https://www.mediaharmonists.de/bilder/Sammler41/Victory-1910-Details-250113_1986.jpg[/img]
Here is my comparison picture again. The shoe for the anchor is still far too small, but the rest is slowly coming along :-)
[img]https://www.mediaharmonists.de/bilder/Sammler41/Vergleich-Vic-farbe_1986.jpg[/img]
Even more distinct without color.
[img]https://www.mediaharmonists.de/bilder/Sammler41/Vergleich-Vic-sw_1986.jpg[/img]
As the picture is from 1920 and the state I am showing is 10 years earlier I do not know yet how much of the rot I will show.
XXXDAn
|
|
|
|
Posted: Wed Feb 05, 2025 10:35 am |
|
|
|
|
|
| |
Post subject: |
Re: To HMS Victory and beyond |
|
|
Thank you SG! When the side gallery was in place, it didn't seem gloomy enough. An anxious look, and sure enough, the white balusters that I had been looking forward to so much just weren't there. Crap. And painting over it looked like crap. I'm sorry, but it did. Like dafi does what dafi does best: Destruction!  So I broke out the white balusters and put in new black ones. Now the eyeliner is still missing in the broad white profiles and then it could work. It's only an approximation anyway, as otherwise the side galleries would have to be completely rebuilt. At that time, the curves were less pronounced and the whole structure was more angular. But I can't reconstruct it much better with the documents I have so far. Maybe later on, new sources might turn up.  And since I was just tinkering around, I added the chutes for the signal cannons. Probably so that powder and cartridge residues don't stick to the ship's side.  XXXDAn Thank you SG!
When the side gallery was in place, it didn't seem gloomy enough. An anxious look, and sure enough, the white balusters that I had been looking forward to so much just weren't there. Crap. And painting over it looked like crap. I'm sorry, but it did.
Like dafi does what dafi does best: Destruction!
[img]https://www.mediaharmonists.de/bilder/Sammler41/Victory-Side-Gallery-250202_0743.jpg[/img]
So I broke out the white balusters and put in new black ones. Now the eyeliner is still missing in the broad white profiles and then it could work. It's only an approximation anyway, as otherwise the side galleries would have to be completely rebuilt. At that time, the curves were less pronounced and the whole structure was more angular. But I can't reconstruct it much better with the documents I have so far. Maybe later on, new sources might turn up.
[img]https://www.mediaharmonists.de/bilder/Sammler41/Victory-oars-250202_0769.jpg[/img]
And since I was just tinkering around, I added the chutes for the signal cannons. Probably so that powder and cartridge residues don't stick to the ship's side.
[img]https://www.mediaharmonists.de/bilder/Sammler41/Victory-oars-250202_0777.jpg[/img]
XXXDAn
|
|
|
|
Posted: Wed Feb 05, 2025 3:26 am |
|
|
|
|
|
| |
Post subject: |
Re: To HMS Victory and beyond |
|
|
Beautiful dafi-esque work. Amazing as always Beautiful dafi-esque work. Amazing as always :cool_2:
|
|
|
|
Posted: Tue Feb 04, 2025 11:16 am |
|
|
|
|
|
| |
Post subject: |
Re: To HMS Victory and beyond |
|
|
Made a little progress over the last few days. First planked the poop railing, then built the curved end to the aft deck railing, pressed on the end strip using cable ties.  Then sanded down the balusters on the side pocket, which has become quite fast.  First built the dominant vertical rear end profile. Then came the other window frames.  The whole thing sprayed and the white balusters glued on ...  ... and then - oh horror - ... ... ... ... XXXDAn Made a little progress over the last few days.
First planked the poop railing, then built the curved end to the aft deck railing, pressed on the end strip using cable ties.
[img]https://www.mediaharmonists.de/bilder/Sammler41/Victory-1910-poop_2002.jpg[/img]
Then sanded down the balusters on the side pocket, which has become quite fast.
[img]https://www.mediaharmonists.de/bilder/Sammler41/Victory-1910-Seitentasche_0330.jpg[/img]
First built the dominant vertical rear end profile.
Then came the other window frames.
[img]https://www.mediaharmonists.de/bilder/Sammler41/Victory-1910-Seitentasche_0333.jpg[/img]
The whole thing sprayed and the white balusters glued on ...
[img]https://www.mediaharmonists.de/bilder/Sammler41/Victory-1910-Seitentasche_0340.jpg[/img]
... and then - oh horror - ...
...
...
...
XXXDAn
|
|
|
|
Posted: Tue Feb 04, 2025 7:23 am |
|
|
|
|
|
| |
Post subject: |
Re: To HMS Victory and beyond |
|
|
|
The rigols have also found their way onto the model. Here still in the stack ...
[img]https://www.mediaharmonists.de/bilder/Sammler41/Victory-1910-Details-250112_1923.jpg[/img]
... and here already at the scene of the crime.
[img]https://www.mediaharmonists.de/bilder/Sammler41/Victory-1910-Details-bow-250112_1931.jpg[/img]
[img]https://www.mediaharmonists.de/bilder/Sammler41/Victory-1910-Details-bow-250112_1926.jpg[/img]
[img]https://www.mediaharmonists.de/bilder/Sammler41/Victory-1910-Details-bow-250112_1947.jpg[/img]
[img]https://www.mediaharmonists.de/bilder/Sammler41/Victory-1910-Details-bow-250112_1954.jpg[/img]
[img]https://www.mediaharmonists.de/bilder/Sammler41/Victory-1910-Details-bow-250112_1959.jpg[/img]
[img]https://www.mediaharmonists.de/bilder/Sammler41/Victory-1910-Details-250112_1930.jpg[/img]
My favorite detail :-) But I saw afterwards that the wooden panel only covers the top panel, so I'll probably have to touch that up again.
[img]https://www.mediaharmonists.de/bilder/Sammler41/Victory-1910-Details-bow-250112_1948.jpg[/img]
The area of the hase bolsters has already been marked on the bow and the prison cell has also been given its bars ...
[img]https://www.mediaharmonists.de/bilder/Sammler41/Victory-1910-Details-Head-250112_1960.jpg[/img]
... and the windows under the poop also got their window frames.
[img]https://www.mediaharmonists.de/bilder/Sammler41/Victory-1910-Details-stern-250112_1962.jpg[/img]
XXXDAn
|
|
|
|
Posted: Tue Jan 14, 2025 3:02 am |
|
|
|
|
|
| |
Post subject: |
Re: To HMS Victory and beyond |
|
|
And because it was so beautiful, we went straight on. Some of the ports have been planked up over the years. So that it still looks very well-fortified ...  ... the missing windows were simply painted on. Honi soit qui mal y pense.   The artillery has also found its way to the dressed rehearsal. In front are the three signal cannons for the salute, above them short 12-pounders from dubious historical stocks ...  ... and amidships the historic Trafalgar guns - or what they were considered to be at the time  And before the questions come, yes, the barrels did indeed sit on the lower portframe back then. Improperly executed changes to the port dimensions and incorrect carriages ... XXXDAn And because it was so beautiful, we went straight on.
Some of the ports have been planked up over the years. So that it still looks very well-fortified ...
[img]https://www.mediaharmonists.de/bilder/Sammler41/Victory-1910-Details_1890.jpg[/img]
... the missing windows were simply painted on. Honi soit qui mal y pense.
[img]https://www.mediaharmonists.de/bilder/Sammler41/Victory-1910-Details_1892.jpg[/img]
[img]https://www.mediaharmonists.de/bilder/Sammler41/Victory-1910-Details_1894.jpg[/img]
The artillery has also found its way to the dressed rehearsal. In front are the three signal cannons for the salute, above them short 12-pounders from dubious historical stocks ...
[img]https://www.mediaharmonists.de/bilder/Sammler41/Victory-1910-Details_1899.jpg[/img]
... and amidships the historic Trafalgar guns - or what they were considered to be at the time ;-)
[img]https://www.mediaharmonists.de/bilder/Sammler41/Victory-1910-Details_1904.jpg[/img]
And before the questions come, yes, the barrels did indeed sit on the lower portframe back then. Improperly executed changes to the port dimensions and incorrect carriages ...
XXXDAn
|
|
|
|
Posted: Mon Jan 13, 2025 4:32 am |
|
|
|
|
|
| |
Post subject: |
Re: To HMS Victory and beyond |
|
|
|
Fantastic! I have an appreciation for the clean, uncompromising lines and paint schemes of this period. It will be interesting to see how the warping correction turns out.
Fantastic! I have an appreciation for the clean, uncompromising lines and paint schemes of this period. It will be interesting to see how the warping correction turns out.
|
|
|
|
Posted: Fri Jan 10, 2025 6:22 am |
|
|
|
|
|
| |
Post subject: |
Re: To HMS Victory and beyond |
|
|
|
... and even the anchor chains :lol_3: :lol_3: :lol_3: :lol_3:
|
|
|
|
Posted: Fri Jan 10, 2025 5:03 am |
|
|
|
|
|
| |
Post subject: |
Re: To HMS Victory and beyond |
|
|
as a fellow black and white sailing ship builder....( Bretagne) ( but mine is 7 x smaller )  I understand the joy of all the ' stuff ' being uncompromisingly painted ;black and white--including the anchors as a fellow black and white sailing ship builder....( Bretagne)
( but mine is 7 x smaller ) :big_grin:
I understand the joy of all
the ' stuff ' being uncompromisingly painted ;black and white--including the anchors
|
|
|
|
Posted: Fri Jan 10, 2025 4:15 am |
|
|
|
|
|
| |
Post subject: |
Re: To HMS Victory and beyond |
|
|
When it rolls, it rolls, or the victory of impatience over model-building caution. Once I was this far along, I naturally wanted to see the whole thing in paint. This was a risk because the paper planking is quite sensitive and I still had to do the whole other side. But, but, but: it just had to be done. I had slightly oversized the separating battens, so I sanded the thicker one even thinner and broke the edges. It did the whole thing good. I used the masking tape to protect the paper planks. This worked really well.  After the first round of white spray over everything, a beveled skewer was ideal for removing grains and impurities.  Then I generously covered the white strip with masking tape and used the profile battens to cut it into shape with a scalpel, which went really quickly. Then black spray and removed the masking and simply: JOY! It worked.  The first size sample of the rigols hung up.  Very striking on the contemporary hull are the many additions, here the downpipes, probably plumbing.   But with a little paint, they blend into the overall work of art in such a way that one thinks they have always been there   Enjoy, DAniel When it rolls, it rolls, or the victory of impatience over model-building caution.
Once I was this far along, I naturally wanted to see the whole thing in paint. This was a risk because the paper planking is quite sensitive and I still had to do the whole other side. But, but, but: it [i]just had[/i] to be done.
I had slightly oversized the separating battens, so I sanded the thicker one even thinner and broke the edges. It did the whole thing good.
I used the masking tape to protect the paper planks. This worked really well.
[img]https://www.mediaharmonists.de/bilder/Sammler41/Victory-1910-Planking-250107_1867.jpg[/img]
After the first round of white spray over everything, a beveled skewer was ideal for removing grains and impurities.
[img]https://www.mediaharmonists.de/bilder/Sammler41/Victory-1910-Planking-250107_1869.jpg[/img]
Then I generously covered the white strip with masking tape and used the profile battens to cut it into shape with a scalpel, which went really quickly. Then black spray and removed the masking and simply: JOY! It worked.
[img]https://www.mediaharmonists.de/bilder/Sammler41/Victory-1910-Planking-250107_1878.jpg[/img]
The first size sample of the rigols hung up.
[img]https://www.mediaharmonists.de/bilder/Sammler41/Victory-1910-Planking-250107_1881.jpg[/img]
Very striking on the contemporary hull are the many additions, here the downpipes, probably plumbing.
[img]https://www.mediaharmonists.de/bilder/Sammler41/Victory-1910-Planking-250107_1882.jpg[/img]
[img]https://www.mediaharmonists.de/bilder/Sammler41/Victory-1910-Planking-250107_1883.jpg[/img]
But with a little paint, they blend into the overall work of art in such a way that one thinks they have always been there ;-)
[img]https://www.mediaharmonists.de/bilder/Sammler41/Victory-1910-Planking-250107_1885.jpg[/img]
[img]https://www.mediaharmonists.de/bilder/Sammler41/Victory-1910-Planking-250107_1887.jpg[/img]
Enjoy, DAniel
|
|
|
|
Posted: Fri Jan 10, 2025 3:46 am |
|
|
|
|
|
| |
Post subject: |
Re: To HMS Victory and beyond |
|
|
Well, and the little fat one with the stripes is still stuck in the camper van since Evian. Nevertheless, there is always enough Victory for me to do. I really missed the 1910 model at the last two exhibitions, as I like to show the developments on the ship. Time to take another look at my victorian black and white beauty. The first construction phase was January to March 2022, so that's already 2 years ago. A brief look back: After sanding down and fattening up the entire side of the ship to get a level surface, she looked all tattered at first. 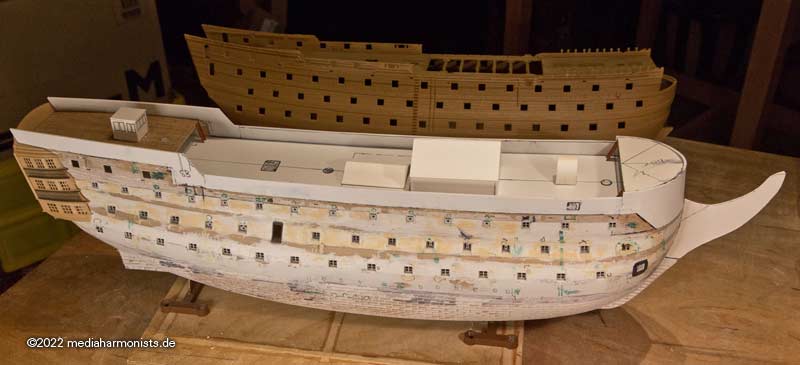 But the grace of the paint brought back some decency and dignity.  But in this state I realized one thing: A lot of glue and car filler had caused the hull halves to warp outwards quite a bit, 2 mm on the port side and 6 mm on the starboard side :-0 Then I was initially frustrated, but also realized that I should let the material work out in peace and see if it would still turn out any good. And I think it's going to become something in the end. The good girl was released from her slumber and thoroughly checked. Deformation no had longer increased. However, it will take a lot of bending force, but I think the decks can manage this, with a little internal help if necessary. But that will only come when the time comes. Why? I can only insert the decks once the window panes have been inserted. I can only insert the window panes once the outside has been painted. And I can't paint the outside until the planks are in place. So I had to take care of the planks. In the past, I liked to use 0.2 mm ABS sheet, but the plastic glue tended to leave fingerprints. Wood was too thick for me and too time-consuming to procure. That's why I went exploring in my model maker friends' circles and found what I was looking for: 250 gram paper/cardboard. Initial tests were quite inspiring.  In the original, there were wooden battens nailed on in two thicknesses to separate the colors. I made these from Evergreen, although I made them slightly thicker for handling reasons.  So planks cut on the guillotine shears ...  ... and opened the glue pot.  First planks are slapped on ...   ... and even that didn't put me off any further And at some point the port half was planked, deliberately disregarding all planking schemes.     And in case anyone thinks that the entrance gate visible today is original, no, the gate that can be seen today is from this state of construction and was installed in the ship between 1820 and 1828. One gate further back than as build. And these port parts were simply reinstalled one port further forward in 1920 and declared as Trafalgar state. Honi soit qui mal y pense.   Fortunately, I've had the parts in my supply kit for a long time, so I just had to grab them. For me as a plastic person, the tight planking around the stern was of course something new. I'll have to clean it up a bit, then it'll fit.  And I don't know why I remembered some well-known lines in the next picture ...  "Beneath it, visible to all, lay a huge spaceship, one hundred and fifty meters long, shaped like a smooth sneaker, snow-white and maddeningly beautiful. At its heart was a small golden box containing the most sophisticated invention ever made, an invention that made this spaceship something unique in the history of the galaxy, an invention that gave the spaceship its name - 'Heart of Gold'." - The Hitchhiker's Guide to the Galaxy, Chapter 4 But what still looks like this ...  ... should develop into this  Cheers, DAniel Well, and the little fat one with the stripes is still stuck in the camper van since Evian. Nevertheless, there is always enough Victory for me to do.
I really missed the 1910 model at the last two exhibitions, as I like to show the developments on the ship. Time to take another look at my victorian black and white beauty. The first construction phase was January to March 2022, so that's already 2 years ago.
A brief look back: After sanding down and fattening up the entire side of the ship to get a level surface, she looked all tattered at first.
[img]https://www.mediaharmonists.de/bilder/Sammler36/Victory-1910-Upgrade-220225_1696.jpg[/img]
But the grace of the paint brought back some decency and dignity.
[img]https://www.mediaharmonists.de/bilder/Sammler36/Victory1910-hull_9851.jpg[/img]
But in this state I realized one thing: A lot of glue and car filler had caused the hull halves to warp outwards quite a bit, 2 mm on the port side and 6 mm on the starboard side :-0
Then I was initially frustrated, but also realized that I should let the material work out in peace and see if it would still turn out any good.
And I think it's going to become something in the end. The good girl was released from her slumber and thoroughly checked. Deformation no had longer increased. However, it will take a lot of bending force, but I think the decks can manage this, with a little internal help if necessary. But that will only come when the time comes. Why?
I can only insert the decks once the window panes have been inserted. I can only insert the window panes once the outside has been painted. And I can't paint the outside until the planks are in place. So I had to take care of the planks.
In the past, I liked to use 0.2 mm ABS sheet, but the plastic glue tended to leave fingerprints. Wood was too thick for me and too time-consuming to procure. That's why I went exploring in my model maker friends' circles and found what I was looking for: 250 gram paper/cardboard.
Initial tests were quite inspiring.
[img]https://www.mediaharmonists.de/bilder/Sammler41/Victory-1910-Planking-250103_1757.jpg[/img]
In the original, there were wooden battens nailed on in two thicknesses to separate the colors. I made these from Evergreen, although I made them slightly thicker for handling reasons.
[img]https://www.mediaharmonists.de/bilder/Sammler41/Victory-1910-Planking-250103_1764.jpg[/img]
So planks cut on the guillotine shears ...
[img]https://www.mediaharmonists.de/bilder/Sammler41/Victory-1910-Planking-250105_1790.jpg[/img]
... and opened the glue pot.
[img]https://www.mediaharmonists.de/bilder/Sammler41/Victory-1910-Planking-241217_1755.jpg[/img]
First planks are slapped on ...
[img]https://www.mediaharmonists.de/bilder/Sammler41/Victory-1910-Planking-241215_1746.jpg[/img]
[img]https://www.mediaharmonists.de/bilder/Sammler41/Victory-1910-Planking-241216_1753.jpg[/img]
... and even that didn't put me off any further ;-)
And at some point the port half was planked, deliberately disregarding all planking schemes.
[img]https://www.mediaharmonists.de/bilder/Sammler41/Victory-1910-Planking-250103_1767.jpg[/img]
[img]https://www.mediaharmonists.de/bilder/Sammler41/Victory-1910-Planking-250103_1770.jpg[/img]
[img]https://www.mediaharmonists.de/bilder/Sammler41/Victory-1910-Planking-250103_1769.jpg[/img]
[img]https://www.mediaharmonists.de/bilder/Sammler41/Victory-1910-Planking-250103_1771.jpg[/img]
And in case anyone thinks that the entrance gate visible today is original, no, the gate that can be seen today is from this state of construction and was installed in the ship between 1820 and 1828. One gate further back than as build. And these port parts were simply reinstalled one port further forward in 1920 and declared as Trafalgar state. Honi soit qui mal y pense.
[img]https://www.mediaharmonists.de/bilder/Sammler41/Victory-1910-Planking-250103_1772.jpg[/img]
[img]https://www.mediaharmonists.de/bilder/Sammler41/Victory-1910-Planking-250103_1778.jpg[/img]
Fortunately, I've had the parts in my supply kit for a long time, so I just had to grab them.
For me as a plastic person, the tight planking around the stern was of course something new. I'll have to clean it up a bit, then it'll fit.
[img]https://www.mediaharmonists.de/bilder/Sammler41/Victory-1910-Planking-250103_1788.jpg[/img]
And I don't know why I remembered some well-known lines in the next picture ...
[img]https://www.mediaharmonists.de/bilder/Sammler41/Victory-1910-Planking-250103_1784.jpg[/img]
"Beneath it, visible to all, lay a huge spaceship, one hundred and fifty meters long, shaped like a smooth sneaker, snow-white and maddeningly beautiful. At its heart was a small golden box containing the most sophisticated invention ever made, an invention that made this spaceship something unique in the history of the galaxy, an invention that gave the spaceship its name - 'Heart of Gold'."
- The Hitchhiker's Guide to the Galaxy, Chapter 4
But what still looks like this ...
[img]https://www.mediaharmonists.de/bilder/Sammler41/Victory-1910-Planking-250103_1782a.jpg[/img]
... should develop into this :-)
[img]https://www.mediaharmonists.de/bilder/Sammler41/Victory-1910-Planking-250103_1782b.jpg[/img]
Cheers, DAniel
|
|
|
|
Posted: Thu Jan 09, 2025 6:31 am |
|
|
|
|


