The Ship Model Forum

The Ship Modelers Source
It is currently Fri Jul 11, 2025 2:04 pm

All times are UTC - 6 hours [ DST ]


Post new topic Reply to topic  [ 301 posts ]  Go to page Previous  1 ... 11, 12, 13, 14, 15, 16  Next
Author Message
PostPosted: Thu May 15, 2014 6:16 am 
Offline
User avatar

Joined: Tue Dec 08, 2009 11:15 am
Posts: 677
Location: Fremantle Western Australia
Looking fantastic there Neptune. For wood carving I use jelutong. It's nice and easy to carve while being fine grained so you can still achieve sharp edges.

Image

The stern carvings and top of the lantern are from jelutong. Have also made sonar domes, small boats etc.

_________________
AT
1/72 Arleigh Burke flight iia
1/72 Hobart class AWD HMAS Brisbane
http://www.shipmodels.info/mws_forum/viewtopic.php?f=13&t=154767
1/72 Friesland
1/75 Wasa
1/53 STS Leeuwin II
1/72 HMAS Perth 1942
1/72 Russian Corvette Steregushchy


Report this post
Top
 Profile  
Reply with quote  
PostPosted: Wed May 28, 2014 4:49 am 
Offline
User avatar

Joined: Sun Mar 13, 2005 11:51 am
Posts: 2432
Location: Belgium
I've heard of jelutong before, but availability is very limited here. Haven't actually even seen it in any shops. There are only a couple of decent modelling shops in Belgium and the ones that do exist are focussed on kits rather than scratchbuilding.

A small update. Here you have one of the lifeboats with its small 1/700 sister.
Image

And here are both of the lifeboats. They still require some sanding and filling as the hulls aren't perfect yet. After that is the detailing stage. Still some work to do, but I'm already happy to have overcome the hurdle of getting started on these. I was kind of postponing that after a previous effort two or three years ago. Once the hooks are on, I can start to construct the davits. I wanted to avoid any offset on the wires/hooks, due to mismeasurement etc.
Image

_________________
The merchant shipyard


Report this post
Top
 Profile  
Reply with quote  
PostPosted: Wed May 28, 2014 7:16 am 
Offline
User avatar

Joined: Thu Oct 11, 2012 6:49 am
Posts: 67
Location: Adelaide, South Australia
Neptune I think you've done a fantastic job so far, I know how you feel with the construction of your life rafts I have the same with Garibaldi's boats but will attack them one day. Scott


Report this post
Top
 Profile  
Reply with quote  
PostPosted: Tue Jun 03, 2014 10:22 am 
Offline
User avatar

Joined: Mon Jul 01, 2013 6:55 am
Posts: 428
Location: Usa
Impressive boats. I like it.

Jorge

_________________
Beautiful Girls in your city


Report this post
Top
 Profile  
Reply with quote  
PostPosted: Tue Jul 29, 2014 9:47 am 
Offline
User avatar

Joined: Sun Mar 13, 2005 11:51 am
Posts: 2432
Location: Belgium
Thanks Jorge,
finally some time for an update. Hope to get these finished this holiday. I also slowly started on building the davits. I wanted to get the boats first so I can have the correct measurements for the davit spacing, otherwise the wires might end up looking angled etc.

They're pretty much ready for the first coats of orange. before I can continue with detailing. The small holes on one line are for the grablines that are hung on the sides of the boat. They'll be placed after the painting of course. Also the cooling lines for the engine as well as the hooks, mooring bollards and propellor/nozzle will be done after painting.

The scribing of the panel lines wasn't very succesful, the milliput wasn't entirely hardened (after 2 months, so perhaps the age of the milliput or the mix wasn't entirely good). Anyway, I opt to live with it since it's really tiny compared to the hole build and I'm not planning on spending another 5 years on this build :heh: .

Image

Image

Image

_________________
The merchant shipyard


Report this post
Top
 Profile  
Reply with quote  
PostPosted: Tue Jul 29, 2014 12:39 pm 
Offline
User avatar

Joined: Tue Apr 17, 2007 9:18 am
Posts: 1993
Location: Brasil
the boats looks superb very well done :good_job:


Report this post
Top
 Profile  
Reply with quote  
PostPosted: Sat Aug 02, 2014 1:37 pm 
Offline
User avatar

Joined: Sun Mar 13, 2005 11:51 am
Posts: 2432
Location: Belgium
And finally painted and slightly more detailed. One boat is now 90% finished, apart from some touch-ups and additional details. I also still need to figure out a way to do the grablines on the side.

This is how I did the "reflective SOLAS tape" on the sides. I just painted Revell Silver, with a Chinese ink pen along the edge of some masking tape. Not entirely sharp, but it does the job. In reality they just cut up the tape, so it's also not really equal in length. Generally it looks more white due to the tape fading.

Image

Image

And the number of the boat and the call sign of the ship on top.
Image

_________________
The merchant shipyard


Report this post
Top
 Profile  
Reply with quote  
PostPosted: Wed Aug 06, 2014 1:45 pm 
Offline
User avatar

Joined: Sun Mar 13, 2005 11:51 am
Posts: 2432
Location: Belgium
So, they're mostly finished now. I still have to find a way to nicely drape those grablines though. Tried with some sewing thread impregnated with wood glue-water mixture.

Although it was not planned for this period, I did start the davits as well. Just testing though, needs some fine tuning. They won't be movable in the and, but I'm building them movable for now, just to see if it is realistic. To make sure the davits are not too far off of the side etc. Once the distances are fixed, I will fix them in place and put on the wires (sewing thread).

First I just glued the aft hooks on the boats with a styrene rod as a lashing block. In the end I decided to remove that styrene rod (1mm) and redrill the hole through the hook as well as the transom of the boat. I then inserted a brass rod and glued with with CA to both the boat and the hook. This should make it stronger. I want to avoid the way too common (in reality) boat-falling-from-davit occurence on the water.

Image

Image

Image

_________________
The merchant shipyard


Report this post
Top
 Profile  
Reply with quote  
PostPosted: Wed Aug 06, 2014 10:10 pm 
Offline
Site Admin
Site Admin
User avatar

Joined: Sat Jan 08, 2005 4:31 pm
Posts: 3579
Location: Plattsburg, Missouri
I keep looking for the like button!

_________________
Timothy Dike
Owner & Administrator
ModelWarships.com


Report this post
Top
 Profile  
Reply with quote  
PostPosted: Thu Aug 07, 2014 5:47 am 
Offline
User avatar

Joined: Sat Jan 22, 2005 10:18 am
Posts: 4131
Location: Liverpool
Hi Roal these type ships boats are not always easy to make but you have done them justice , superb job . Jelutong is my timber of choice for these type of jobs. I have recently completed 2 Hallmatic 24 ribs using this material.
Great job overall
Dave Wooley :thumbs_up_1: :thumbs_up_1: :thumbs_up_1: :thumbs_up_1:


Report this post
Top
 Profile  
Reply with quote  
PostPosted: Tue Oct 07, 2014 2:55 am 
Offline
User avatar

Joined: Sun Mar 13, 2005 11:51 am
Posts: 2432
Location: Belgium
Been a while again. Not much has happened though. I've finally started tackling my other obstacle, the deck tank. Considering my mini-lathe is a metal lathe and not a wood lathe, I had to figure a different way than my initial dummy tank from wood.

Current effort was the very un-original build-up of styrene and milliput. Practically I cut a circle of a slightly oversized diameter (28mm). THen I put a cross of two frames with the correct curve on top. And then just fill up the remaining space with milliput. During that process I used an external shaper to push the milliput a bit to get a correct shape and to not end up with too much material on one side and too little on the other.
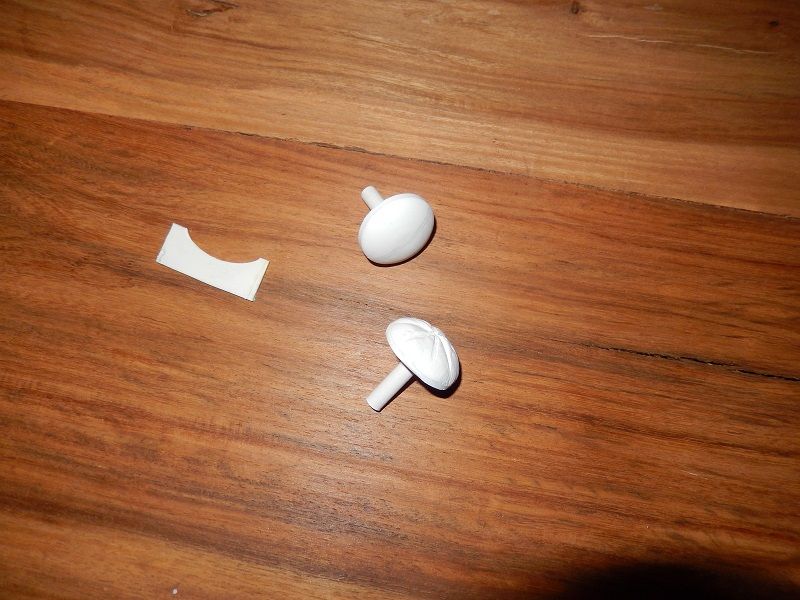
I also keyed in a 6mm styrene rod in the centre to centre it in the chuck of the lathe.
After this process I machined the milliput to shape and ended with some sanding. The result is acceptable, better than anything I'd achieve by hand. It was also a good exercise with the lathe for me, although I'm aware this is not a conventional way of doing this.

Next challenge is finding a tube of the correct diameter (27mm) to fit between the two caps. I was thinking of the wood one, but that would be difficult to seal and get a smooth surface.

Here you see the two mushrooms with the external shaper.
Image

Here you see the places on one of them where I pushed the external shaper on top to even out the material and get an idea of the real volume of the end-result.
Image

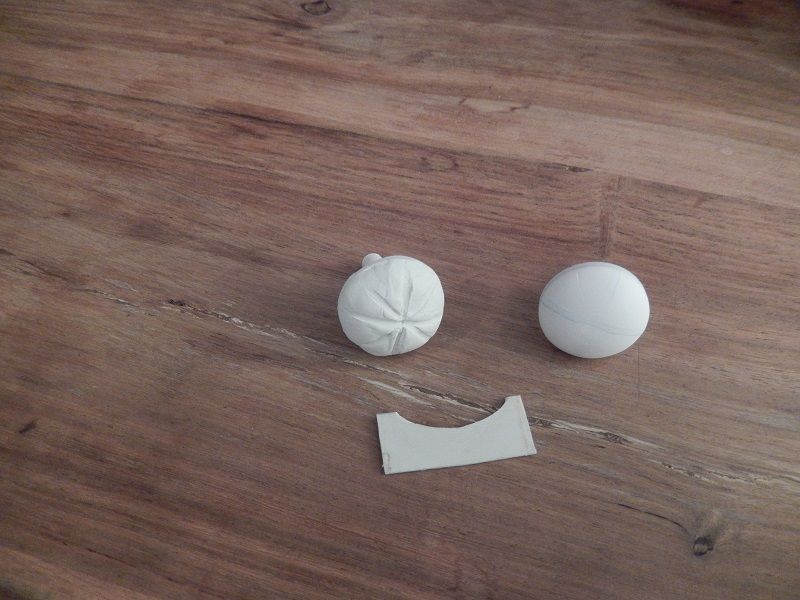
And the first "cap" checked against the external frame (in this case the frame is less perfect than the cap since it was cut by hand):
Image

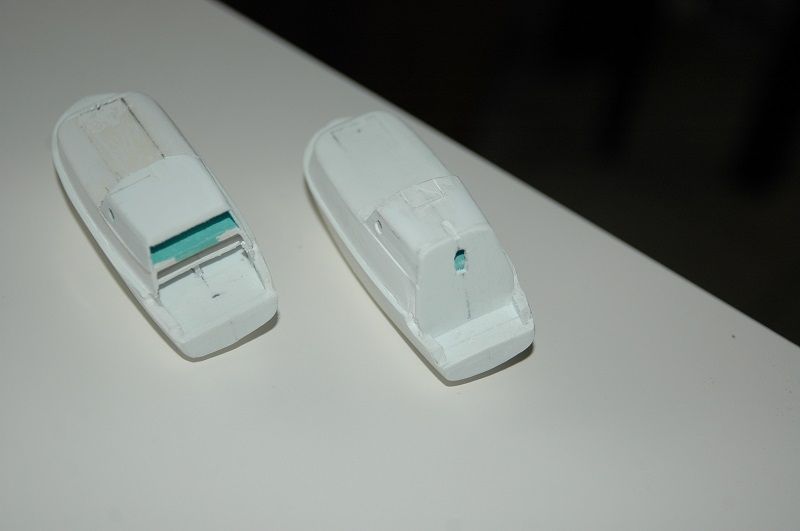
I've also continued a bit more on the forward part with supports and piping, a preparation to instal the grating over the piping.

_________________
The merchant shipyard


Report this post
Top
 Profile  
Reply with quote  
PostPosted: Tue Nov 18, 2014 7:13 am 
Offline
User avatar

Joined: Sun Mar 13, 2005 11:51 am
Posts: 2432
Location: Belgium
It's been a while again, but I haven't been sitting still.
I continued the way pictured before. I made the second cap for the deck tank. For the tank body I used a rather thick walled plastic scupper tube. I calculated the circumference of the tube by its (oversized) diameter, calculated the circumference of the real tank and then cut out the necessary distance from the tube. I then made 5 internal wooden pieces which I glued inside, forcing the tube together to get a tank body with just a slightly bigger-than-needed diameter. Afterwards I turned it slightly smaller on the lathe to match the diameter of the end caps.
I sort of forgot to take in-progress pictures. So here is the result, I'll just spray it with one more coat of white before final installation. The supports are already fixed on the deck.
Image

Image

And as mentioned before as well, I've continued with the forward part, nearing the completion of that part by now. The "pumps" with connections to the piping were finally installed. Lining them out proved to be difficult since it had to go over the already installed piping.
Furthermore some platforms and the final piping on the forward part were installed.
Image

Image

You can also see a paper jig to produce the required grating for the catwalk on top of the pipes. This catwalk is present on a lot of ships and allows to go forward in relative safety when in bad weather.
Image

On the forward piece is already some of the mesh I will use for this catwalk grating. It's made of Ikea splash shields for cooking pans. Quite cheap and very fine mesh. I chose this, because although it is tough to cut, it also has strength and I wanted some strength as it will be lined by styrene L-beams which by themselves aren't very strong/rigid.

_________________
The merchant shipyard


Report this post
Top
 Profile  
Reply with quote  
PostPosted: Tue Nov 18, 2014 7:54 am 
Offline

Joined: Fri Sep 25, 2009 6:28 am
Posts: 571
Location: Near Veenendaal, The Netherlands
Hi Neptune,

Great work there mate!!
Nicely detailed!!!

Greetings Josse

_________________
Making a complete new Well Enhancer, again scale 1:75.


Report this post
Top
 Profile  
Reply with quote  
PostPosted: Mon Feb 02, 2015 4:17 pm 
Offline
User avatar

Joined: Sun Mar 13, 2005 11:51 am
Posts: 2432
Location: Belgium
After a couple of months finally an update. Haven't been sitting still. Just a lot of detailing done and remaining to be done!

First of all I decided to finally finish tank dome 1, for that I had to make some valves which are also present on tank dome 2 and 3, so I made all of them. So soon I'll finish these tank domes as well. I also decided to order some parts from Dean's Marine. So I ordered a real pile of handwheels along with the railing etc. They are cast from white metal and slightly over sized, but in the end it would even be possible to have this size of wheel as well, so nothing that is not acceptable to me.

Image

Image

While parts were drying I also started further experiments with the tiny mesh for the gratings. The results is one grating for the drip tray on the manifold finished. This is also the way I will build the catwalk. The mesh itself is from an Ikea grease splash screen for cooking pans, they're cheap and very fine. Much cheaper than any PE gratings I found. They are also quite strong so their strength is keeping the styrene L-shapes around them straight. This is a property I was looking for to align the catwalk later on.

Image

And finally I also made all 13 actuators for the hydraulic valves on deck. First one was installed on tank dome 1, but the remaing ones will be on the other tank domes and on the manifolds. This will save some time later on as well. Each one consists of 9 parts and they are reinforced with brass pins to avoid them breaking or disappearing when the ship is on the water.

Image


Well that's it for now. Plugging on on all these details. Hope to finish this ship this year...

_________________
The merchant shipyard


Report this post
Top
 Profile  
Reply with quote  
PostPosted: Tue Feb 03, 2015 6:23 am 
Offline
User avatar

Joined: Tue Apr 17, 2007 9:18 am
Posts: 1993
Location: Brasil
very good attention to detail and very good construction :thumbs_up_1: :wave_1:


Report this post
Top
 Profile  
Reply with quote  
PostPosted: Tue Feb 03, 2015 9:24 am 
Offline
User avatar

Joined: Sat Jan 22, 2005 10:18 am
Posts: 4131
Location: Liverpool
Hi Roel really good to see the Chaconia developing . All that deck pipe work makes for a super model . Oil and LPG carriers are frequent visitors to the Mersey and Manchester ship canal . We see these close hand every time we attend our bi-monthly model build group meetings at the Boat Museum which in next to the canal . After completing HMS Daring I'm well on with a 1905 scout cruiser all good fun and a change from modern designs .
Dave Wooley :thumbs_up_1: :thumbs_up_1: :thumbs_up_1: :wave_1:


Report this post
Top
 Profile  
Reply with quote  
PostPosted: Wed Feb 18, 2015 2:25 pm 
Offline
User avatar

Joined: Sun Mar 13, 2005 11:51 am
Posts: 2432
Location: Belgium
Hi all,

changed my tactics more or less. The forward-to-aft approach isn't working very well as you get stuck all the time in producing many parts for future steps and get stuck on interference from parts that are more aft that need to be finished first.
So this holiday I just sort of focused on getting stuff finished. I'm sort of randomly building things in order to make at least some progress! Shifting from more delicate parts to larger parts and back.

First I made the boosterpumps. The main electric motor drive is covered in green canvas as they normally are. I first shaped the styrene dummy in the general shape of the motor and afterwards covered it in aluminium foil. Then I painted it green to resemble the canvas.

Attachment:
C10.jpg
C10.jpg [ 180.26 KiB | Viewed 580 times ]


Then I tested/made some more walkways that are made of gratings, first around the deck house:
Attachment:
C11.jpg
C11.jpg [ 226.07 KiB | Viewed 580 times ]

Attachment:
C12.jpg
C12.jpg [ 170.41 KiB | Viewed 580 times ]


And then on the lifeboat station. This was one of the hick-ups on the lifeboat stations.
Attachment:
C13.jpg
C13.jpg [ 164.52 KiB | Viewed 580 times ]


Most of what you see is however dry-fit. The lifeboat stations supports are glued, but the walkway itself isn't glued yet. On the deck house walkways the supports are still missing as well, I drilled out the places and produced the supports a long while back, so I just put some in place temporarily to see if everything looked correct up till now.

I also finished the navigation lights on the accomodation, but forgot to take a picture, quite a structure just to mount two lights...

_________________
The merchant shipyard


Last edited by Neptune on Mon Mar 06, 2023 11:07 am, edited 1 time in total.

Report this post
Top
 Profile  
Reply with quote  
PostPosted: Wed Feb 25, 2015 5:43 am 
Offline
User avatar

Joined: Sun Mar 13, 2005 11:51 am
Posts: 2432
Location: Belgium
And some more progress.

First a diagram. This is the kind of drawings I made a while back, while I was away from home. It made/makes building a lot easier and quicker once you get to the table. The top is the piping diagram, more or less in scale. The bottom part is the structure for the lifeboat gratings. As you can see they are drawn on scale with the measurements written next to them. They are made by combination of drawings and pictures, so that I don't have to go look at pictures all the time during construction. It saves a lot of time. You can also double check the model structure with the drawing to see if it's all correct before installing it.

Attachment:
C5.jpg
C5.jpg [ 281.95 KiB | Viewed 586 times ]


I also went to a model fair and drafted me a crew! In the end I had little other options than to buy the Preiser 1/100 scale figure set. 190 figures, most of which are only usuable for architecture, but I've noticed quite a few of them can be used for ships as well, there is even a Captain figure (3 of them). With some minor adaptations I think they'll be ok. The remaining ones I can maybe use on other projects as passengers or something.

Attachment:
C6.jpg
C6.jpg [ 262.42 KiB | Viewed 586 times ]


Then the ship itself. Here are the navigation light structures.
Attachment:
C7.jpg
C7.jpg [ 237.99 KiB | Viewed 586 times ]


And the starboard lifeboat access support structure is finished, only needs painting and railing.

Attachment:
C9.jpg
C9.jpg [ 215.82 KiB | Viewed 586 times ]

Attachment:
C8.jpg
C8.jpg [ 238.74 KiB | Viewed 586 times ]

_________________
The merchant shipyard


Last edited by Neptune on Fri Feb 24, 2023 9:49 am, edited 3 times in total.

Report this post
Top
 Profile  
Reply with quote  
PostPosted: Mon May 25, 2015 6:15 am 
Offline

Joined: Mon May 25, 2015 5:58 am
Posts: 1
Location: Turkey
Dear Neptune,

I want to contact to you. We are the new owner and operator of LPG/C Gent, Hedda, Chaconia. We would like to buy both 3 vessels model for our new office and exhibit them in our office.

Melih ICOZ
Opr. Mng.
TGM DENIZ ISLETMECILIGI VE ACENTELIGI LTD.STI.
Bayar Caddesi, Gulbahar sokak, No: 17, Kozyatagi Perdemsac Plaza No: 106,107,108,109 Kadikoy-Istanbul TURKIYE
Tel: +90 (216) 380 44 33
Mob: +90 (549) 773 33 17
e-mail: operation@gasmaster.eu


Report this post
Top
 Profile  
Reply with quote  
PostPosted: Tue May 26, 2015 3:46 pm 
Offline
User avatar

Joined: Tue Apr 17, 2007 9:18 am
Posts: 1993
Location: Brasil
kptmelih wrote:
Dear Neptune,

I want to contact to you. We are the new owner and operator of LPG/C Gent, Hedda, Chaconia. We would like to buy both 3 vessels model for our new office and exhibit them in our office.

Melih ICOZ
Opr. Mng.
TGM DENIZ ISLETMECILIGI VE ACENTELIGI LTD.STI.
Bayar Caddesi, Gulbahar sokak, No: 17, Kozyatagi Perdemsac Plaza No: 106,107,108,109 Kadikoy-Istanbul TURKIYE
Tel: +90 (216) 380 44 33
Mob: +90 (549) 773 33 17
e-mail: operation@gasmaster.eu


Hi Roel great goal :woo_hoo:


Report this post
Top
 Profile  
Reply with quote  
Display posts from previous:  Sort by  
Post new topic Reply to topic  [ 301 posts ]  Go to page Previous  1 ... 11, 12, 13, 14, 15, 16  Next

All times are UTC - 6 hours [ DST ]


Who is online

Users browsing this forum: No registered users and 10 guests


You can post new topics in this forum
You can reply to topics in this forum
You cannot edit your posts in this forum
You cannot delete your posts in this forum
You cannot post attachments in this forum

Jump to:  
Powered by phpBB® Forum Software © phpBB Group