The Ship Model Forum

The Ship Modelers Source
It is currently Mon Sep 16, 2024 5:52 am

All times are UTC - 6 hours [ DST ]


Post new topic Reply to topic  [ 261 posts ]  Go to page Previous  1 ... 3, 4, 5, 6, 7, 8, 9 ... 14  Next
Author Message
PostPosted: Wed Aug 24, 2016 5:58 am 
Offline
User avatar

Joined: Thu Dec 10, 2015 10:36 pm
Posts: 140
Location: Bangkok, Thailand
Brett M wrote:

Hey Aur

Camera......well, I'm using my Samsung S6 for all these shots so far :). I have a Nikon D7000, which I'll eventually use as I get the hull assembled.

Thanks for the tip on the screws, I'll make sure to keep track of them. I might look for actually brass screws, if I get carried away as well!

Hi Brett,
These new phones make really nice photos. Looking forward to your hull photos, too.

I don't recall seeing any brass screws for the Iowas in 1/350th scale, except the North Carolina screws by G Factor. I've got a set of it a while ago, and it's seriously not worth the price. Not sure how they suit for NC, but they're extremely undersized, with incorrect blade shapes and funny twisting. The blades aren't lined up either. I guess they're outdated, as newer G Factor screws are OK.

You may have to stick with the Tamiya ones, which are not very good either (not enough twisting/pitch, wrong blade shape), but certainly better than G Factor's. Or, alternatively, you may have to 3D print them.

Anyway you are making good progress on the magnificent Veteran Models parts! :thumbs_up_1:

Regards,
Aur

_________________
On the way:
1/350 Tamiya DKM Tirpitz Nov 1944

1/350 scratch-build HMS Lion never built battleship (1938)

Completed build:
1/350 AFV Club Japanese Submarine I-58

And our artworks!


Report this post
Top
 Profile  
Reply with quote  
PostPosted: Wed Aug 24, 2016 9:53 am 
Offline
User avatar

Joined: Thu Dec 23, 2010 5:00 pm
Posts: 297
Location: Salt Lake City, Utah
Aur wrote:
Brett M wrote:

Hey Aur

Camera......well, I'm using my Samsung S6 for all these shots so far :). I have a Nikon D7000, which I'll eventually use as I get the hull assembled.

Thanks for the tip on the screws, I'll make sure to keep track of them. I might look for actually brass screws, if I get carried away as well!

Hi Brett,
These new phones make really nice photos. Looking forward to your hull photos, too.

I don't recall seeing any brass screws for the Iowas in 1/350th scale, except the North Carolina screws by G Factor. I've got a set of it a while ago, and it's seriously not worth the price. Not sure how they suit for NC, but they're extremely undersized, with incorrect blade shapes and funny twisting. The blades aren't lined up either. I guess they're outdated, as newer G Factor screws are OK.

You may have to stick with the Tamiya ones, which are not very good either (not enough twisting/pitch, wrong blade shape), but certainly better than G Factor's. Or, alternatively, you may have to 3D print them.

Anyway you are making good progress on the magnificent Veteran Models parts! :thumbs_up_1:

Regards,
Aur


Thanks Aur. I think once I'm done with the ECM antennas, I need to box up the super structure and move on to the hull. I've taken too much time here! :)

I appreciate the tips on the screws, definitely will have to keep my options open and see what I can find.

Onward to the next part of the build!

_________________
Brett Matthews


Report this post
Top
 Profile  
Reply with quote  
PostPosted: Mon Aug 29, 2016 8:28 am 
Offline
User avatar

Joined: Thu Dec 23, 2010 5:00 pm
Posts: 297
Location: Salt Lake City, Utah
Last updates for the main superstructure I've been working on. I'll add the antenna when I'm closer to the end of the build. ECM replaced with the Veteran Models parts, which also came with the SRBOC launchers....haven't decided if I want to do those too.

Anyway, here you go. Please please please let me know if you see something I can change/correct/remove. I have plenty of time and you guys all have the knowledge!

Image

Image

New ECM antenna, with a bent railing....guess I'll straighten that!

Image

And I began on the hull, first by drilling 1/4" holes and then using 5 minute epoxy to secure washers. I'll add the nuts this evening and secure them as well. Then to remove the GIANT seam down the length of the hull. Come on Tamiya....that one is bad!

Image

Thanks for looking!

_________________
Brett Matthews


Report this post
Top
 Profile  
Reply with quote  
PostPosted: Mon Aug 29, 2016 9:31 am 
Offline

Joined: Tue Dec 08, 2015 10:37 am
Posts: 283
Location: Prague, Czech Republic
How? How is it even possible to create something beautiful like THIS? :shock:
What a beauty!

_________________
- David
------------
Almost completed: BB-44 ('45), BB-56 ('42), BB-59 ('44)
Just building:


Report this post
Top
 Profile  
Reply with quote  
PostPosted: Sun Sep 04, 2016 5:02 pm 
Offline
User avatar

Joined: Thu Dec 23, 2010 5:00 pm
Posts: 297
Location: Salt Lake City, Utah
Managing a little bit of work on the New Jersey over the holiday weekend. Rudder and shafts in place at the rear. Removed the huge seam along the center of the hull, front to rear. Mounted the model to it's base so I'll have a nice solid place to work on it. I've glued the rear decking in place and will glue the center and front deck in next. I think after that, I'll paint the hull (hull red, boot stripe and haze grey) and then begin on the deck.

How she sits currently....

Image
Larger version if you want to look
https://c5.staticflickr.com/9/8276/2887 ... f918_h.jpg

Image

Image

Slightly bigger than my work area.....oops.

Image

Have a good weekend everyone!

_________________
Brett Matthews


Last edited by Brett M on Tue Sep 06, 2016 10:20 am, edited 2 times in total.

Report this post
Top
 Profile  
Reply with quote  
PostPosted: Sun Sep 04, 2016 5:21 pm 
Offline
User avatar

Joined: Thu Mar 31, 2016 1:52 pm
Posts: 502
Location: Inverness
Awesome work, :eyes_spinning: 
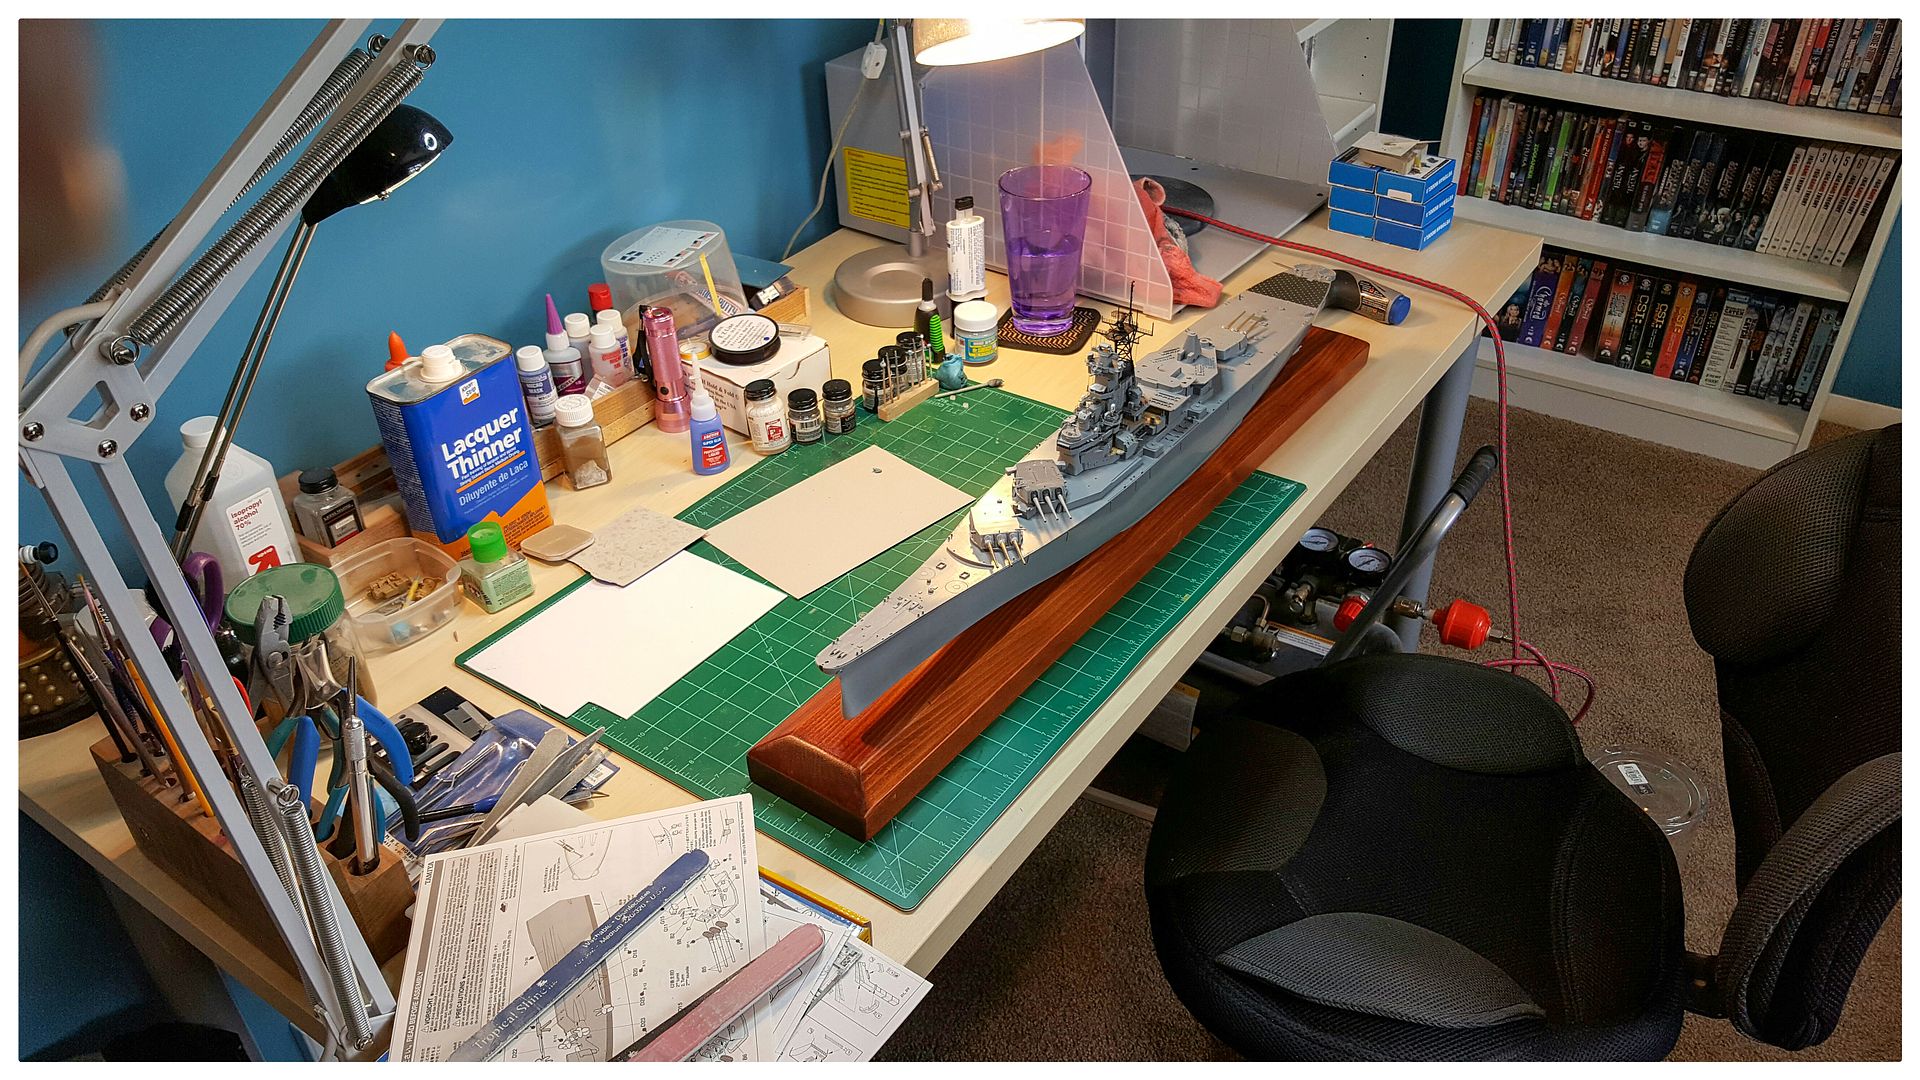
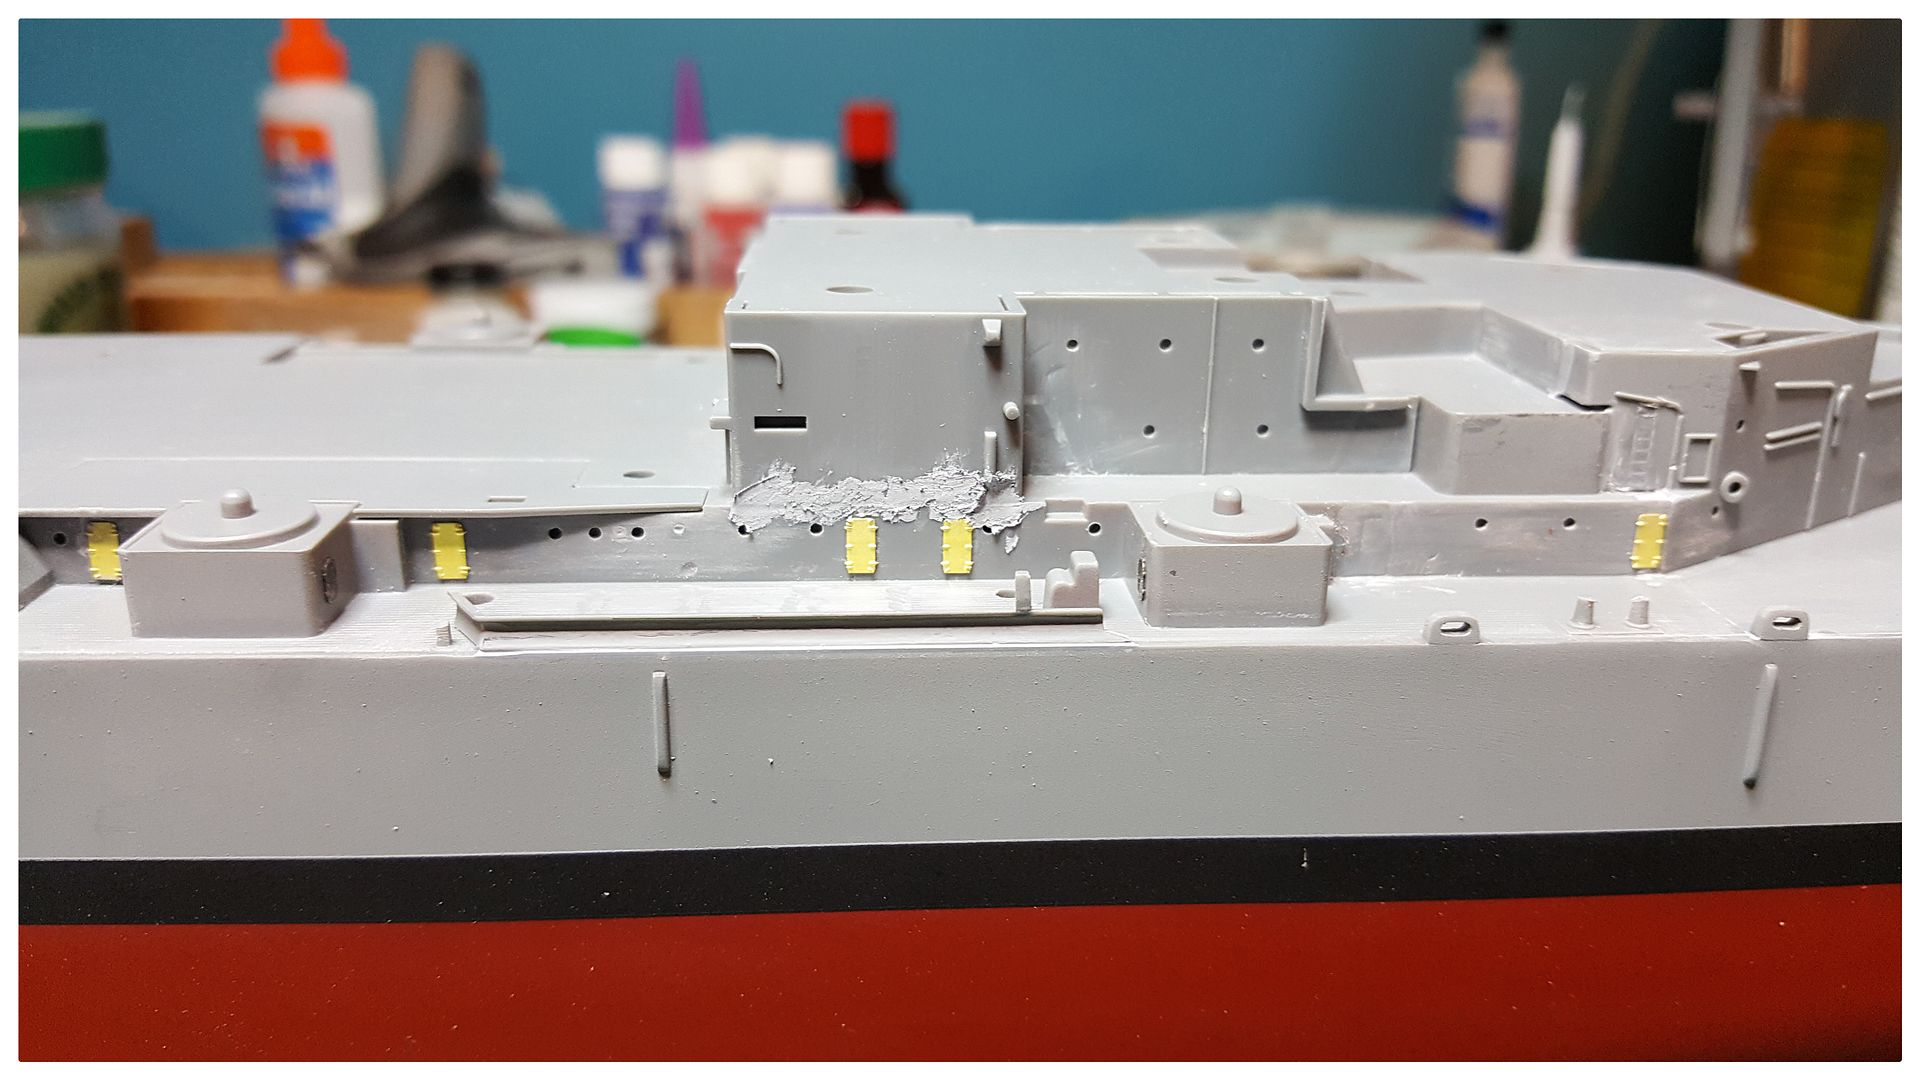
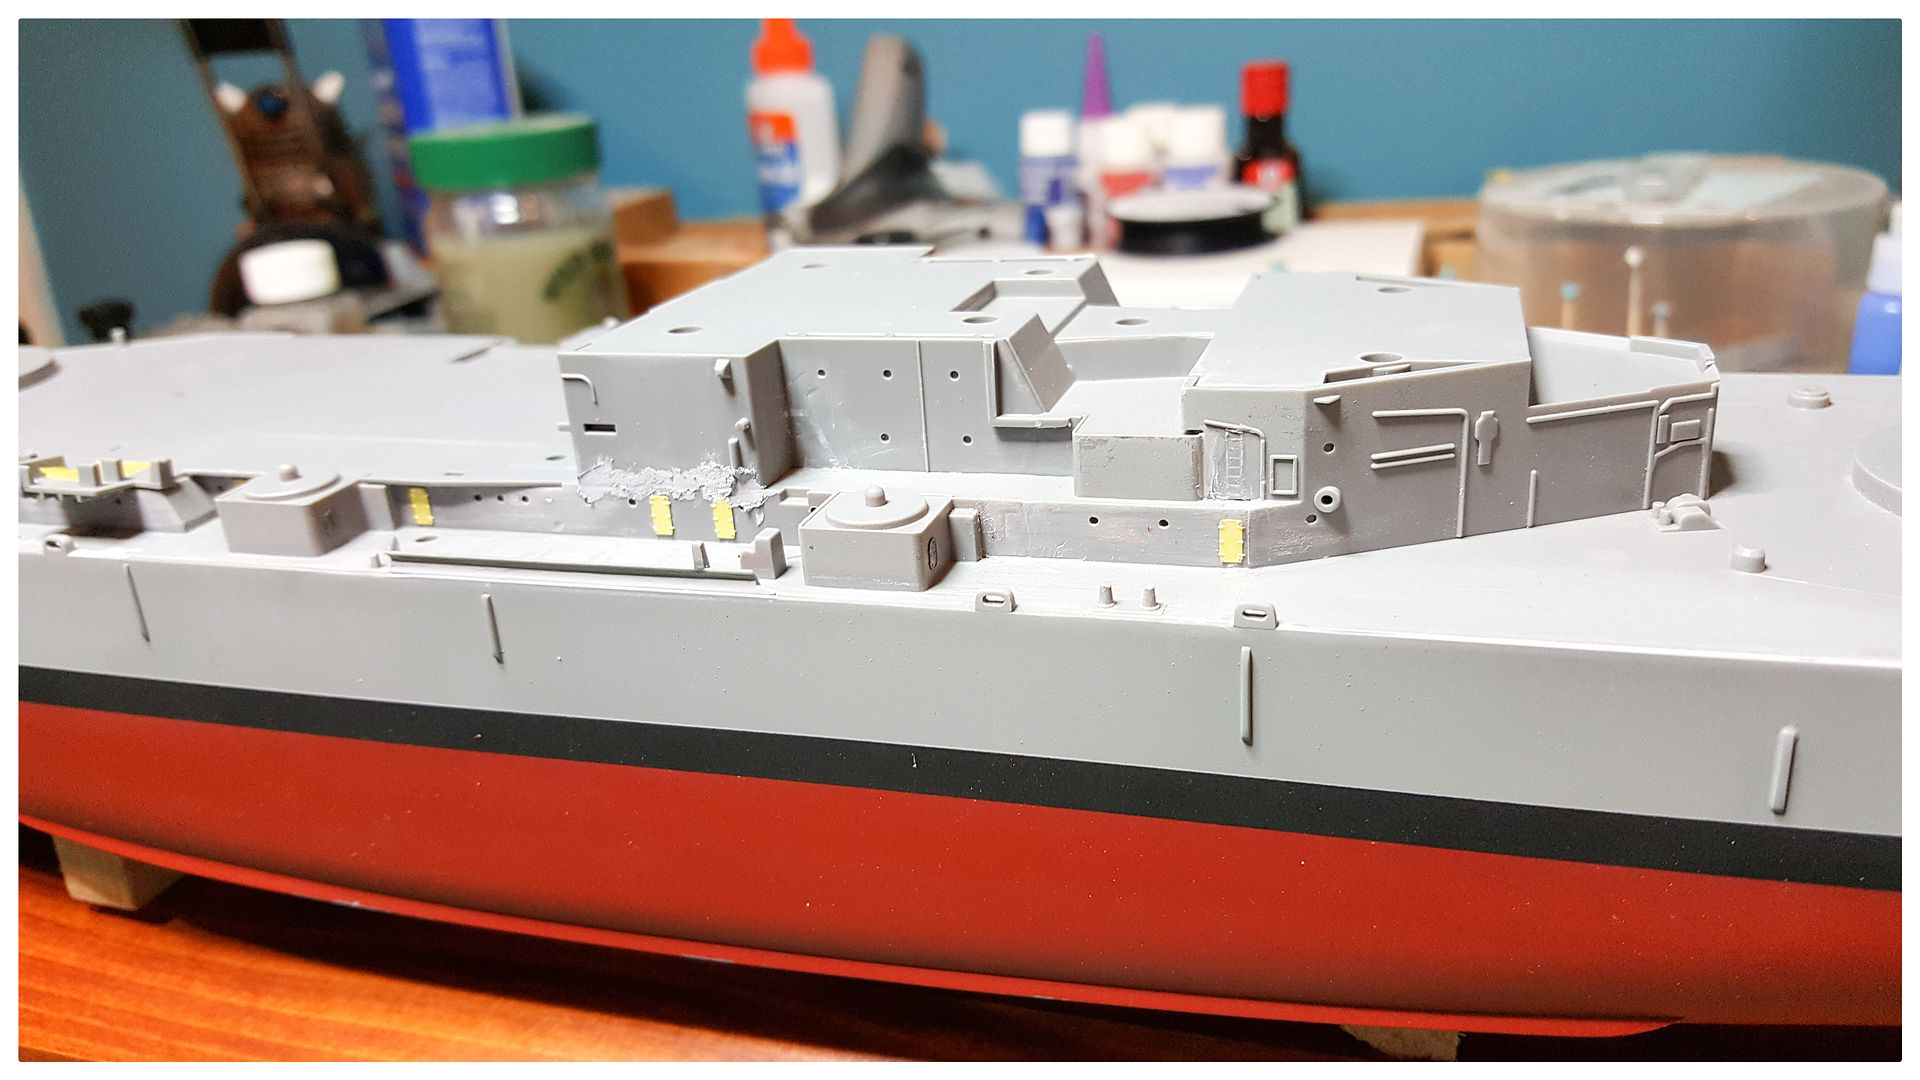
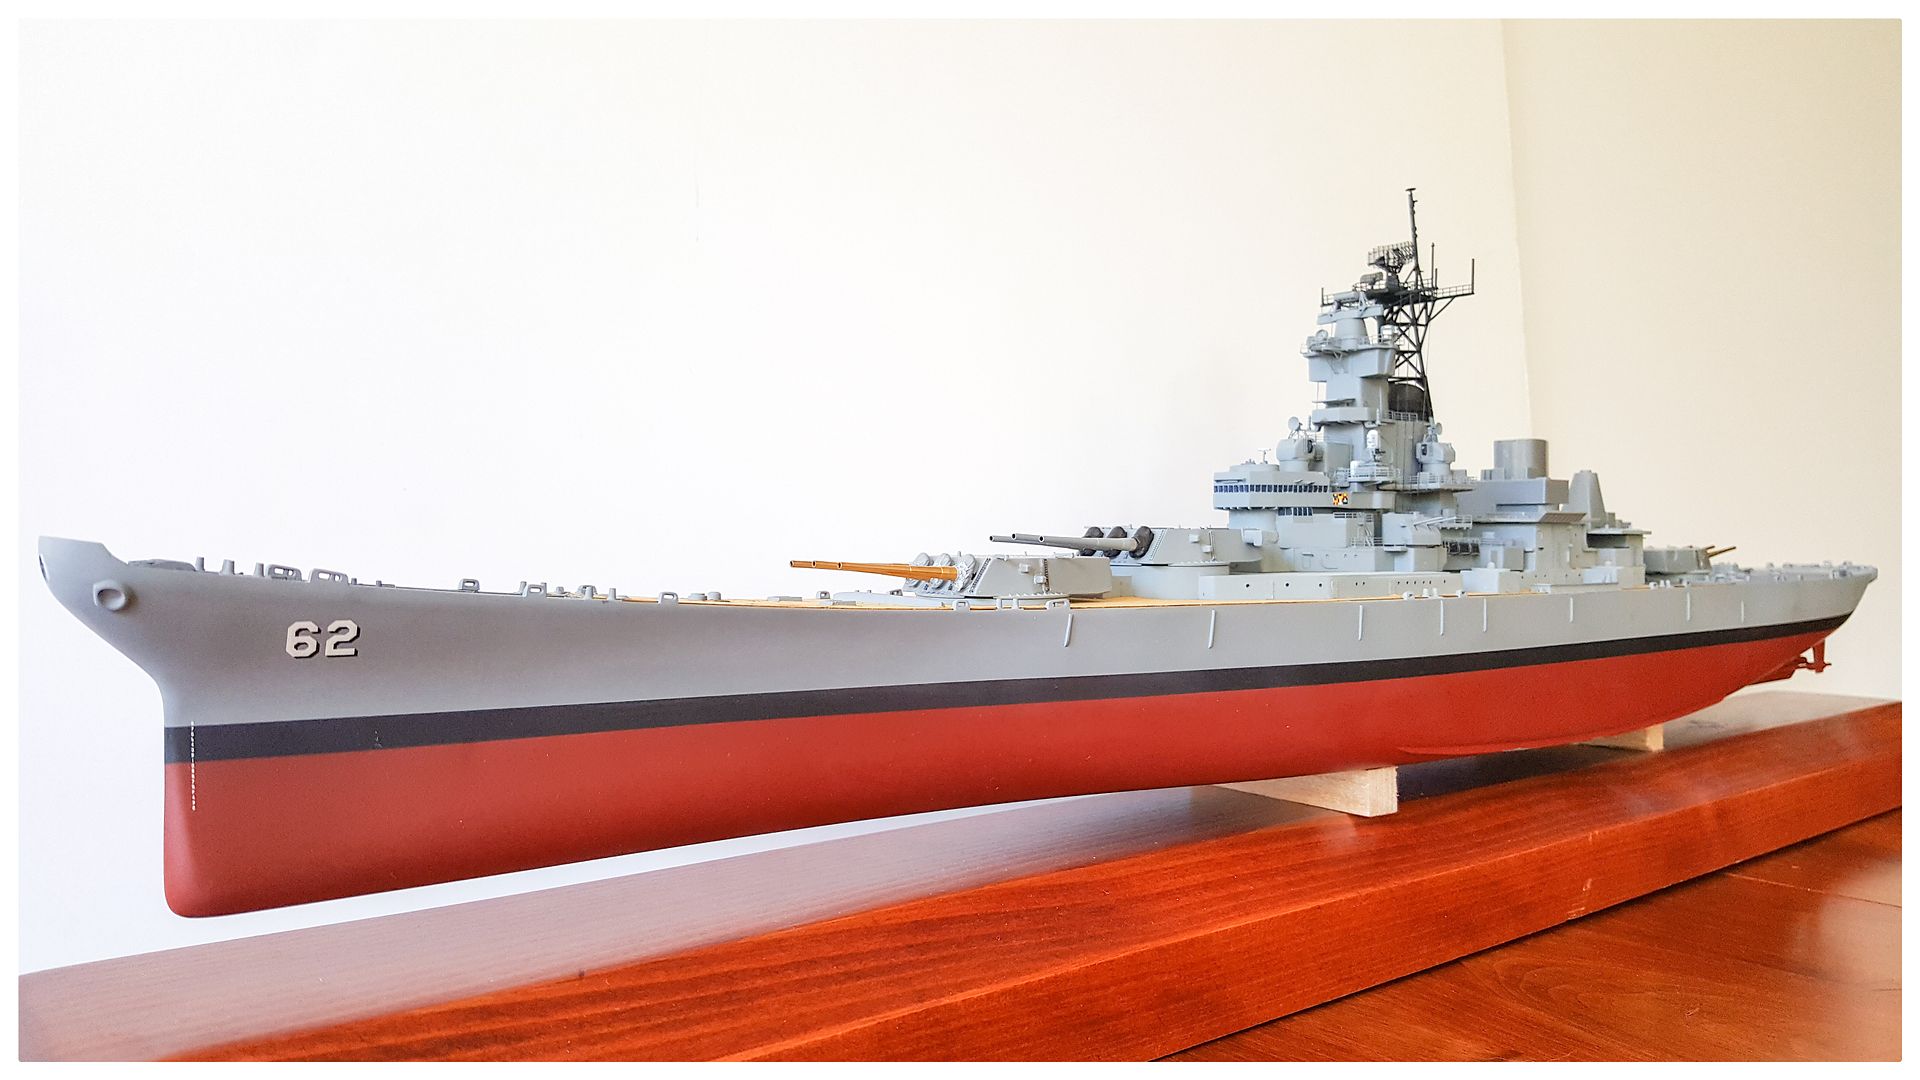
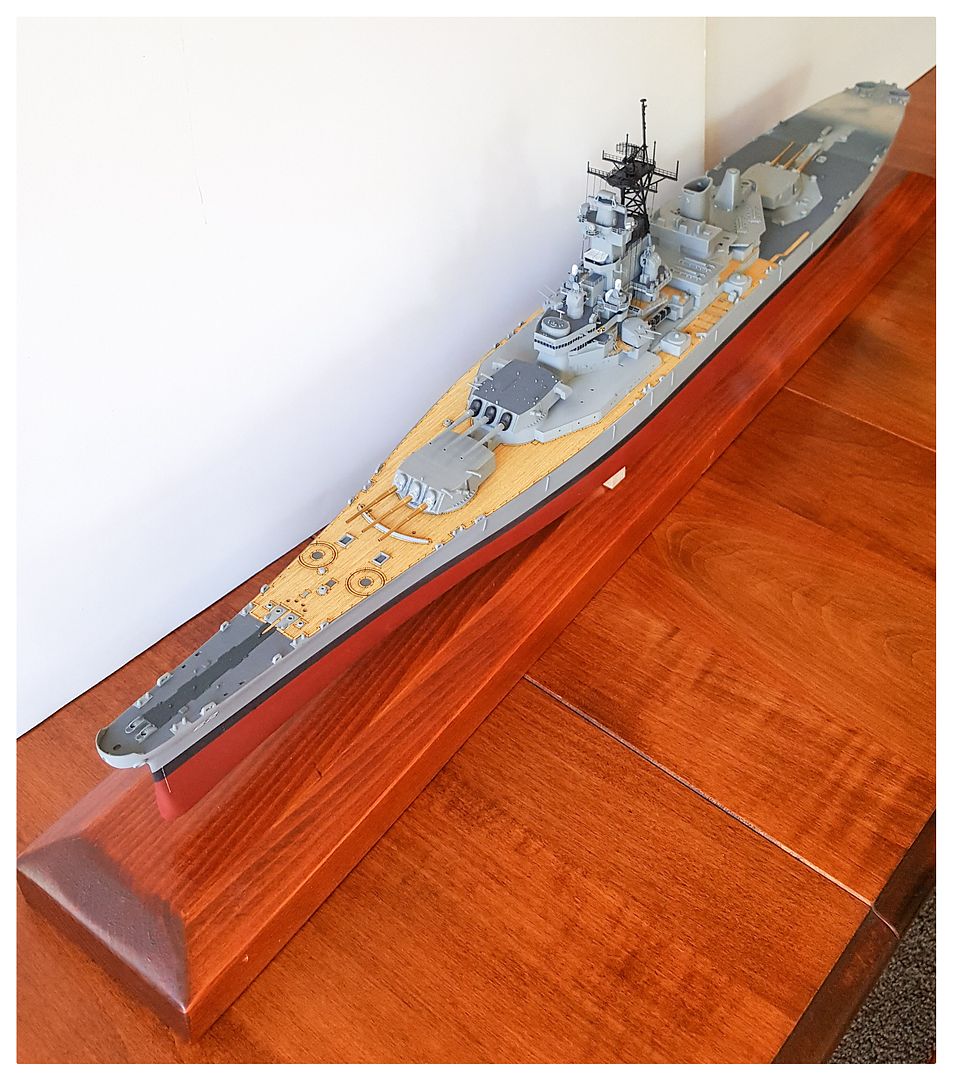
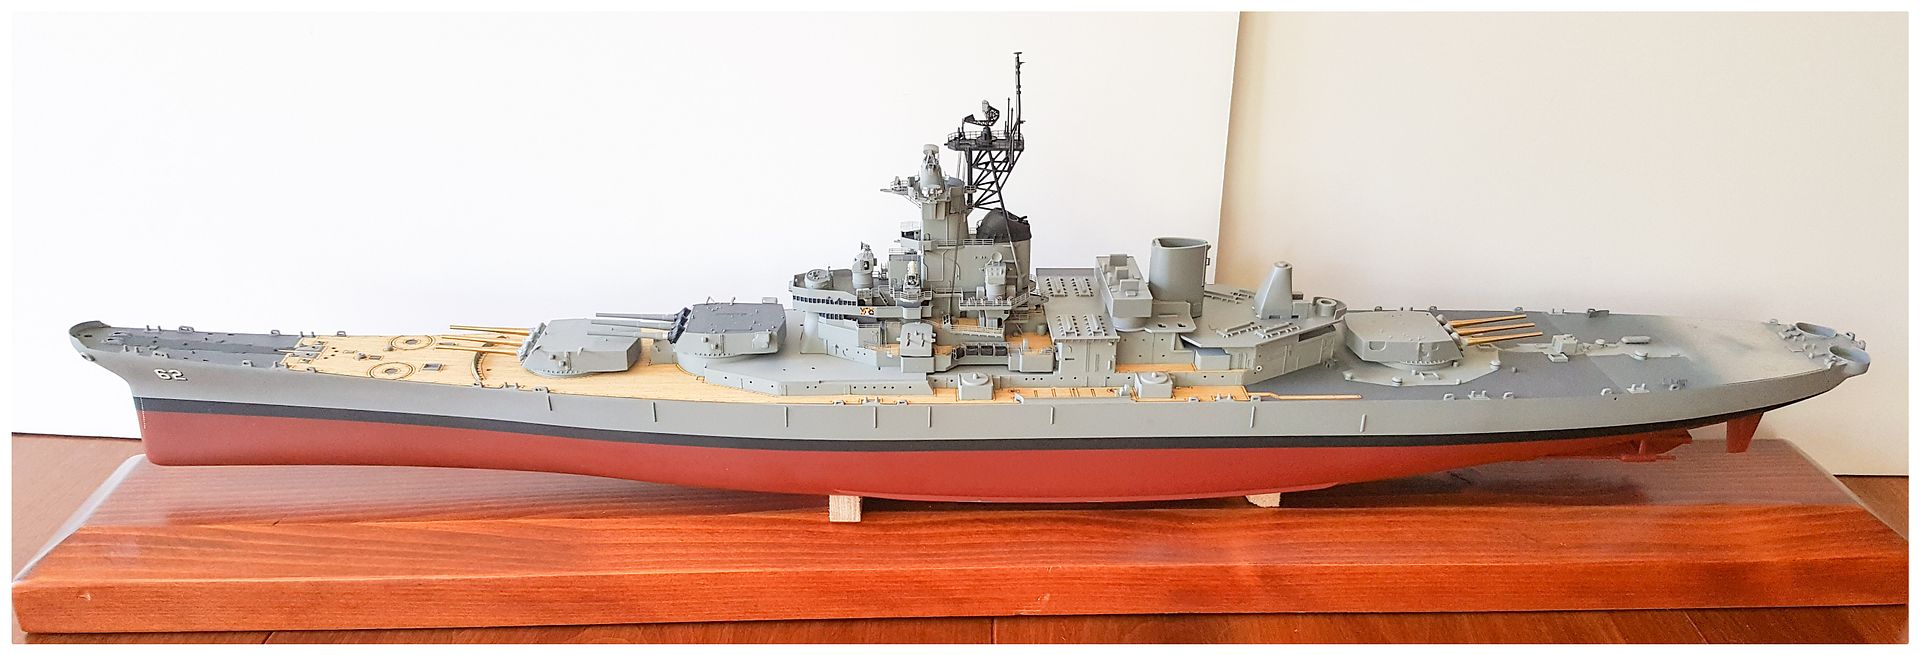
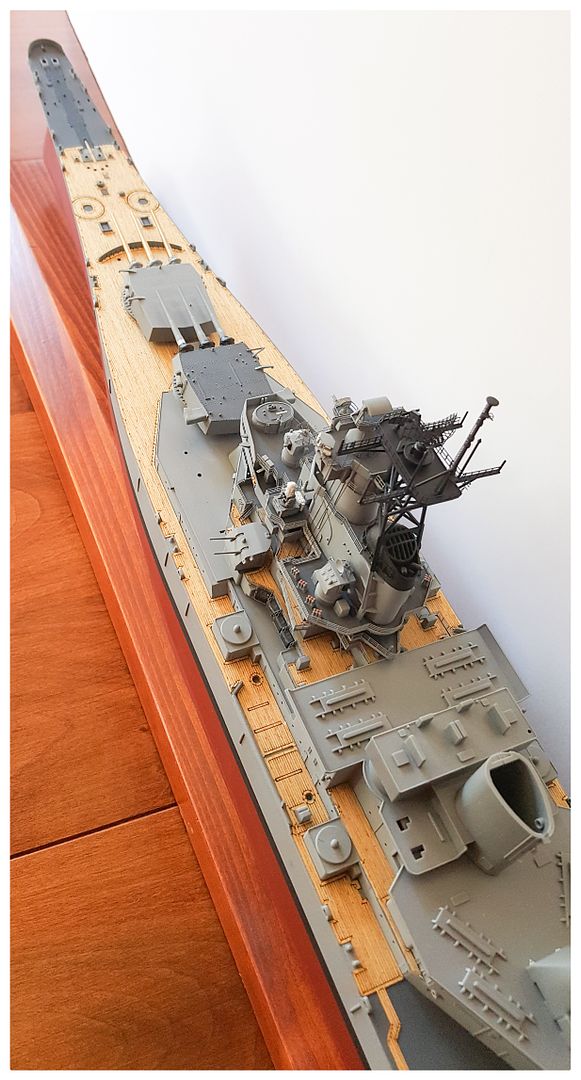
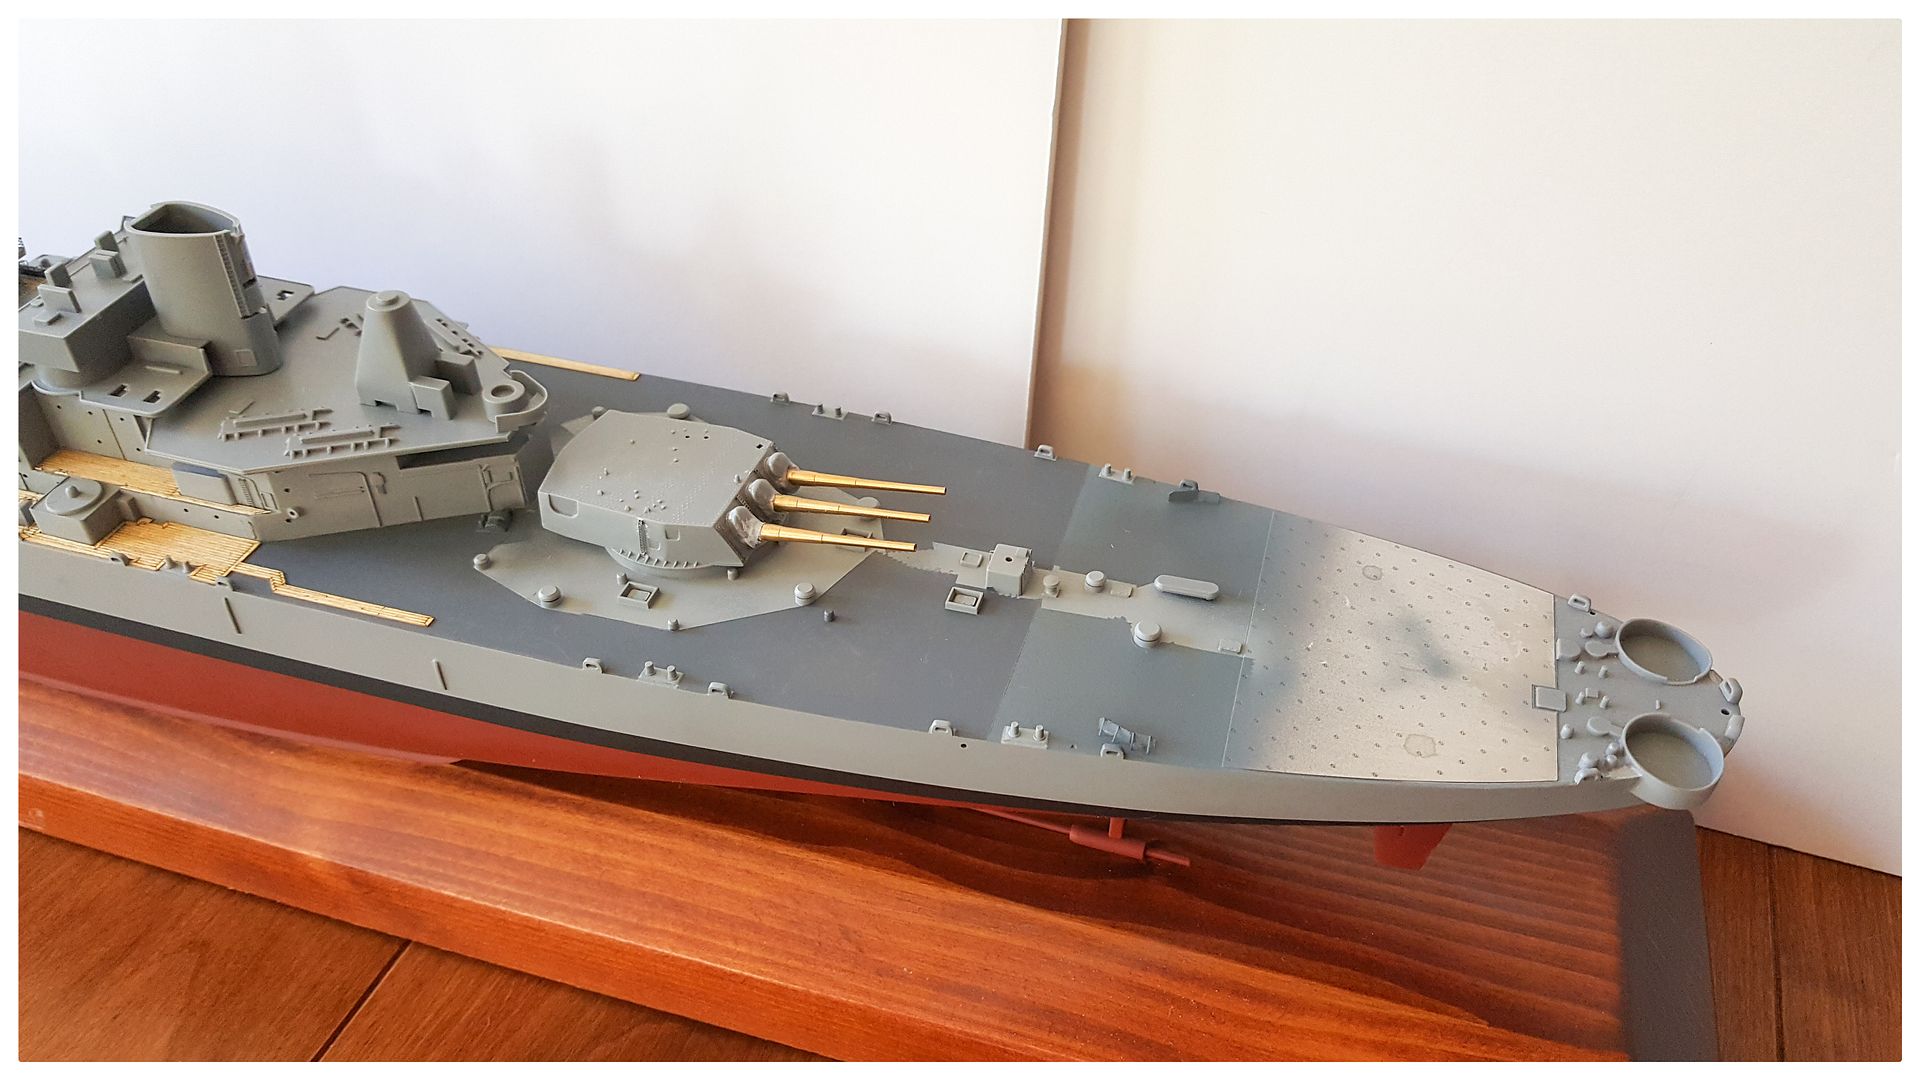
so neat and tidy. I wish!!!

Cheers, Jabb

_________________
HMS Hood, the big one!

I used to be indecisive, now I'm not so sure.


Report this post
Top
 Profile  
Reply with quote  
PostPosted: Tue Sep 13, 2016 9:28 pm 
Offline
User avatar

Joined: Thu Dec 23, 2010 5:00 pm
Posts: 297
Location: Salt Lake City, Utah
So, not even close to how I meant to paint the hull, but when the air brush blows up, you find solutions.....in a can of Tamiya Hull Red!

So, overspray everywhere, but not thick. Fine sanding paper smoothed it right out and I followed up this evening by masking and painting the boot stripe. Give it a day or two to cure and then I'll start on the haze grey upper hull.

Sorry for picture quality, but it's overcast, rainy and DARK out so not much light even in my hobby room.

Image

Full size
https://c1.staticflickr.com/9/8198/2955 ... e166_o.jpg

Comments are always welcome

_________________
Brett Matthews


Report this post
Top
 Profile  
Reply with quote  
PostPosted: Tue Sep 13, 2016 10:18 pm 
Offline
User avatar

Joined: Sun Mar 18, 2012 7:31 pm
Posts: 1287
Location: Macclesfield NC
Brett,
Looking really good there, I have this same kit in my stash and I'll be following your build closely. :thumbs_up_1: :thumbs_up_1:

_________________
Jim Varnell
ABH2 USN/RET.
89-00

Eastern NC Modelworks

Up coming projects:
1/700 scale rebuild of diorama project 960 square feet.
(Table 1 underway)Feb.2017
1/350 USS ALASKA CB-1(started Aug. 2017) 70% completed


Report this post
Top
 Profile  
Reply with quote  
PostPosted: Wed Sep 14, 2016 7:58 am 
Offline
User avatar

Joined: Thu Dec 23, 2010 5:00 pm
Posts: 297
Location: Salt Lake City, Utah
JimVarnellABH2USN wrote:
Brett,
Looking really good there, I have this same kit in my stash and I'll be following your build closely. :thumbs_up_1: :thumbs_up_1:


Thanks Jim, I appreciate it!

I've also been adding the rope tie offs (the proper name escapes me) to the deck. I'd read in another thread that Tamiya placed them inboard when they should be flush with the outside edge of the hull. Hopefully I won't have much of a gap to fill between the Pontos wood deck when done.

Image

_________________
Brett Matthews


Report this post
Top
 Profile  
Reply with quote  
PostPosted: Sat Sep 17, 2016 3:30 pm 
Offline
User avatar

Joined: Thu Dec 23, 2010 5:00 pm
Posts: 297
Location: Salt Lake City, Utah
A few in progress shots. Port side hull is painted, and doesn't look too bad. Airbrush malfunction shot a huge blob of acrylic paint all over the stern. Thankfully that cleaned up with no issues. I've begun adding the doors and portholes that are missing (and Eduard didn't include doors, so extras from GMM). Lot's more to do. Quite a few portholes still to drill. I've been working on the bow as well, please let me know if you think the dark area where the anchor chains will be is dark enough....I'm not sold yet.

It's definitely nice to see it finally looking like a battleship. Makes me want to work more and more on it and get it done.

Comments are welcome, critiques, tips, etc. etc. etc..

Image
Larger version
https://c1.staticflickr.com/9/8366/2963 ... 1457_k.jpg

Image

Image

Thanks everyone for following

_________________
Brett Matthews


Report this post
Top
 Profile  
Reply with quote  
PostPosted: Sat Sep 17, 2016 5:13 pm 
Offline

Joined: Wed Jun 22, 2016 9:23 pm
Posts: 122
Brett M wrote:
A few in progress shots. Port side hull is painted, and doesn't look too bad. Airbrush malfunction shot a huge blob of acrylic paint all over the stern. Thankfully that cleaned up with no issues. I've begun adding the doors and portholes that are missing (and Eduard didn't include doors, so extras from GMM). Lot's more to do. Quite a few portholes still to drill. I've been working on the bow as well, please let me know if you think the dark area where the anchor chains will be is dark enough....I'm not sold yet.

It's definitely nice to see it finally looking like a battleship. Makes me want to work more and more on it and get it done.

Comments are welcome, critiques, tips, etc. etc. etc..

Image
Larger version
https://c1.staticflickr.com/9/8366/2963 ... 1457_k.jpg

Image

Image

Thanks everyone for following


She is looking Smart Brett, in reply to the anchor question - did you mean the plates where they ran on the forward deck? I painted mine on my Warspite Build AP507A Dark Grey as that was the RN colour call fot them, yours looks right to my eyes.

Regards

1944 :smallsmile:


Report this post
Top
 Profile  
Reply with quote  
PostPosted: Sat Sep 17, 2016 5:36 pm 
Offline
User avatar

Joined: Thu Mar 31, 2016 1:52 pm
Posts: 502
Location: Inverness
Really nice, clean, tidy build.

Cheers, Jabb

_________________
HMS Hood, the big one!

I used to be indecisive, now I'm not so sure.


Report this post
Top
 Profile  
Reply with quote  
PostPosted: Sat Sep 17, 2016 9:10 pm 
Offline
User avatar

Joined: Thu Jul 02, 2015 1:06 am
Posts: 972
Location: Bangkok, Thailand
As David said, the build is really crisp and clean. Great job! Look forward to more updates! :thumbs_up_1: :thumbs_up_1: :woo_hoo:

Aop

_________________
On the way:
--1/350 Tamiya DKM Tirpitz Nov 1944

--1/350 scratch-build HMS Lion never built battleship (1938)

And our artworks!


Report this post
Top
 Profile  
Reply with quote  
PostPosted: Sun Sep 18, 2016 4:27 pm 
Offline
User avatar

Joined: Thu Dec 23, 2010 5:00 pm
Posts: 297
Location: Salt Lake City, Utah
1944WarspiteMan wrote:
She is looking Smart Brett, in reply to the anchor question - did you mean the plates where they ran on the forward deck? I painted mine on my Warspite Build AP507A Dark Grey as that was the RN colour call fot them, yours looks right to my eyes.

Regards

1944 :smallsmile:


Thanks! Yep, those were the plates I was referring to. Glad they look the part.

_________________
Brett Matthews


Report this post
Top
 Profile  
Reply with quote  
PostPosted: Sun Sep 18, 2016 4:28 pm 
Offline
User avatar

Joined: Thu Dec 23, 2010 5:00 pm
Posts: 297
Location: Salt Lake City, Utah
Thanks Jabb and Aop, I appreciate it! :wave_1:

_________________
Brett Matthews


Report this post
Top
 Profile  
Reply with quote  
PostPosted: Wed Sep 21, 2016 8:19 am 
Offline
User avatar

Joined: Thu Dec 23, 2010 5:00 pm
Posts: 297
Location: Salt Lake City, Utah
Portholes, water tight doors and more portholes. That's been my primary work so far this week. I've also begun assembling/gluing the after superstructure to the model so that I can have everything ready for a coat of haze grey....then decking! I also got ahead of myself and added the dry transfer registry number to the bow Of course, now that I look at it, I swear it's too high. Thoughts?

Thanks for any comments, help, tips, etc. Oh and don't mind my ugly putty job. I'm probably popping those two doors off while I smooth the seam.

PS, not sure what the camera did, but some of the images appear slightly distorted based on how wiggly the boot stripe looks....weird!

Too high?
Image

Image

Image

Very ugly, I know. The starboard side is much cleaner, go figure.
Image

Image

_________________
Brett Matthews


Report this post
Top
 Profile  
Reply with quote  
PostPosted: Wed Sep 21, 2016 11:13 am 
Offline

Joined: Tue Nov 22, 2011 4:04 pm
Posts: 107
Location: New Jersey
Really looking very nice


Report this post
Top
 Profile  
Reply with quote  
PostPosted: Wed Sep 21, 2016 11:59 am 
Offline

Joined: Wed Jun 22, 2016 9:23 pm
Posts: 122
She is looking Great - the paintwork really makes her stand out.


1944 :smallsmile:


Report this post
Top
 Profile  
Reply with quote  
PostPosted: Thu Sep 22, 2016 3:24 am 
Offline
User avatar

Joined: Thu Dec 10, 2015 10:36 pm
Posts: 140
Location: Bangkok, Thailand
Great progress with the hull there, Brett! :thumbs_up_1: Very beautiful paint work, too. Too bad Tamiya couldn't make a nicer bow...the first shot clearly shows! Anyway she still looks great. Keep more coming. :thumbs_up_1:

Cheers,
Aur

_________________
On the way:
1/350 Tamiya DKM Tirpitz Nov 1944

1/350 scratch-build HMS Lion never built battleship (1938)

Completed build:
1/350 AFV Club Japanese Submarine I-58

And our artworks!


Report this post
Top
 Profile  
Reply with quote  
PostPosted: Sun Sep 25, 2016 4:11 pm 
Offline
User avatar

Joined: Thu Dec 23, 2010 5:00 pm
Posts: 297
Location: Salt Lake City, Utah
Hi all

Weekend updates, lots of progress so far. I attached everything I needed to to get the main "structure" sprayed haze grey, attached all the doors from Eduard and the extras from GMM, drilled multiple port holes and sprayed away. Then onto placing the main Pontos decking. If you haven't used their product, I have to throw out my endorsement. So easy to get down and forgiving when you accidentally stick an area down early. Highly recommend! Still more to add, but more to take place first. The rear decking is in progress. Gunship grey for the deck, then a custom mix for the section in between the helicopter deck and the rest.I attached the metal helo deck using a thinned mix of white glue, which worked surprisingly well. I still have to spray the helo deck, as you can see, then do the rear wooden deck as well. But, overall....just getting here is exciting.

Getting there more and more. I'm also considering painting the 16" turrets overall haze grey for a early refit version. I just like the look of the light grey tops...we'll see.

Please post up if you see something wrong or something not quite right. Plenty of time to fix and change parts.

Image

Image
Larger version
https://c6.staticflickr.com/9/8623/2985 ... 5792_k.jpg

Image

Image

Image

Image

_________________
Brett Matthews


Last edited by Brett M on Mon Sep 26, 2016 8:55 am, edited 1 time in total.

Report this post
Top
 Profile  
Reply with quote  
Display posts from previous:  Sort by  
Post new topic Reply to topic  [ 261 posts ]  Go to page Previous  1 ... 3, 4, 5, 6, 7, 8, 9 ... 14  Next

All times are UTC - 6 hours [ DST ]


Who is online

Users browsing this forum: No registered users and 19 guests


You can post new topics in this forum
You can reply to topics in this forum
You cannot edit your posts in this forum
You cannot delete your posts in this forum
You cannot post attachments in this forum

Jump to:  
Powered by phpBB® Forum Software © phpBB Group