The Ship Model Forum

The Ship Modelers Source
It is currently Wed Aug 06, 2025 4:22 am

All times are UTC - 6 hours [ DST ]


Post new topic Reply to topic  [ 1315 posts ]  Go to page Previous  1 ... 56, 57, 58, 59, 60, 61, 62 ... 66  Next
Author Message
PostPosted: Wed Feb 14, 2024 6:03 am 
Offline

Joined: Sat Sep 17, 2005 9:19 am
Posts: 1554
Nice trick with the mdf board. I also wonder why Redoutable had her carronadee amidships rather than at the poop of foc'sle like on most illustrations I have seen of ship of this era. Wouldn't they be damaging the rigging?


Report this post
Top
 Profile  
Reply with quote  
PostPosted: Wed Feb 14, 2024 6:10 am 
Online
User avatar

Joined: Wed Sep 28, 2011 12:04 pm
Posts: 1974
Location: Paris
I like the attention to detail, such as the secured gun barrel that had been knocked off its carriage - there is not for nothing the English expression of someone behaving like a 'loose cannon'. A barrel shifting uncontrolled around the deck can be lethal.

That sort of cradle that protects the model is a good idea. I tend to put the model on a base that is longer and wider than the finished model, but one still has the tendency to rest one's hand on something, where one shouldn't rest the hand on ... :whistle:

_________________
Eberhard

Former chairman Arbeitskreis historischer Schiffbau e.V. (German Association for Shipbuilding History)

--------------------------------------------------------------------------------------------------------------------------------------------------------------------------------------------

Image Image Image Image


Report this post
Top
 Profile  
Reply with quote  
PostPosted: Wed Feb 14, 2024 8:45 am 
Offline
User avatar

Joined: Mon Mar 12, 2012 11:13 am
Posts: 963
Location: Ludwigsburg/Germany
Simply BRAVO!

XXXDAn

_________________
To Victory and beyond ...
viewtopic.php?f=59&t=99050&start=60

See also our german forum for the age of Sail and History:
http://www.segelschiffsmodellbau.com


Report this post
Top
 Profile  
Reply with quote  
PostPosted: Thu Feb 15, 2024 5:41 am 
Offline

Joined: Mon Apr 17, 2017 2:43 am
Posts: 307
Great Progress. Love the disabled guns! :thumbs_up_1:

_________________
http://www.3xblackcats.wordpress.com


Report this post
Top
 Profile  
Reply with quote  
PostPosted: Thu Feb 15, 2024 7:22 am 
Offline
User avatar

Joined: Wed Nov 22, 2006 4:42 pm
Posts: 398
Location: Lisbon, Portugal
What a joy to see these update photos, Marijn!
Simply marvellous

BZ

Cheers,
Rui

_________________
Ship Modelers of the World UNITE


Report this post
Top
 Profile  
Reply with quote  
PostPosted: Thu Feb 15, 2024 8:20 am 
Offline

Joined: Wed Jan 21, 2009 1:51 pm
Posts: 2874
Oh, very nice :woo_hoo: Very jealous you have a 0.3mm punch & die set ;)


Report this post
Top
 Profile  
Reply with quote  
PostPosted: Thu Feb 15, 2024 9:54 am 
Offline

Joined: Tue Feb 06, 2007 10:24 am
Posts: 2588
Location: Belgium
Thanks everyone! :cool_2: :smallsmile: :cool_2:

Pieter wrote:
I also wonder why Redoutable had her carronadee amidships rather than at the poop of foc'sle like on most illustrations I have seen of ship of this era. Wouldn't they be damaging the rigging?

This was my interpretation from the report of captain Lucas (he mentions the bursting of one of them on the 'galliards'). But I think you are right, and if I were to build it again I would probably choose the poop deck instead. I think it would also be better visually. But I had already committed to this amount of gun ports on the quarterdeck long before coming to that conclusion, so I went ahead... Anyway, it is not actually known where they were positioned, only that she had four 36pd carronades. But I think the poop deck would be the most likely indeed...

wefalck wrote:
but one still has the tendency to rest one's hand on something, where one shouldn't rest the hand on ... :whistle:

Isn't that the truth! ;)
The cradle really helps a lot with that. But still, I sometimes still rest fingers on the bulwark edges... :thinking: :whistle:

EJFoeth wrote:
Very jealous you have a 0.3mm punch & die set ;)

Yes, it is the size I use most, by far! I haven't found any anymore since I bought this set more than 20 years ago. I don't even know who made them, but I'm sure they don't anymore. If I find another punch&die set with 0,3mm, I will buy it instantly!
I have people see making their own with a 0,3mm HSS drill bit. But I'm sure it's not nearly as convenient...


Report this post
Top
 Profile  
Reply with quote  
PostPosted: Thu Feb 15, 2024 10:23 am 
Offline

Joined: Wed Jan 21, 2009 1:51 pm
Posts: 2874
marijn van gils wrote:
EJFoeth wrote:
Very jealous you have a 0.3mm punch & die set ;)

Yes, it is the size I use most, by far! I haven't found any anymore since I bought this set more than 20 years ago. I don't even know who made them, but I'm sure they don't anymore. If I find another punch&die set with 0,3mm, I will buy it instantly!
I have people see making their own with a 0,3mm HSS drill bit. But I'm sure it's not nearly as convenient...


Old Historex set, I think I once owned them and left them to rust into oblivion... (oops). The PR Toolz set is by far the nicest punch I have (also had the Waldron set) but doesn't go to 0.3mm. Need to make tiny pulleys too (soon, as in my building pace soon...). SG1 recommended making your own and I think I may do just that!

I did buy this set the other day (when previously lamenting the loss of my rusted Historex set)

Image

https://www.1999.co.jp/eng/10690010

which is very nice to add indentations ("engrave"), but it doesn't cut discs from plate.


Last edited by EJFoeth on Thu Feb 15, 2024 1:27 pm, edited 1 time in total.

Report this post
Top
 Profile  
Reply with quote  
PostPosted: Thu Feb 15, 2024 11:11 am 
Online
User avatar

Joined: Wed Sep 28, 2011 12:04 pm
Posts: 1974
Location: Paris
There are two strategies to make your own: either hollow punches or punch&die sets.

Hollow punches with internal diametres down to 0.5 mm can be purchased from the usual suspects, but making a hollow punch with only 0.3 mm internal diameter would a bit of a challenge. You would need not only to drill the 0.3 mm hole, but also mill the ejection opening, then turn on the cutting edge, harden and temper the punch, and finally sharpen and hone it ...

For a punch&die configeration you would need a die-plate of sufficient hardness and thickness. Still would be best, but drilling 0.3 mm holes deeper than about 3 times the diameter is not so easy. OK, you could open it up from the back using a conical burr to create the necessary relief. For punching discs from styrene, one might get away with aluminium, but the die will wear quite fast and drilling into aluminium can also be tricky. For the guide-plate on top you can use Plexiglas, as do RPZ Toolz, and drilling a 0.3 mm through say a 1 mm sheet it not a big deal. The punch themselves could be fashioned from either piano-wire or better perhaps from drills. The ends of which would need to be ground flat (a slight hollow would be better, but quite impossible to achieve in those dimensions). If I was going to make this, I would probably design it to fit onto my watchmaker's jewelling press to ensure a straight application of force, which reduces the risk of breaking the punch.

Incidentally, Lloyd McCaffery describes in his book how he makes oval hollow punches for blocks.

A completely different route would be to photo-etch the round or oval discs. Down to 0.5 mm diameter I also managed to produce quite acceptable discs from cardstock using my laser-cutter.

_________________
Eberhard

Former chairman Arbeitskreis historischer Schiffbau e.V. (German Association for Shipbuilding History)

--------------------------------------------------------------------------------------------------------------------------------------------------------------------------------------------

Image Image Image Image


Report this post
Top
 Profile  
Reply with quote  
PostPosted: Thu Feb 15, 2024 12:27 pm 
Offline

Joined: Mon Apr 17, 2017 2:43 am
Posts: 307
EJFoeth wrote:
SG1 recommended making your own and I think I may do just that!

Marijn, my apologies in advance for taking some space on your thread.
A few months ago I tested my homemade P&D with 0.13 mm styrene and it worked. I "punched" six 0.3 mm disks from a styrene panel in a couple of minutes: 3 disks were perfect and the last 3 not so perfect but acceptable (pic below, on the blue adhesive tape, the better ones are on the left).

https://u.cubeupload.com/SGm/ABDDF2F394124C869460.jpeg

a closeup of the p&d:

https://u.cubeupload.com/SGm/39F9F49E975441A4BD31.jpeg

and the best way to use it:

https://u.cubeupload.com/SGm/3DC242AC00FE42B4987A.jpeg

no hammer is needed, just a "skewering" motion (thrust with some degree of twisting) with a reversed 0.3 mm drillbit pointing at the p&d (the flat end of the drill is actually doing the punching). A decisive thrust is needed to create a disk, some force must be used to win the styrene resistance. Careful not to punch your fingers with the drillbit tip, just hold it firmly between your fingers. Careful not to break the tip as well.
The p&d is held tight with flat nosed pliers during the punching. It helps stabilizing the ensamble and to freeze the sandwiched 0.13 mm panel.
My device was worn out from having punched many aluminium disks for the 1/400 Uboat 88 gun so the p&d's 0.3 mm hole edges must have been somewhat damaged/deformed with use. i guess drilling thicker material such as 0,13mm styrene must have sped-up the damaging process. Anyway, drilling new punching holes when the produced-disks start to come out imperfect is adviceable and easy to perform.

A cheap/cheerful/reusable alternative to difficult-to-find micro-p&d for aluminium foil and 0.1-0.13 mm-thin styrene. Give it a try EJ!

Cheers,

SG

_________________
http://www.3xblackcats.wordpress.com


Report this post
Top
 Profile  
Reply with quote  
PostPosted: Thu Feb 22, 2024 9:56 am 
Offline

Joined: Tue Feb 06, 2007 10:24 am
Posts: 2588
Location: Belgium
Thank you guys! Great discussion on Punch and Dies! :thumbs_up_1:


Report this post
Top
 Profile  
Reply with quote  
PostPosted: Mon Mar 04, 2024 8:02 am 
Offline

Joined: Tue Feb 06, 2007 10:24 am
Posts: 2588
Location: Belgium
Since the last update, I have been working on several things.


First, I added a spare topmast and yards to Victory:
Image

Image


Now, I wanted to glue the poop decks in place.
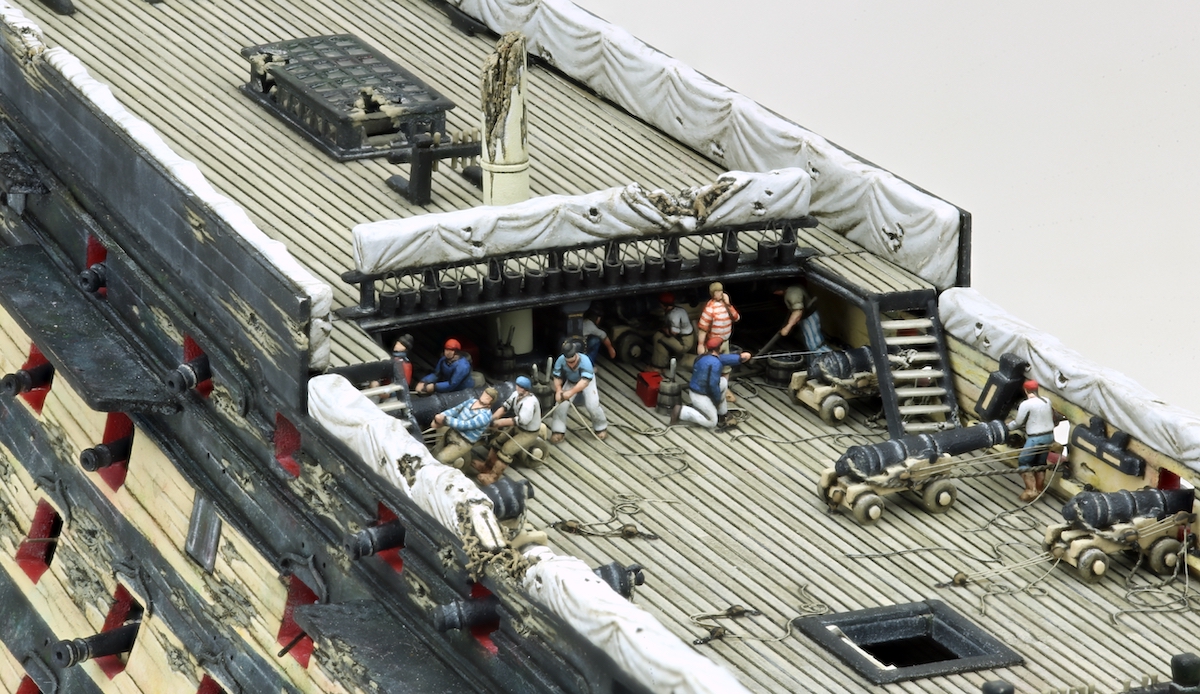
But before I could do that, I needed to add the (visible) figures below that I won’t be able to access after.
So, I made and painted another little series of figures and equipment for the area and glued them in place. Rubble will be added at a later stage.

Redoutable, before the poop deck is installed:
Image

And after:
Image

I also installed (and before that, finished painting) the stair construction.

Image

Image


And Victory, before installing the deck:
Image

And after:
Image

The broken mast and two ladders were painted and glued in place after the deck. Before the deck was installed, I also added a row of fire buckets to the front railing:

Image

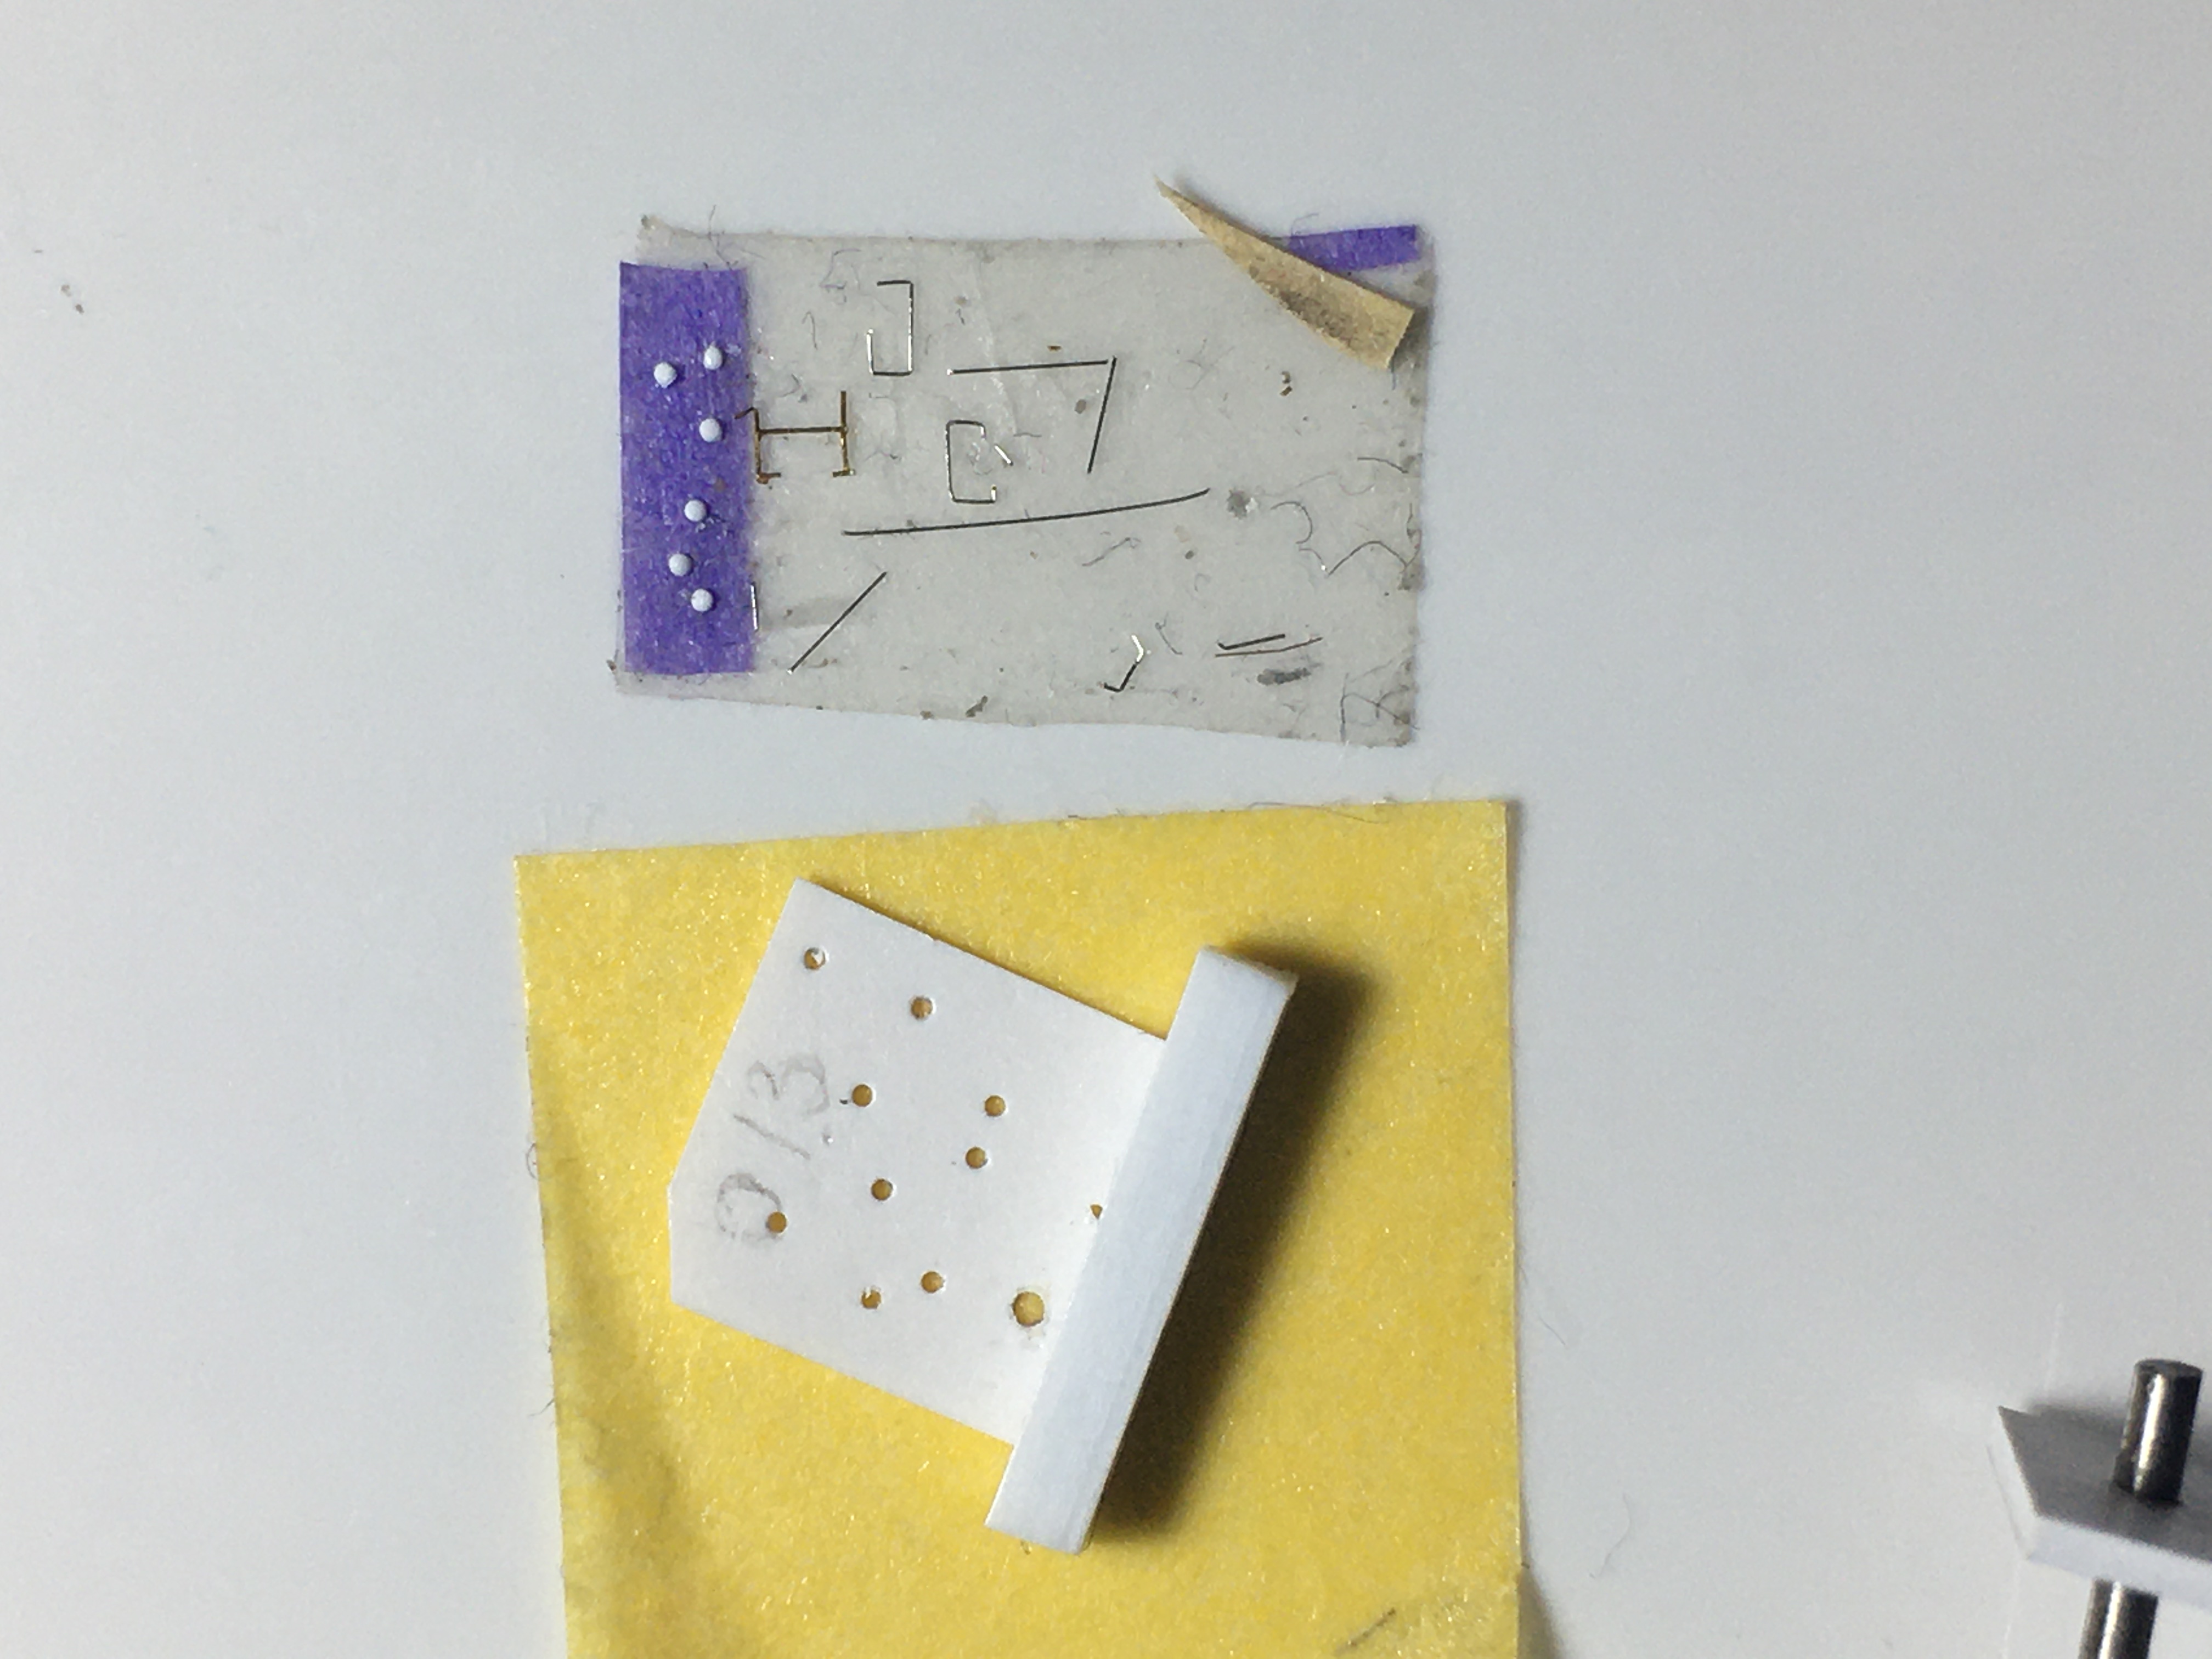
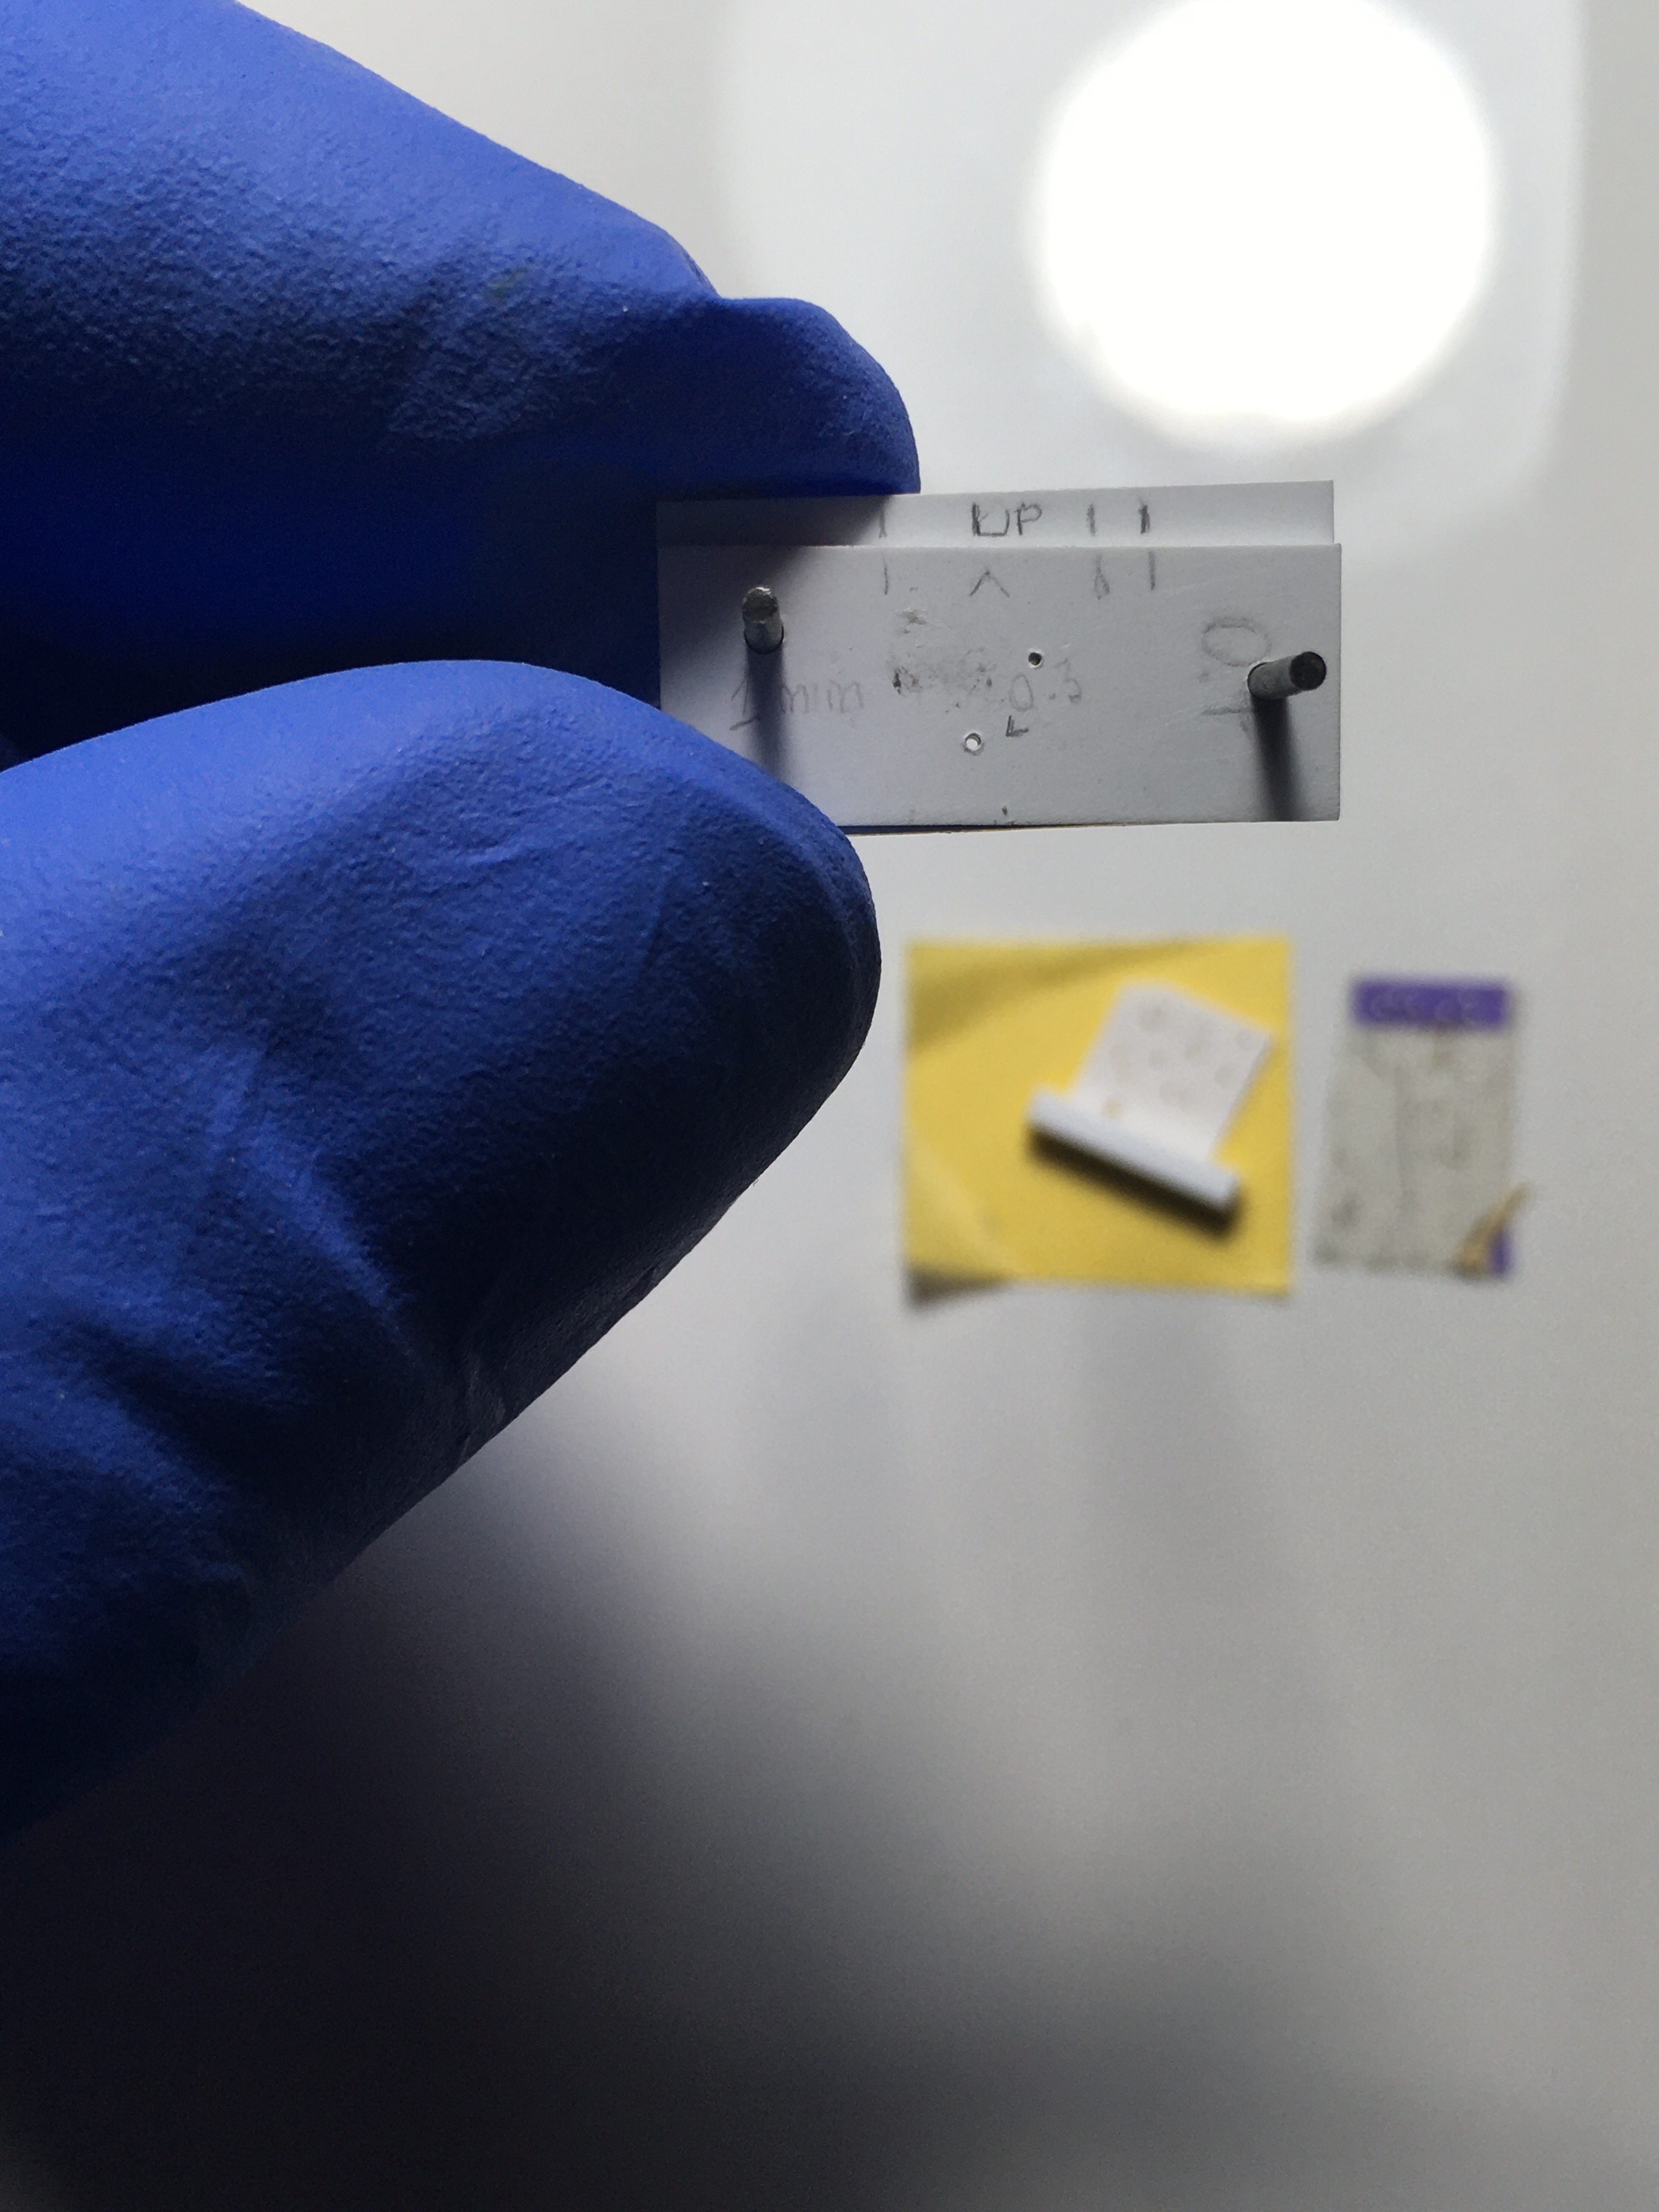
I turned these earlier, and had them cast by a friend:
Image

Each received a handle (leather strap in reality) from 0,05 mm copper wire. I tried to paint a simulation of the royal cypher on them, but since the buckets are only 1 mm wide these just looked like smudges so I erased them and left the buckets plain:
Image

In the above pic, you can also see that I added glass to the skylight. I used Microscale Kristal Klear for.

I also tried Humbrol Clearfix, but found it much harder to work with. It was very syrupy, and I couldn’t thin it with water or mineral spirits. It also dried very quickly, making adjustments or removal of air bubbles difficult to impossible.
The Kristal Klear was much more flexible: it can be thinned with water and applied at any consistency you like with a small brush. Before it dries, you can easily add a bit extra or remove a little, poke away any little air bubbles, and you can wash the brush with water.

An overall view of Victory’s poop deck:
Image

Besides filling some gaps around the edges, mast and flag lockers, and touching up paint, I also added some flag pole fixtures and some cleats. The larger cleats were carved from styrene, the small ones cut from leftover PE bits.


The quarter gallery windows also received ‘glass’:
Image

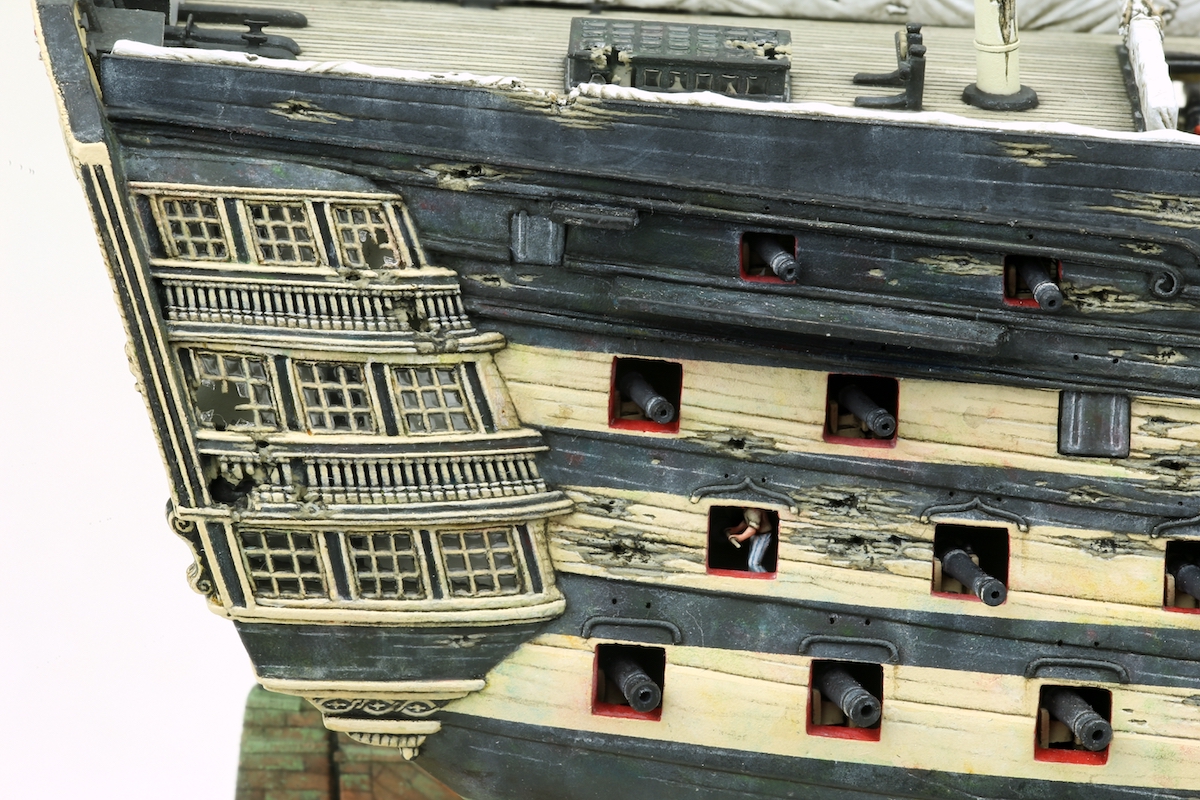
The broken pieces are actually real glass: tiny pieces of crushed microscope cover glass (very thin!), glued with Kristal Klear.

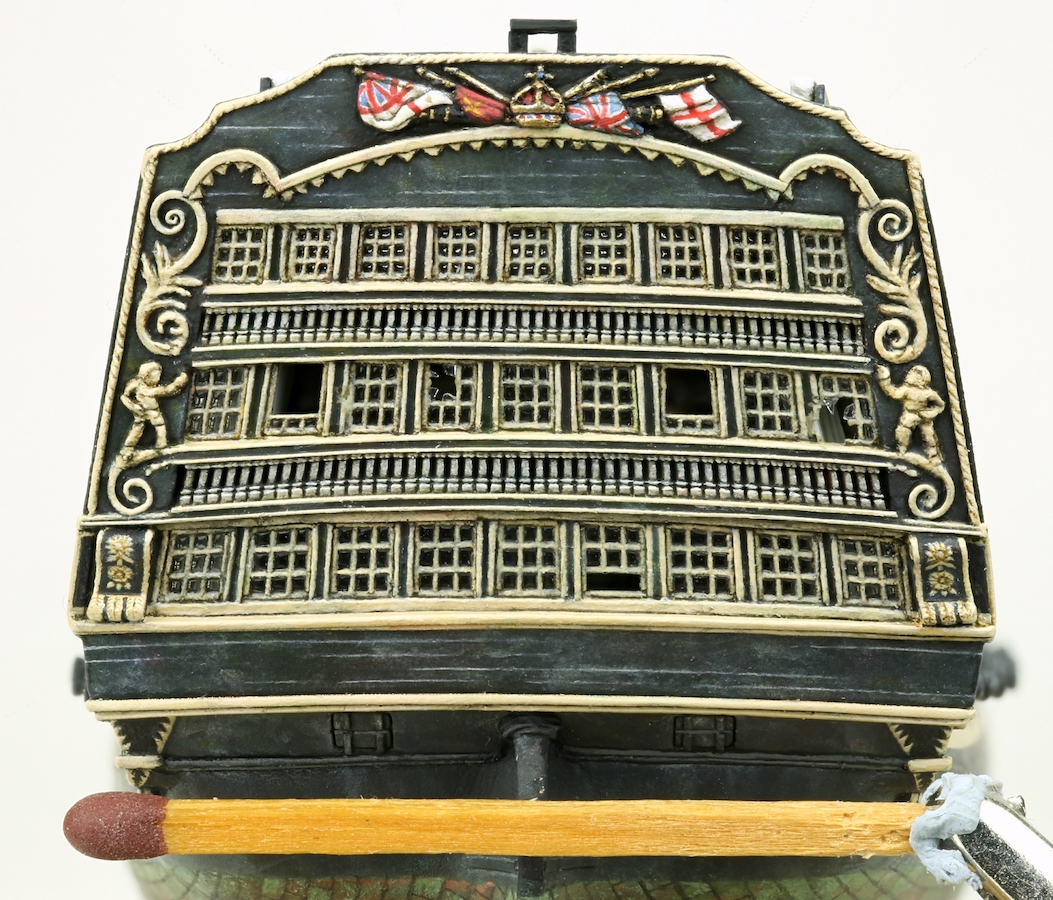
The stern received the same treatment.
Note the lucifer for scale.
Image


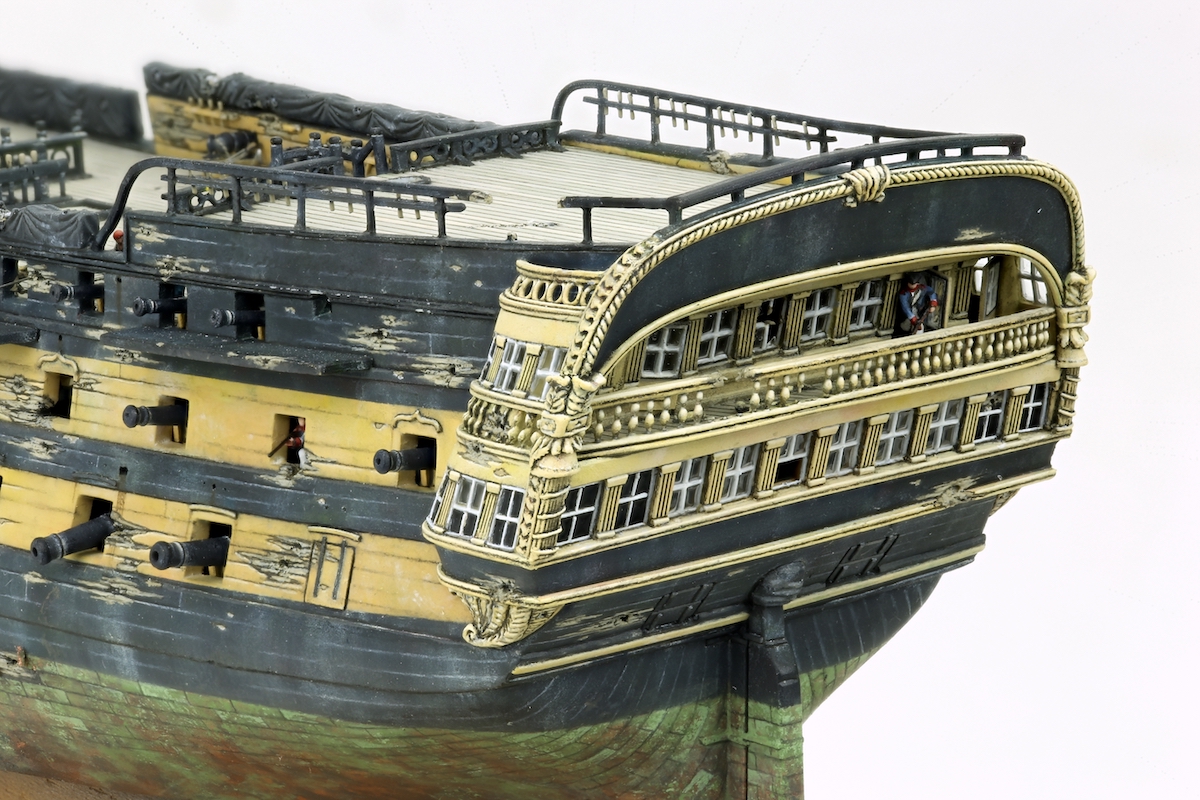
Of course, Redoutable also needed glass.
But first, I needed to install the stern. I had kept this as a separate piece until now, for easier access to the balcony (older photo, before much of the paintwork):
Image

So, the stern was now glued in place, any seams filled and the paintwork touched up, and of course the glass added.
After the poop was installed, I also repaired the rail around the poop, because I had crushed it with my fat fingers multiple times.
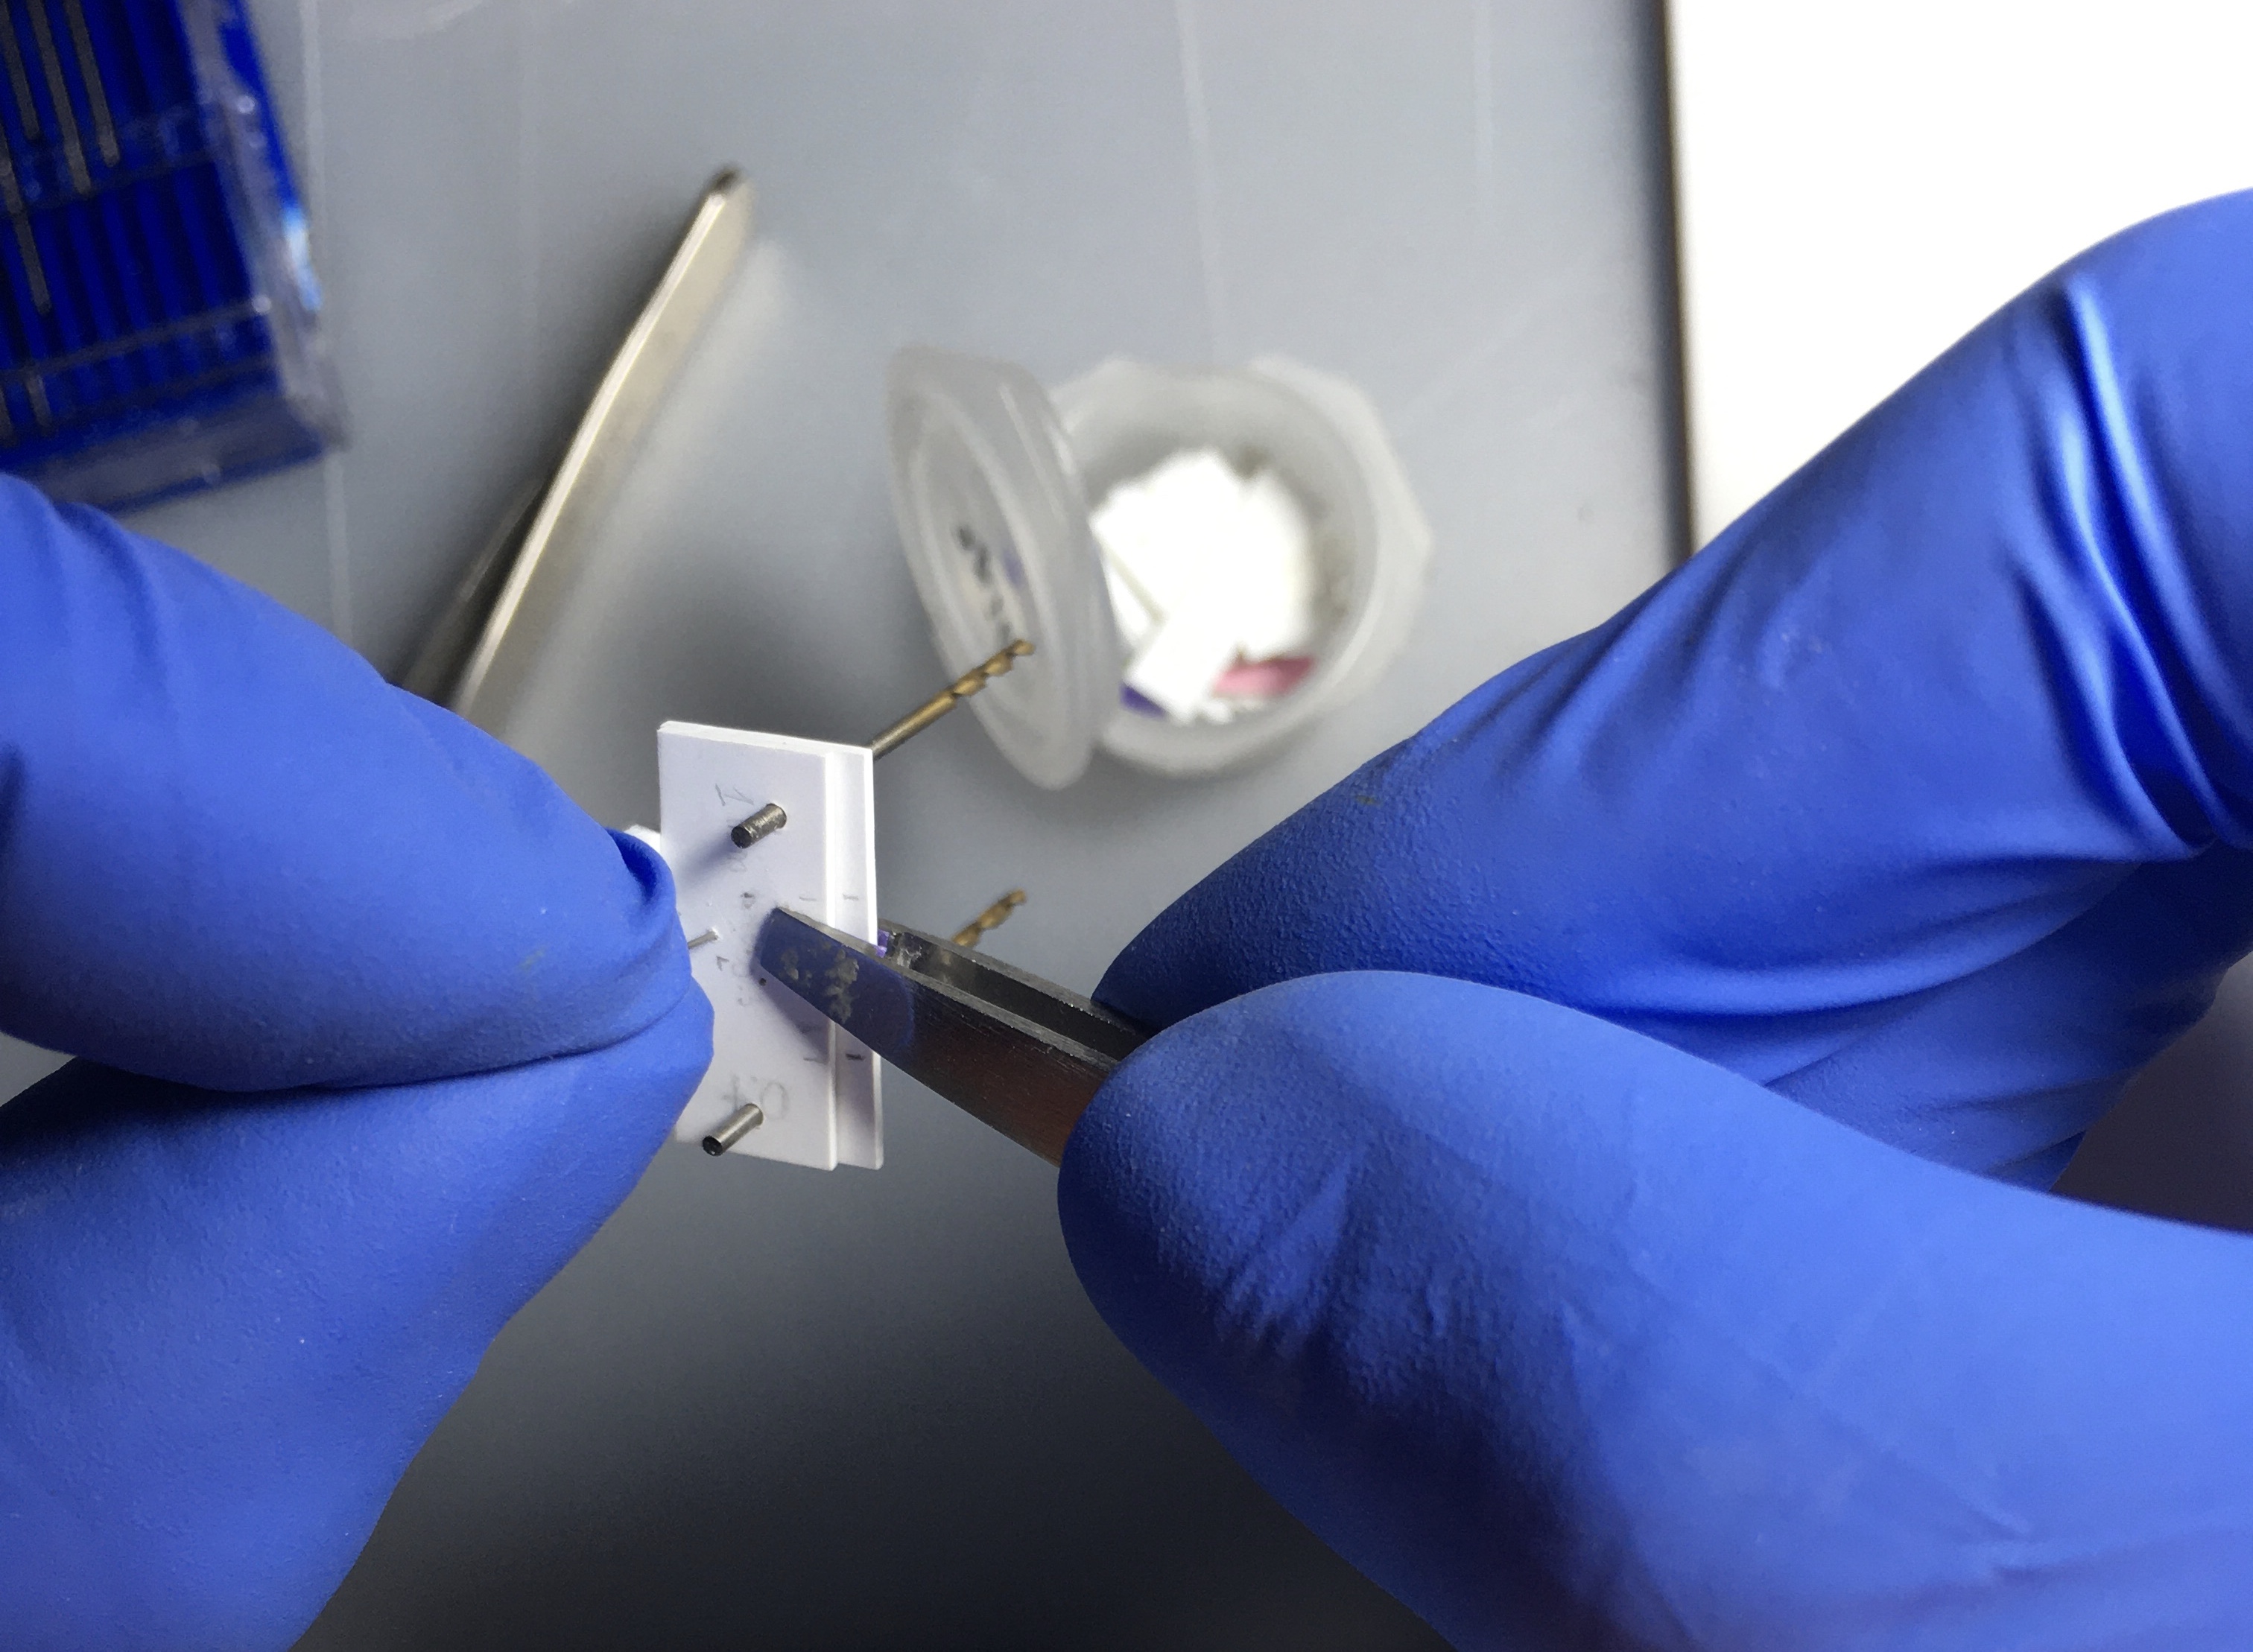
Image

Image

Image


Report this post
Top
 Profile  
Reply with quote  
PostPosted: Mon Mar 04, 2024 10:02 am 
Offline
User avatar

Joined: Tue Jan 11, 2005 1:40 pm
Posts: 8360
Location: New Jersey
Really brilliant work. It's breathtaking in the scope and amount of detail packed into every nook and cranny.

_________________
Martin

"Tomorrow is the most important thing in life. Comes into us at midnight very clean. It's perfect when it arrives and it puts itself in our hands. It hopes we've learned something from yesterday." John Wayne

Ship Model Gallery


Report this post
Top
 Profile  
Reply with quote  
PostPosted: Mon Mar 04, 2024 10:15 am 
Offline

Joined: Mon Apr 17, 2017 2:43 am
Posts: 307
M A G N I F I Q U E in every respect! :thumbs_up_1:

_________________
http://www.3xblackcats.wordpress.com


Report this post
Top
 Profile  
Reply with quote  
PostPosted: Mon Mar 04, 2024 11:23 am 
Online
User avatar

Joined: Wed Sep 28, 2011 12:04 pm
Posts: 1974
Location: Paris
One always has the impression that one looks at an 1/48 scale model, but in reality this is only 1/6 the size ... :shock: :faint:

_________________
Eberhard

Former chairman Arbeitskreis historischer Schiffbau e.V. (German Association for Shipbuilding History)

--------------------------------------------------------------------------------------------------------------------------------------------------------------------------------------------

Image Image Image Image


Report this post
Top
 Profile  
Reply with quote  
PostPosted: Mon Mar 04, 2024 12:22 pm 
Offline
User avatar

Joined: Tue Sep 29, 2020 4:35 pm
Posts: 1890
Location: Bretagne, France
An another world.. :cool_1:

_________________
Pascal

•Battleship Bretagne 3D: https://vu.fr/FvCY
•SS Delphine 3D: https://vu.fr/NeuO
•SS Nomadic 3D: https://vu.fr/tAyL
•USS Nokomis 3D: https://vu.fr/kntC
•USS Pamanset 3D: https://vu.fr/jXGQ


Report this post
Top
 Profile  
Reply with quote  
PostPosted: Mon Mar 04, 2024 12:36 pm 
Offline

Joined: Tue Jan 11, 2005 10:56 am
Posts: 8848
Location: New York City
Everything is exquisite. Nice touch with the extra yardarm and topmast. That looks really good.

Of course, you have so very many nice, extra touches. :smallsmile:


Report this post
Top
 Profile  
Reply with quote  
PostPosted: Tue Mar 05, 2024 10:29 am 
Offline

Joined: Tue Feb 06, 2007 10:24 am
Posts: 2588
Location: Belgium
Thank you very much for your kind words everyone! :smallsmile: :cool_1: :smallsmile:


Report this post
Top
 Profile  
Reply with quote  
PostPosted: Tue Mar 05, 2024 11:03 am 
Offline
User avatar

Joined: Mon Jan 10, 2005 10:46 am
Posts: 2468
Location: Hoboken, NJ
Astounding work, as always. I've run out of superlatives. Looking forward to seeing this in person again this fall.

_________________
We like our history sanitized and theme-parked and self-congratulatory, not bloody and angry and unflattering. - Jonathan Yardley


Report this post
Top
 Profile  
Reply with quote  
PostPosted: Wed Mar 06, 2024 12:55 pm 
Offline

Joined: Tue Feb 06, 2007 10:24 am
Posts: 2588
Location: Belgium
Thank you Devin! I'm looking forward to seeing you again too at SMC! :smallsmile: :wave_1: :smallsmile: :wave_1:


Report this post
Top
 Profile  
Reply with quote  
Display posts from previous:  Sort by  
Post new topic Reply to topic  [ 1315 posts ]  Go to page Previous  1 ... 56, 57, 58, 59, 60, 61, 62 ... 66  Next

All times are UTC - 6 hours [ DST ]


Who is online

Users browsing this forum: No registered users and 34 guests


You can post new topics in this forum
You can reply to topics in this forum
You cannot edit your posts in this forum
You cannot delete your posts in this forum
You cannot post attachments in this forum

Jump to:  
cron
Powered by phpBB® Forum Software © phpBB Group