The Ship Model Forum

The Ship Modelers Source
It is currently Sat Mar 08, 2025 5:24 pm

All times are UTC - 6 hours [ DST ]


Post new topic Reply to topic  [ 4819 posts ]  Go to page Previous  1 ... 202, 203, 204, 205, 206, 207, 208 ... 241  Next
Author Message
PostPosted: Thu Nov 08, 2012 3:32 pm 
Offline

Joined: Sat Aug 06, 2005 12:25 pm
Posts: 56
Location: Cork, Ireland
So after a spell in the funny farm from all the railings, the sponsons and decks were added, and we moved on to fitting the flight deck. First of all, some life had to be added to the hangar.

Image

I used a mix of the excellent Fujimi and accurate but basic Italeri a/c for the hangar, the placement was planned to maximise the available viewing areas through the hangar doors.

Image

My hangar scratchbuilding skills are not up to the standard of others, and with no lighting who was going to see it anyway.

Image

Image

Image

Image


Report this post
Top
 Profile  
Reply with quote  
PostPosted: Thu Nov 08, 2012 4:02 pm 
Offline
User avatar

Joined: Tue Jun 28, 2005 1:24 pm
Posts: 2586
Location: South Carolina
Looking Good there Roy :thumbs_up_1: :thumbs_up_1: :thumbs_up_1: I am looking forward to seeing it progress


Happy Modeling

John

_________________
Si Vis Pacem, Para Bellum


Report this post
Top
 Profile  
Reply with quote  
PostPosted: Thu Nov 08, 2012 4:06 pm 
Offline

Joined: Sat Aug 06, 2005 12:25 pm
Posts: 56
Location: Cork, Ireland
A few off duty sailors were added to the stern, one waving at the passing helo...

Image

The painted and decaled flightdeck was test fitted.

Image

I must say, as there was no guides for the landing lines I had several fits trying to mask out the pattern. Eventually I decided to give the kits decals a go, for want of a better alternative. Using decals for this was a new technique for me, ususally I paint them on using the moulded lines as guides.

I then had several more fits trying to get them on straight, correctly positioned, and lined up with each other. (I figured if it didn't work I'd just paint over again and try to mask the lines again). Jeez, it was a sweating session... I almost lost it once or twice, but got there in the end. I replaced the kit's "63" on the bow with a pair of GMM numerals, they just looked a better shape to me.
Image

After a flat coat and some weathering, I was well impressed with myself..

Image

another update tomorrow, with some details of the fit problems I found attaching the deck. Will try to be a bit more active, recently got a Italeri Ranger (my missing link in the 1/720 collection) and the Trumpy 1/700 Chinese carrier (ex-Varyag) added to the stash!

Edit; anyone know why my pics are cropped? Photobucket issues?


Report this post
Top
 Profile  
Reply with quote  
PostPosted: Fri Nov 09, 2012 6:02 am 
Offline

Joined: Sat Aug 06, 2005 12:25 pm
Posts: 56
Location: Cork, Ireland
gtbred wrote:
Image anybody want to do a dio? :big_grin: :eyebrows:


Give me a chance, I'm working on it!

Image

Get well soon Red.

Awesome Saratoga on the last page too....


Report this post
Top
 Profile  
Reply with quote  
PostPosted: Fri Nov 09, 2012 2:34 pm 
Offline

Joined: Sat Aug 06, 2005 12:25 pm
Posts: 56
Location: Cork, Ireland
Here's some of the gap showing...

Image

and here's some of the reasons; the deck is not the best fit on the hull, the hull+sponsons= too wide for deck recesses.
This might explain more..
before;
Image

After;
Image

material had to be removed from right angle of underside of flightdeck and it's outer lip, also removed from the edges of the part my thumb is holding.. without this the part was squashing the hull sides in..

Here are other trouble spots, indicated by the scalpel point.

Image

Image

Image


Report this post
Top
 Profile  
Reply with quote  
PostPosted: Fri Nov 09, 2012 2:36 pm 
Offline

Joined: Sat Aug 06, 2005 12:25 pm
Posts: 56
Location: Cork, Ireland
More tomorrow. :wave_1:


Report this post
Top
 Profile  
Reply with quote  
PostPosted: Fri Nov 09, 2012 2:53 pm 
Offline
User avatar

Joined: Fri Nov 24, 2006 7:30 pm
Posts: 1607
Location: Cape Canaveral Florida
Nice Work on Kitty Hawk! Is that the Fujimi Kit?


Report this post
Top
 Profile  
Reply with quote  
PostPosted: Sat Nov 10, 2012 8:08 am 
Offline

Joined: Sat Aug 06, 2005 12:25 pm
Posts: 56
Location: Cork, Ireland
Hi Mark,

Thanks, it is the Fujimi kit. I started the build thread back on page 179;
viewtopic.php?f=59&t=18158&p=454033#p454033

The biggest issue I had (and it may just be me) is that when I went to test fit the deck after the above mods it would fit, but when I went to add the elevators they would not fit. Specifically, they would not line up with the elevator openings in the flightdeck. It's as if the guide rails (fitted back on page 179) were out of alignment. I don't think that it was all me, or that I had the flightdeck too far forward or too far aft, as one el was nearly ok, two were aft and one was fwd in alignment. I don't recall the guides having too much play in positioning when they were going on. I had to file open the guides in the rails a bit more, and shorten the tabs on the ELs that fit in the rails, along with some trimming of the mating surfaces of the ELs and their openings. Even so, number 2 EL (immediately in front of the island) had to be added in the lowered position, as there was no way I could make it fit closed.
(I hope I'm making sense, I've lost the relevant pics...)

If I was to do this again (and I will when I'm making Connie) the flightdeck will have to be attached before the elevator guiderails, which also means it will be attached before all the sponsons that go around the guiderails. Could cause more issues though...!


Report this post
Top
 Profile  
Reply with quote  
PostPosted: Mon Nov 12, 2012 12:46 pm 
Offline
User avatar

Joined: Tue May 01, 2012 4:38 pm
Posts: 1091
Location: The Buckeye State
Hey guys I could use some help. I know some have you have built/are building Revel's 1/542 Saratoga and I need help with the placement of the port side aft CIWS sponson. I don't like how the instructions have a starboard side only exploded view of assembly. I cannot find a single good photo to assist me. Any and all help is much appreciated. :thumbs_up_1:

_________________
_________________
James

http://www.modelshipgallery.com/gallery/users/James-Guard/user-index.html


Report this post
Top
 Profile  
Reply with quote  
PostPosted: Mon Nov 12, 2012 9:51 pm 
Offline

Joined: Sat Oct 06, 2012 9:25 pm
Posts: 15
boomstick68 wrote:
Hey guys I could use some help. I know some have you have built/are building Revel's 1/542 Saratoga and I need help with the placement of the port side aft CIWS sponson. I don't like how the instructions have a starboard side only exploded view of assembly. I cannot find a single good photo to assist me. Any and all help is much appreciated. :thumbs_up_1:


I highly recommend using the pdf link Cliffy posted for me a couple of weeks ago in this thread. It is deck by deck master plans of the Saratoga, and includes side views of both the port and starboard sides. It has been immeasurably helpful to me on my 1/542 Revell Saratoga project. If you need photos, I have come across quite a few online showing the ex-Saratoga as she sits in Philadelphia, with many close up views of the fantail and port aft CIWS mount in particular. I plan on using these photos to scratchbuild the intricate latticework supports below the sponson, and superdetail the fantail area.

In the realm of updates; Still working on detailing the new hangar deck. Bay 3 is nearly done, with watertight doors, the port side escalator is done, have most of the service plates in, and have the elevator armored doors ready to install. Bay 2 has the starboard aft weapons elevator trunk in place, and the EOD diving locker. The Bay 2/3 passageways on either sides of the armored doors are installed. Still have to build the Bay 2 escalator, install the watertight doors, and the hose storage on the port wall. Bay 1 only has the forward overhanging workshops built. As I included the fantail as part of the hangar deck, I am detailing it at the same time. I have the jet engine shop complete with the passage to the fantail open from the hangar deck, the port side O2 Level shipping receiving bay added to the rear bulkhead, and the jet engine test control room on the fantail built. Also have the port and starboard line handling areas on either side of the jet engine shop to complete. After all the detail is in, just have to paint and add murals to the hangar deck armored doors and I'm ready to move back to the hull. Pictures soon!

_________________
My wife says I can't have any more till I finish this one.


Report this post
Top
 Profile  
Reply with quote  
PostPosted: Thu Nov 29, 2012 9:39 am 
Offline

Joined: Sat Aug 06, 2005 12:25 pm
Posts: 56
Location: Cork, Ireland
Just a quick post to finish off the Kitty Hawk build.
As I lost the rest of the construction pics in a camera drop incident, these will have to do. They were taken on her first outing at the IPMS Ireland nats in October.

Image

Image

Image

Image

Image


Report this post
Top
 Profile  
Reply with quote  
PostPosted: Thu Nov 29, 2012 9:50 am 
Offline

Joined: Sat Aug 06, 2005 12:25 pm
Posts: 56
Location: Cork, Ireland
I tried to rig up two of the brass liferaft barrels and decided life was far too short. So I raided the spares box for some leftover Italeri ones and matched up with available pics.
Aircraft had exhausts drilled, EA-6Bs, S-3Bs and C-2 were from Trumpeter, E-2s Italeri, rest are Fujimi as are the decals on the planes. Prowlers have GMM PE refuelling probes.
Any questions, comments, constructive criticisms welcome. This is the most detailed carrier (or ship for that matter) model I've built so far. Looking at the pics it's screaming for rigging, but in the flesh it's not noticeable by it's absence.
I'll take some more better pics later for the finished thread. In the meantime, here's the rest of what I have.

Image

Image

Image

Image

Image


Report this post
Top
 Profile  
Reply with quote  
PostPosted: Fri Nov 30, 2012 5:15 am 
Offline
User avatar

Joined: Tue Jun 28, 2005 1:24 pm
Posts: 2586
Location: South Carolina
A very nice clean build, did She place in the Nats? whats next?

Happy Modeling

John

_________________
Si Vis Pacem, Para Bellum


Report this post
Top
 Profile  
Reply with quote  
PostPosted: Fri Nov 30, 2012 6:02 am 
Offline
User avatar

Joined: Wed Jan 13, 2010 9:10 am
Posts: 2710
Location: san francisco
:thumbs_up_1: :thumbs_up_1: :thumbs_up_1:


Report this post
Top
 Profile  
Reply with quote  
PostPosted: Mon Dec 03, 2012 5:09 am 
Offline

Joined: Sat Aug 06, 2005 12:25 pm
Posts: 56
Location: Cork, Ireland
kidcurrie42 wrote:
A very nice clean build, did She place in the Nats? whats next?


Hi John,
She wasn't judged as she was the only entry in the (4) ship categories. :scratch: 
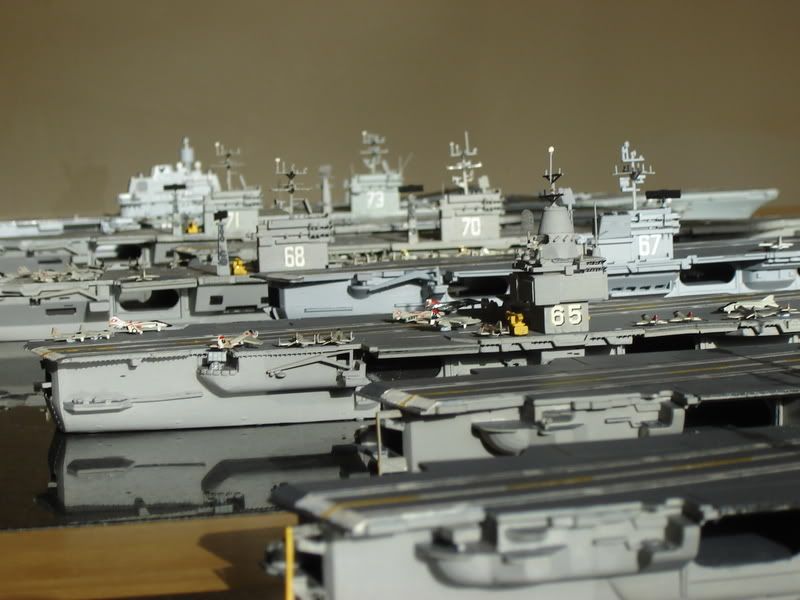
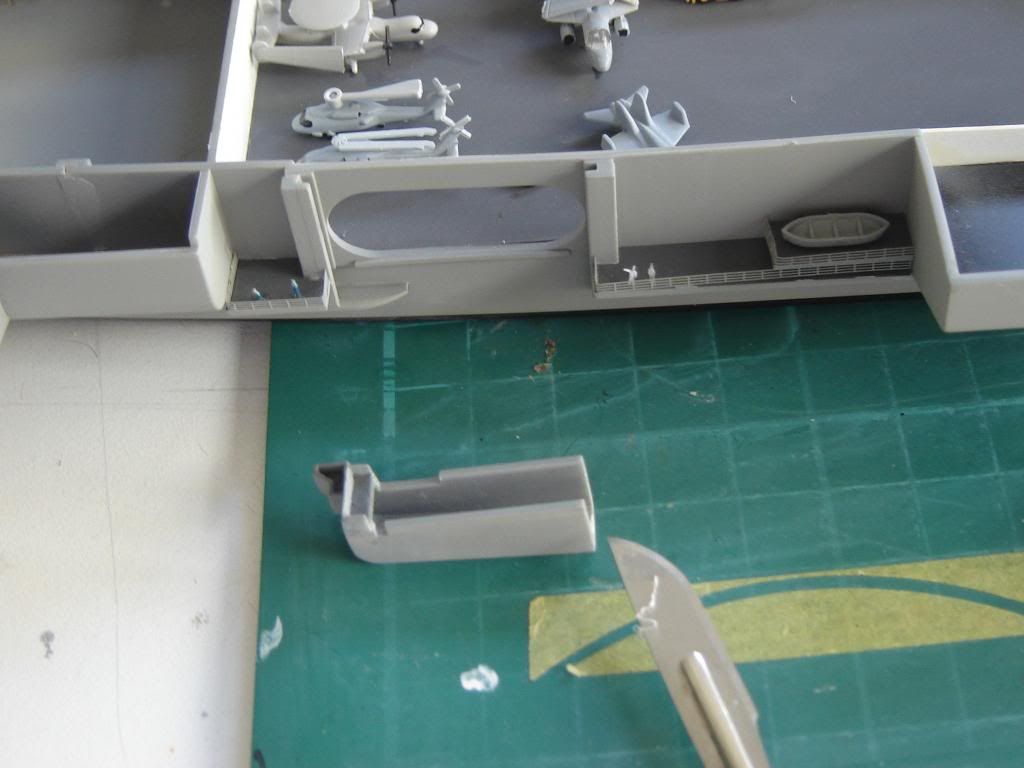
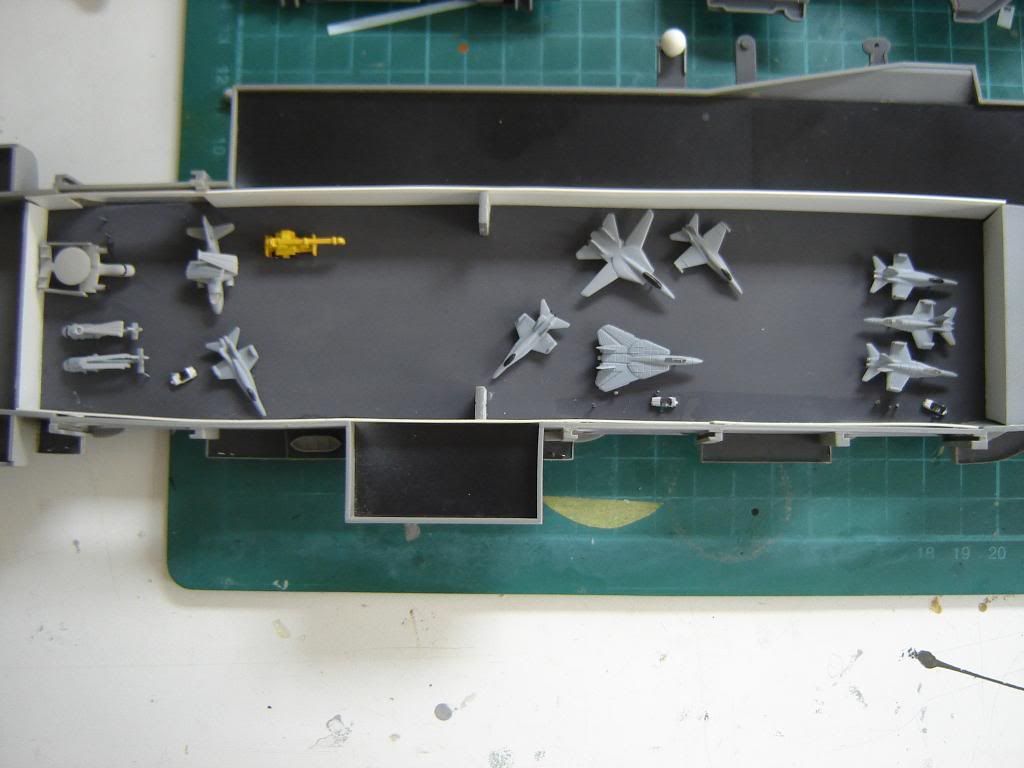
Next up is to kick in to finishing my Italeri Forrestal and Reagan, although I recently got the Trumpy PLAN carrier in 1/700, that is one good value kit as it is available online for Italeri money.

The debate is whether or not to go all out PE on some or all of these kits. My original plan was to do Forrestal as such along with the first and last of the Nimitzes (Italeri Nimitz and Reagan both as commissioned), while the rest would be OOB. Exceptions would be Trumpy Nimitz 2005 and at some point a modernised Revell Enterprise. Then this Kitty Hawk came along, and the US Navy built and launched CVN-76, 77 and have half built CVN-78, which will undoubtedly be finished before I am.
I then thought about just doing radars and such, but once I add a bit of PE I see then where it's missing. The flip side of this is that the elapsed time between starting and finishing a build matches or exceeds that of the real CVNs....

I currently have kits of CV-6, three Dragon postwar Essexes, CV-41, two Italeri Forrestals, Fujimi Connie, Italeri America (and another for conversion to JFK), all the Italeri Nimitzes, Trumpy Nimitz 2005 and PLAN carrier, one Dragon Tarawa-class and 2 Revell Wasps.
Never mind the pair of Heller 1/400s (Foch and De Gaulle) as well as Tamiya Enterprise and Trumpy Nimitz in 1/350. Time?


Report this post
Top
 Profile  
Reply with quote  
PostPosted: Mon Dec 03, 2012 11:30 pm 
Offline
User avatar

Joined: Tue Jun 28, 2005 1:24 pm
Posts: 2586
Location: South Carolina
Well I hope they placed you first and gave you best ship award. paid your money and entered.

I am just finishing off the shipyard revamp, I will then post pics as well as pics of the stash.

Only way to save money is to be selective on which get full/partial PE treatment.

Happy Modeling

John

_________________
Si Vis Pacem, Para Bellum


Report this post
Top
 Profile  
Reply with quote  
PostPosted: Thu Dec 06, 2012 6:22 pm 
Offline
User avatar

Joined: Tue Jun 28, 2005 1:24 pm
Posts: 2586
Location: South Carolina
Well the Slipway is back in commission, Brighter and more Organized, I am looking forward to working in here, Feels good.

Image
Image

More pics in the Post pics of workbenches thread.

Happy Modeling

John

_________________
Si Vis Pacem, Para Bellum


Report this post
Top
 Profile  
Reply with quote  
PostPosted: Fri Dec 07, 2012 7:52 am 
Offline
User avatar

Joined: Wed Nov 29, 2006 12:22 pm
Posts: 2013
Location: Calif
kidcurrie42 wrote:
Well the Slipway is back in commission, Brighter and more Organized, I am looking forward to working in here, Feels good.

Image
Image

More pics in the Post pics of workbenches thread.

Happy Modeling

John


:big_eyes: :big_eyes: Only thing I can say is, it's too clean john!! :heh: Ya needs ta git busy & make it look well used :thumbs_up_1:

_________________
If ya lose yer sense of humor...
You've lost everything...

On the Bench:
1/720 Italeri CVN-68 ca 1976/77
1/800 ARii 1/800 CV-59 backdating to 1961 (CVA-59)
1/700Trumpy USS Hornet CV-8 "Doolittle Raiders"


Report this post
Top
 Profile  
Reply with quote  
PostPosted: Fri Dec 07, 2012 8:28 am 
Offline
User avatar

Joined: Wed Jan 13, 2010 9:10 am
Posts: 2710
Location: san francisco
nice little spot. :thumbs_up_1:


Report this post
Top
 Profile  
Reply with quote  
PostPosted: Sat Dec 08, 2012 6:13 pm 
Offline
User avatar

Joined: Fri Nov 24, 2006 7:30 pm
Posts: 1607
Location: Cape Canaveral Florida
I kind of wish my work table looked that good.


Report this post
Top
 Profile  
Reply with quote  
Display posts from previous:  Sort by  
Post new topic Reply to topic  [ 4819 posts ]  Go to page Previous  1 ... 202, 203, 204, 205, 206, 207, 208 ... 241  Next

All times are UTC - 6 hours [ DST ]


Who is online

Users browsing this forum: Bing [Bot], jmarc and 21 guests


You can post new topics in this forum
You can reply to topics in this forum
You cannot edit your posts in this forum
You cannot delete your posts in this forum
You cannot post attachments in this forum

Jump to:  
Powered by phpBB® Forum Software © phpBB Group