The Ship Model Forum

The Ship Modelers Source
It is currently Sun Jan 19, 2025 6:17 pm

All times are UTC - 6 hours [ DST ]


Post new topic Reply to topic  [ 12 posts ] 
Author Message
 Post subject: 1/72 USS Cod submarine
PostPosted: Tue Feb 26, 2013 8:59 pm 
Offline
User avatar

Joined: Mon May 14, 2012 12:18 pm
Posts: 2068
Location: Salt Lake City, USA
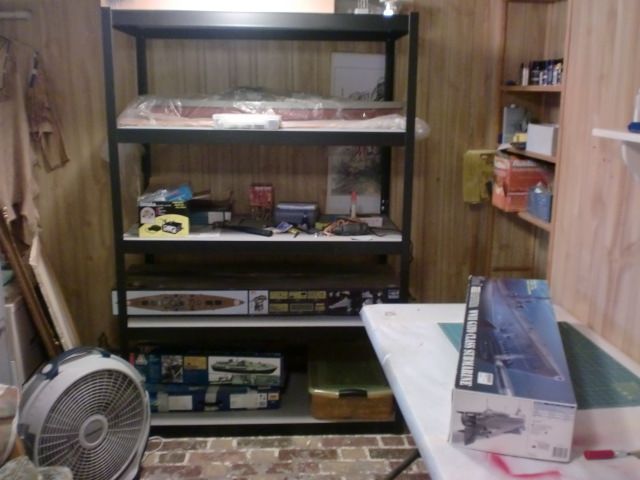
It's tax season here in the USA, usually a bad time but not this year (for me anyway! :big_grin:). Uncle Sam has made it possible for me to upgrade my "operation" with a new set of big-ass shelves to stack my growing collection of permanently under construction big-ass boats on:
Image

I picked up a 1/35 scale PT boat for a future project... I think I can now officially say I have a "cache"!

I also became the last serious modeler on the planet to get an airbrush:

Image

...and am ready for business!!

I still have a gato that was modded to extremes last year (viewtopic.php?f=59&t=106287) and isn't quite done but I am still unsatisfied with it for reasons that can only be considered an "artistic hissy-fit" without the smashing and swearing in French. It's been carefully tucked away and while I learned a lot on the build I am haunted by the notion that it should be *better* in some way. I don't know why or how, but somehow, someway I must build and finish a perfect gato... my all-time favorite ship.

Anyway, you can imagine what happened when I came across another gato kit at the store at a most excellent price:

Image

The "good deal factor" was quickly erased with an order for the Eduard "Big Ed" and White Ensign PE sets and while I promised myself I would hold off on it I still found myself robotically cutting it up the other day like it's last year all over again.

Maybe it's mental illness, and maybe I'm only happy with an xacto knife in hand and a box of fresh expensive plastic begging to be modded in front of me.... but there are worse ways to loose it, I suppose. :tongue:

Anyway...(drum roll) Welcome to my new build... the USS Cod in 1/72 scale!

Here are the goals for this build:

-A semi-scratch "see through" deck made from individually laid PE plates and styrene strips like my last gato.

-A modded "covered wagon" fairwater that replicates the actual boat and new 5" gun.

-Replacing/scratchbuilding the torpedo tube doors to match the actual boat.

-Scratchbuilding the forward pressure hull top and all the struts/equipment in that area.

-A quality (airbrushed) wartime paint job.

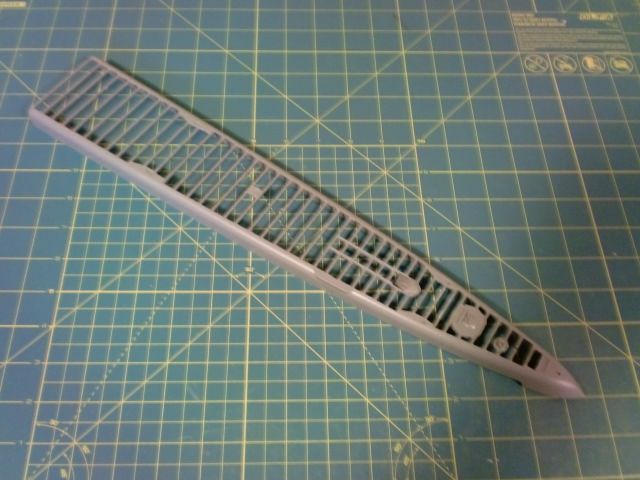
I've learned a lot about what does/doesn't work from the first gato; this time I will not bother with recreating the entire pressure hull top (which can't be seen under the deck anyway) and instead focus only on the forward area under the deck which is visible. I'm gonna skip "oil canning" the hull (except for the upper portion of the bow which I will try a very subdued effect) and keep the kit weld lines, though I might "distress" them a bit.

In other words, plenty of ambition without the excess. And so it begins:
Image

_________________
-Jason Channell

Current Project: 1/200 Bismarck


Last edited by Channell on Mon Mar 04, 2013 11:46 pm, edited 1 time in total.

Report this post
Top
 Profile  
Reply with quote  
PostPosted: Wed Feb 27, 2013 12:24 am 
Offline

Joined: Sat Jan 12, 2013 1:44 am
Posts: 272
Location: San Diego, CA
Channell, I think you are going to like what the airbrush can do for you. I use a Iwata Neo CN gravity-feed, dual-action airbrush run off a CO2 tank. Probably the best modeling investment I ever made. You can still decant rattle can colors, just let it sit for a little to boil out.

Here is my "cache". Although not ships, it is mostly 1/72 German armor.

Looking forward to watching this new build of yours.


Attachments:
SAM_0128.JPG
SAM_0128.JPG [ 198.31 KiB | Viewed 3259 times ]
Report this post
Top
 Profile  
Reply with quote  
PostPosted: Wed Feb 27, 2013 11:57 pm 
Offline
User avatar

Joined: Mon May 14, 2012 12:18 pm
Posts: 2068
Location: Salt Lake City, USA
Quick update:

Image

I should have remembered to do a "before" pic but this will have to do. It's gonna take a serious amount of work to turn the Cobia fairwater into the Cod... besides the "covered wagon" top (which will hopefully be made easy to do with the WEM PE set) virtually every storage locker needs to be moved. I will also need to relocate most of the bar steps; even the step ups to the forward gun platform will have to realigned because the Cod has four steps instead of three as the kit provides. Luckily I have plenty of extra pre-bent steps that I saved from my previous gatos so I won't have to make any more.

Finally the doorways into the fairwater need to be opened as they are molded shut on the kit. This time I am thinning down the plastic around doorways from the inside to get a more realistic look as well. 1 door down and 1 to go...

_________________
-Jason Channell

Current Project: 1/200 Bismarck


Report this post
Top
 Profile  
Reply with quote  
PostPosted: Thu Feb 28, 2013 10:30 pm 
Offline
User avatar

Joined: Mon May 14, 2012 12:18 pm
Posts: 2068
Location: Salt Lake City, USA
I got my PE sets in the mail today and got started with the WEM set:

Image

The main benefit of this particular set is to convert the Cobia fairwater into a "covered wagon" fairwater; a modification done on many wartime Gatos to reduce their silhouette (including the Cod). The kit also includes the necessary pieces to completely rebuild the periscope housing with PE too, which will be VERY nice.

Here's the basic frame:

In progress:

Image

And assembled, next to the Revell part that it replaces:

Image

Image

I also got into some vicious cutting on the fairwater, cutting the beams out of the kit cigarette deck to add the Eduard PE to them for the "see through" effect and taking off the sides of the bridge. I will replace the sides with thinner sheet styrene later on. The forward gun platform needs the same treatment still; the area around the periscope shears is solid metal plate on the cod so I will do likewise with sheet styrene as well.

Image

There's still a ways to go here but it's coming along well so far:

Image

Image

_________________
-Jason Channell

Current Project: 1/200 Bismarck


Report this post
Top
 Profile  
Reply with quote  
PostPosted: Fri Mar 01, 2013 11:30 am 
Offline
User avatar

Joined: Sun Oct 30, 2005 12:27 pm
Posts: 305
Looking good Jason, you certainly are a dab hand with the PE!!

Does this mean the sides of the tower will be open, showing those beautiful I beams?

_________________
Regards

Nigel


Report this post
Top
 Profile  
Reply with quote  
PostPosted: Fri Mar 01, 2013 12:25 pm 
Offline
User avatar

Joined: Mon May 14, 2012 12:18 pm
Posts: 2068
Location: Salt Lake City, USA
NigelR32 wrote:
Looking good Jason, you certainly are a dab hand with the PE!!

Does this mean the sides of the tower will be open, showing those beautiful I beams?


The top will... Eventually it will look like this:

Image

(Photo from Navsource)

The USS Cod is still around as a museum sub in Ohio: http://www.usscod.org/

So for once I can enjoy an overload of resource material in my attempt to replicate a boat.

Image

And Plastic Habbit... it looks like you are the owner of a small private hobby shop! I imagine I'll get there eventually too.

_________________
-Jason Channell

Current Project: 1/200 Bismarck


Report this post
Top
 Profile  
Reply with quote  
PostPosted: Fri Mar 01, 2013 12:50 pm 
Offline
User avatar

Joined: Sun Oct 07, 2012 4:50 pm
Posts: 123
I´ve ordered Trumpeter´s Gato in 1/144, I´ll follow your progress as a reference on tips.
Mine will probably be a fleet snorkel postwar mod.
Good job!

saludos

P

_________________
Done:
Victor III 1/350

In the yard:
USS Gudgeon 1/350
Alfa 1/350
Queue:
Guppy II 1/350
Leonardo Da Vinci 1/350
Type 212 1/350
ARA Santiago del Estero 1/144
USS Nautilus 1/350
ARA San Juan 1/350
ARA Chiriguano 1/350
Severodvinsk 1/350


Report this post
Top
 Profile  
Reply with quote  
PostPosted: Fri Mar 01, 2013 8:03 pm 
Offline

Joined: Sat Jan 12, 2013 1:44 am
Posts: 272
Location: San Diego, CA
Channell,

Your build looks like it is coming along quite nicely. Not sure about you but it is nice to have another project going when there are times that stepping away from the Bismarck are needed.

The funny thing about that collection is that it is only the armor side of it. I have about the same amount of german aircraft on the closet shelves. Some people have drugs or gambling, I have plastic. There is some truth in my user name. Sad thing is, the model shop had a sale on ship kits. Buy 2 get the third free, so I went a little crazy.

Well, looking forward to your next post of progress pics. In the mean time enjoy.


Report this post
Top
 Profile  
Reply with quote  
PostPosted: Sun Mar 03, 2013 10:51 pm 
Offline
User avatar

Joined: Mon May 14, 2012 12:18 pm
Posts: 2068
Location: Salt Lake City, USA
Progress check:

Still plowing away at modifications; I got the sections of the deck which will be covered with PE completely skeletonized and ready to go.

Image

Rather than totally redoing the hatches I am going to leave them on, only scraping off the details which will be replaced by PE as the Eduard instructions suggest and replacing the hatch springs as they look particularly unconvincing molded on.

I'm progressing somewhat with the fairwater as well... here it is next to the mostly unmodified fairwater of the cobia. I've always had problems replicating the spray shield... we'll see how it goes this time.

Image

_________________
-Jason Channell

Current Project: 1/200 Bismarck


Report this post
Top
 Profile  
Reply with quote  
PostPosted: Mon Mar 04, 2013 1:35 pm 
Offline
User avatar

Joined: Sun Oct 30, 2005 12:27 pm
Posts: 305
Looking good Jason. Is all that work on the decks really apparent on the finished model?

I like your new tower. It looks so much better than Cobia's. Looks like you've sold some WEM PE for them!! I have two gato's in my pile as they were being sold in the UK a couple of years ago for £20 and now I see they're fetching over $100 on Fleabay.

_________________
Regards

Nigel


Report this post
Top
 Profile  
Reply with quote  
PostPosted: Mon Mar 04, 2013 2:59 pm 
Offline
User avatar

Joined: Mon May 14, 2012 12:18 pm
Posts: 2068
Location: Salt Lake City, USA
NigelR32 wrote:
Looking good Jason. Is all that work on the decks really apparent on the finished model?

I like your new tower. It looks so much better than Cobia's. Looks like you've sold some WEM PE for them!! I have two gato's in my pile as they were being sold in the UK a couple of years ago for £20 and now I see they're fetching over $100 on Fleabay.


$284 on Amazon... Revell isn't making the kit anymore and they are getting harder to come by.

As for the decks, yes I think it's worth it in the end. It's harder to tell from the photos but it really ups the realism factor by leaps and bounds when looking at one in person.

Here's a couple photos of my previous Gato for example:

vs an unmodiffied kit deck:

Image

Image

Image

What wasn't really worth it on that build was the detailed pressure hull top and induction pipes; you just don't see them under the deck. This time I'm gonna do something a bit simpler underneath.

_________________
-Jason Channell

Current Project: 1/200 Bismarck


Report this post
Top
 Profile  
Reply with quote  
PostPosted: Wed Jul 17, 2019 7:31 pm 
Offline

Joined: Sat Aug 28, 2010 5:26 pm
Posts: 4
Channell wrote:
Progress check:

Still plowing away at modifications; I got the sections of the deck which will be covered with PE completely skeletonized and ready to go.

Image

Rather than totally redoing the hatches I am going to leave them on, only scraping off the details which will be replaced by PE as the Eduard instructions suggest and replacing the hatch springs as they look particularly unconvincing molded on.

I'm progressing somewhat with the fairwater as well... here it is next to the mostly unmodified fairwater of the cobia. I've always had problems replicating the spray shield... we'll see how it goes this time.

Image


Report this post
Top
 Profile  
Reply with quote  
Display posts from previous:  Sort by  
Post new topic Reply to topic  [ 12 posts ] 

All times are UTC - 6 hours [ DST ]


Who is online

Users browsing this forum: Dave from Downunder, Majestic-12 [Bot] and 43 guests


You can post new topics in this forum
You can reply to topics in this forum
You cannot edit your posts in this forum
You cannot delete your posts in this forum
You cannot post attachments in this forum

Jump to:  
Powered by phpBB® Forum Software © phpBB Group