The Ship Model Forum

The Ship Modelers Source
It is currently Fri Jul 04, 2025 12:56 pm

All times are UTC - 6 hours [ DST ]


Post new topic Reply to topic  [ 26 posts ]  Go to page 1, 2  Next
Author Message
PostPosted: Mon Oct 14, 2024 3:22 pm 
Offline
User avatar

Joined: Sun Oct 12, 2008 3:55 am
Posts: 622
Location: Budapest, Hungary
Let me present to you my take on Samek’s 1:700 HMS York. I remember when I bought this kit about twenty years ago I was impressed by the fine rendition of the engraved deck planks. Today the kit does not seem all that impressive, but is a good starting point for making an attractive model. In the meantime Trumpeter had issued an injection moulded kit of this subject, but I wanted to go on with this build. This log is not going to be as detailed as my previous accounts, as my method of construction does not change much and I have written a few before. I am already well into the build, so some of the information will be in retrospect.
I do prefer the sharp details of a resin kit over those of an injection moulded one. The Samek kit, however does require some scratchbuilding to match the finesse of the Flyhawk Ajax kit which it will positioned next to in my planned diorama depicting Souda Bay at the beginning of 1941. A Flower class corvette (Triumph Model) will accompany the two cruisers.
This is my usual photograph of the kit and my journal of the building plan on my desk.
Attachment:
IMG_1190.jpg
IMG_1190.jpg [ 2 MiB | Viewed 1779 times ]

Some of the reference material:
Attachment:
IMG_1192.jpg
IMG_1192.jpg [ 1.95 MiB | Viewed 1779 times ]

Is usual I started with the hull. I added a styrene plate to the bottom to heighten up the hull allowing it to be recessed into the seascape later.
Attachment:
20231210_081333.jpg
20231210_081333.jpg [ 714.42 KiB | Viewed 1779 times ]

The characteristic knuckle at the bow was missing, so I sanded it in.
Attachment:
20231210_090659.jpg
20231210_090659.jpg [ 667.07 KiB | Viewed 1779 times ]

The hawse holes were altered in shape, the portholes drilled deeper, the ground tackle detailed.
Attachment:
20231228_164822 (1).jpg
20231228_164822 (1).jpg [ 348.38 KiB | Viewed 1779 times ]

Attachment:
20231228_164749.jpg
20231228_164749.jpg [ 503.06 KiB | Viewed 1779 times ]

More soon!


Attachments:
IMG_1190.JPG
IMG_1190.JPG [ 3.7 MiB | Viewed 1779 times ]
Report this post
Top
 Profile  
Reply with quote  
PostPosted: Tue Oct 15, 2024 2:36 pm 
Offline
User avatar

Joined: Sun Oct 12, 2008 3:55 am
Posts: 622
Location: Budapest, Hungary
The midship section is covered by the forecastle deck, so I had to complete this part along with painting
Attachment:
20240205_234636.jpg
20240205_234636.jpg [ 549.15 KiB | Viewed 1724 times ]

Attachment:
20240210_144817.jpg
20240210_144817.jpg [ 914.21 KiB | Viewed 1724 times ]

before adding the deck piece out of styrene instead of the resin deck provided for a thinner appearance.
Attachment:
20240303_135137.jpg
20240303_135137.jpg [ 296.44 KiB | Viewed 1724 times ]

Attachment:
20240116_013502.jpg
20240116_013502.jpg [ 340.06 KiB | Viewed 1724 times ]

This did not turn out a wise decision because the deck developed a warping later.


Report this post
Top
 Profile  
Reply with quote  
PostPosted: Tue Oct 15, 2024 2:49 pm 
Offline
User avatar

Joined: Sun Oct 12, 2008 3:55 am
Posts: 622
Location: Budapest, Hungary
The aft superstructure had a wrong shape so I cut it in two by milling away some resin,
Attachment:
20231228_171159.jpg
20231228_171159.jpg [ 539.23 KiB | Viewed 1723 times ]

then fitting a covering piece of deck over it.
Attachment:
20240212_190710.jpg
20240212_190710.jpg [ 664.66 KiB | Viewed 1723 times ]

Numerous items of deck equipment were prepared
like the one in the next picture
Attachment:
20240222_225807 (1).jpg
20240222_225807 (1).jpg [ 1.06 MiB | Viewed 1723 times ]

but most of them were temporarily attached to pieces of cardboard for ease of painting.
The resin components were primed with AK Fine Resin Primer from a rattle can.
Attachment:
20240311_180415.jpg
20240311_180415.jpg [ 225.08 KiB | Viewed 1723 times ]

Attachment:
20240319_213726.jpg
20240319_213726.jpg [ 368.12 KiB | Viewed 1723 times ]

Attachment:
IMG_1196.JPG
IMG_1196.JPG [ 747.12 KiB | Viewed 1723 times ]

Attachment:
IMG_1197.JPG
IMG_1197.JPG [ 645.1 KiB | Viewed 1723 times ]

PE rigols and degaussing cable made of Tamiya masking tape can be seen.
The ship's name was spelt out at the stern by small PE letters
Attachment:
20240330_154716.jpg
20240330_154716.jpg [ 1 MiB | Viewed 1723 times ]

Better this way:
Attachment:
20240330_154919.jpg
20240330_154919.jpg [ 1.52 MiB | Viewed 1723 times ]


Report this post
Top
 Profile  
Reply with quote  
PostPosted: Tue Oct 15, 2024 7:00 pm 
Offline
User avatar

Joined: Tue Jan 11, 2005 1:40 pm
Posts: 8348
Location: New Jersey
Wow - off to a great start. Will be watching with interest!

_________________
Martin

"Tomorrow is the most important thing in life. Comes into us at midnight very clean. It's perfect when it arrives and it puts itself in our hands. It hopes we've learned something from yesterday." John Wayne

Ship Model Gallery


Report this post
Top
 Profile  
Reply with quote  
PostPosted: Wed Oct 16, 2024 2:36 am 
Offline
User avatar

Joined: Sun Jan 17, 2021 3:33 am
Posts: 91
Hi!

Nice details as always :thumbs_up_1: As I can see, the exploration of the details was still quite thorough, the notebook became quite dense :cool_1:


Report this post
Top
 Profile  
Reply with quote  
PostPosted: Wed Oct 16, 2024 4:56 pm 
Offline
User avatar

Joined: Sun Oct 12, 2008 3:55 am
Posts: 622
Location: Budapest, Hungary
Martin thank you so much.
You never fail to encourage me and the others and that is very kind of you!
Szabi, you have a sharp eye!
This building plan actually amounts to two pages of small letter-text and drawings.


Report this post
Top
 Profile  
Reply with quote  
PostPosted: Wed Oct 16, 2024 5:05 pm 
Offline
User avatar

Joined: Sun Oct 12, 2008 3:55 am
Posts: 622
Location: Budapest, Hungary
The bridge was detailed tier after tier with photoetch reinforcing straps affixed to the corticene deck cover. Bracing is taken from WEM County class upgrade set. The pictures show a lot of miniscule details added to the bridge.
Attachment:
20240401_231127.jpg
20240401_231127.jpg [ 413.45 KiB | Viewed 1638 times ]

Attachment:
20240401_231135.jpg
20240401_231135.jpg [ 630.97 KiB | Viewed 1638 times ]

Attachment:
20240428_115930.jpg
20240428_115930.jpg [ 289.38 KiB | Viewed 1638 times ]

Attachment:
20240428_120005.jpg
20240428_120005.jpg [ 449.08 KiB | Viewed 1638 times ]

Attachment:
IMG_1202.JPG
IMG_1202.JPG [ 685.28 KiB | Viewed 1638 times ]

Attachment:
IMG_1203.JPG
IMG_1203.JPG [ 664.19 KiB | Viewed 1638 times ]

Attachment:
IMG_1198.JPG
IMG_1198.JPG [ 1021 KiB | Viewed 1638 times ]

The after bridge was modified along similar lines.
Attachment:
20240526_232210.jpg
20240526_232210.jpg [ 594.18 KiB | Viewed 1638 times ]

Attachment:
20240602_09174366.jpg
20240602_09174366.jpg [ 750.38 KiB | Viewed 1638 times ]


Report this post
Top
 Profile  
Reply with quote  
PostPosted: Sat Oct 19, 2024 3:34 am 
Offline
User avatar

Joined: Sun Oct 12, 2008 3:55 am
Posts: 622
Location: Budapest, Hungary
The funnels
Attachment:
20240602_112129.jpg
20240602_112129.jpg [ 1.01 MiB | Viewed 1575 times ]

Attachment:
20240602_112124.jpg
20240602_112124.jpg [ 1002.74 KiB | Viewed 1575 times ]

had their openings drilled deeper, steam pipes (Albion Alloys), and clinker screen (0,1 mm copper Wire) added.
Attachment:
20240720_124254 (1).jpg
20240720_124254 (1).jpg [ 3.85 MiB | Viewed 1575 times ]

Attachment:
20240722_194733 (1).jpg
20240722_194733 (1).jpg [ 1.32 MiB | Viewed 1575 times ]

Note that at this stage nothing is glued to place yet, all parts are held by metal sticks drilled in to facilitate correct placement when painted.
This deliberately allows for some slack, hence the out of true position of the aft funnel (which has just one positioning stick).
The catapult and crane are from the kit’s PE with added details, primed with AK Fine Metal Primer.
Attachment:
20240812_233038.jpg
20240812_233038.jpg [ 1.45 MiB | Viewed 1575 times ]

Attachment:
20240818_150908.jpg
20240818_150908.jpg [ 1002.7 KiB | Viewed 1575 times ]

Attachment:
20240820_121833.jpg
20240820_121833.jpg [ 368.91 KiB | Viewed 1575 times ]

Attachment:
20240812_233452.jpg
20240812_233452.jpg [ 1.23 MiB | Viewed 1575 times ]

Attachment:
20240820_130044.jpg
20240820_130044.jpg [ 1.67 MiB | Viewed 1575 times ]

Attachment:
20240820_130030.jpg
20240820_130030.jpg [ 688.17 KiB | Viewed 1575 times ]


Report this post
Top
 Profile  
Reply with quote  
PostPosted: Sat Oct 19, 2024 9:29 am 
Offline
User avatar

Joined: Tue Jun 29, 2010 7:45 am
Posts: 142
Location: South West of France
A beautiful subject !

I will follow it with great attention :)

_________________
In 1:700 we trust

There are three kinds of people: the living, the dead and those who go to sea.


Report this post
Top
 Profile  
Reply with quote  
PostPosted: Tue Oct 22, 2024 8:23 am 
Offline
User avatar

Joined: Sun Oct 12, 2008 3:55 am
Posts: 622
Location: Budapest, Hungary
Thank you, Yuth!


Report this post
Top
 Profile  
Reply with quote  
PostPosted: Thu Oct 24, 2024 7:23 am 
Offline
User avatar

Joined: Sun Oct 12, 2008 3:55 am
Posts: 622
Location: Budapest, Hungary
Ship’s boats and rafts are beautiful 3D prints from Micro Master, just as almost all of the armament. One boat is modified from a Combrig rowing boat.
Attachment:
20240925_011602.jpg
20240925_011602.jpg [ 461.84 KiB | Viewed 1406 times ]

Masts were constructed from brass tube from Albion Alloys, yards came from Master Model sets.
Attachment:
20240930_000254.jpg
20240930_000254.jpg [ 677.25 KiB | Viewed 1406 times ]

Attachment:
20241003_002657 (2).jpg
20241003_002657 (2).jpg [ 2.36 MiB | Viewed 1406 times ]

Attachment:
20241006_111255 (3).jpg
20241006_111255 (3).jpg [ 1.62 MiB | Viewed 1406 times ]

In some of the pictures the ship and all the additional parts can be seen together, ready for painting.
Attachment:
20241006_111255 (3).jpg
20241006_111255 (3).jpg [ 1.62 MiB | Viewed 1406 times ]

Attachment:
20241006_111308 (1).jpg
20241006_111308 (1).jpg [ 1.92 MiB | Viewed 1406 times ]


Attachments:
20241003_002657 (2).jpg
20241003_002657 (2).jpg [ 2.36 MiB | Viewed 1406 times ]
45543ff - Copy.jpg
45543ff - Copy.jpg [ 1.12 MiB | Viewed 1406 times ]
IMG_1211.JPG
IMG_1211.JPG [ 3.14 MiB | Viewed 1406 times ]
IMG_1212.JPG
IMG_1212.JPG [ 3.1 MiB | Viewed 1406 times ]
20241006_110358 (1).jpg
20241006_110358 (1).jpg [ 917.65 KiB | Viewed 1406 times ]
Report this post
Top
 Profile  
Reply with quote  
PostPosted: Tue Jan 07, 2025 3:52 pm 
Offline
User avatar

Joined: Sun Oct 12, 2008 3:55 am
Posts: 622
Location: Budapest, Hungary
While in the previous part of this report was written in retrospect, further updates are in line with construction, hence the considerable delay in posting. The painting process started with the wooden deck which was covered with WEM Teak, somewhat lightened.
Attachment:
20241022_202036.jpg
20241022_202036.jpg [ 1.19 MiB | Viewed 1072 times ]

I had to overcome the problem posed by the shelter deck and the quarterdeck portion around the 4” AA guns not having the groove pattern of other deck parts. Initially I had tried to scribe these two areas, but I would have to remove all cast on details to be able to do so, consequently apart from some faint lines, no grooves were present there. Eventually I drew some lines freehand with my 0.02 Warm Grey Marker.
Attachment:
20241023_113818.jpg
20241023_113818.jpg [ 1.73 MiB | Viewed 1072 times ]

These lines, while not really regular or straight, gave a surprisingly credible result. I tried pick out individual planks by spraying them some variation of the original colour but to my horror the masking tape lifted the paint along with the primer at my first attempt, so I had to resort to fine brush painting. Applying AK Dark Wash for Wood Deck finished the painting of the wood deck.
Attachment:
20241023_101721.jpg
20241023_101721.jpg [ 1.21 MiB | Viewed 1072 times ]

Next lightened WEM Corticene was sprayed over some decks, slightly lightened WEM AP 507A over other ones.
Attachment:
20241024_213840.jpg
20241024_213840.jpg [ 1.36 MiB | Viewed 1072 times ]

In the picture above you can see Humbrol Maskol covering wooden deck portions next to steel deck areas.
Attachment:
20241027_203847.jpg
20241027_203847.jpg [ 1.14 MiB | Viewed 1072 times ]

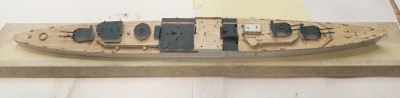
All AP 507A painted surfaces:
Attachment:
20241024_221852.jpg
20241024_221852.jpg [ 1.26 MiB | Viewed 1072 times ]

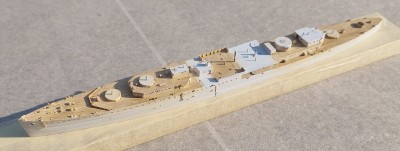
With boot topping (Revell 9 Anthracite) sprayed on without masking:
Attachment:
20241102_110758.jpg
20241102_110758.jpg [ 1.26 MiB | Viewed 1072 times ]


Attachments:
20241023_101721.jpg
20241023_101721.jpg [ 1.21 MiB | Viewed 1072 times ]
Report this post
Top
 Profile  
Reply with quote  
PostPosted: Tue Jan 07, 2025 4:03 pm 
Offline
User avatar

Joined: Sun Oct 12, 2008 3:55 am
Posts: 622
Location: Budapest, Hungary
After some minor colour modulation of these decks I applied a coat of lightened WEM AP507C over the vertical surfaces.
Here it can be seen with the boot topping masked:
Attachment:
20241104_022515.jpg
20241104_022515.jpg [ 880.13 KiB | Viewed 1070 times ]

To faithfully reproduce the characteristic camouflage pattern I laminated a copy of the 1/700 Profile Morskie elevation plan.
Then a strip of masking tape was applied over it, the outlines of the camouflage panels (corrected according to period photographs) drawn in,
Attachment:
20241124_181412(0).jpg
20241124_181412(0).jpg [ 1.06 MiB | Viewed 1070 times ]

Attachment:
20241124_181427.jpg
20241124_181427.jpg [ 1.79 MiB | Viewed 1070 times ]

Attachment:
20241124_212254.jpg
20241124_212254.jpg [ 2.91 MiB | Viewed 1070 times ]

the tape transferred to a hard surface,
Attachment:
20241124_232716.jpg
20241124_232716.jpg [ 1.32 MiB | Viewed 1070 times ]

the individual panels cut out and attached to the model.
The camouflage of the superstructure was hand painted for masking of the complex structures would have been very hard.
Attachment:
20241112_211114.jpg
20241112_211114.jpg [ 1.3 MiB | Viewed 1070 times ]

WEM AP 507B was sprayed over it generating the desired pattern.
Attachment:
20241126_183420.jpg
20241126_183420.jpg [ 819.18 KiB | Viewed 1070 times ]

Attachment:
20241126_214517.jpg
20241126_214517.jpg [ 1.29 MiB | Viewed 1070 times ]

Attachment:
20241126_214553.jpg
20241126_214553.jpg [ 659.05 KiB | Viewed 1070 times ]


Report this post
Top
 Profile  
Reply with quote  
PostPosted: Sun Feb 02, 2025 4:39 am 
Offline
User avatar

Joined: Sun Oct 12, 2008 3:55 am
Posts: 622
Location: Budapest, Hungary
With the basic colours added I moved on to the paint effects. First I reduced contrast and provided some variation of shade using the method described by Marijn van Gils: adding drops of blue, red, brown, tan and green over a surface wetted with white spirit then blending them. After letting dry for one or two days and applying a protective layer of acrylic satin varnish light and dark grey washes were applied using AK products. These effects are most pronounced around the ship’s bow. Next a pin wash imitating shadows was added to every nook and cranny using AK’s ‘Shadows for grey ships’ oil paint. This was followed by highlighting all edges with lighter variations of the base colour. This was really time-consuming regarding the endless count of small details. After adding a hint of rust the paintwork was sealed by a thin layer of matt varnish. The weathering may seem overdone but regarding the wartime conditions it can also be regarded credible.
Attachment:
20241228_235349.jpg
20241228_235349.jpg [ 555 KiB | Viewed 901 times ]

Attachment:
20241229_113400.jpg
20241229_113400.jpg [ 359.18 KiB | Viewed 901 times ]

Attachment:
20241229_113404.jpg
20241229_113404.jpg [ 409.39 KiB | Viewed 901 times ]

Attachment:
20241229_113417.jpg
20241229_113417.jpg [ 490.65 KiB | Viewed 901 times ]

Attachment:
20250106_002316.jpg
20250106_002316.jpg [ 620.15 KiB | Viewed 901 times ]

Attachment:
20250106_002325.jpg
20250106_002325.jpg [ 729.89 KiB | Viewed 901 times ]

Attachment:
20250106_002331.jpg
20250106_002331.jpg [ 1.16 MiB | Viewed 901 times ]

Attachment:
20250106_002410.jpg
20250106_002410.jpg [ 480.9 KiB | Viewed 901 times ]


Report this post
Top
 Profile  
Reply with quote  
PostPosted: Sun Feb 02, 2025 12:32 pm 
Offline
User avatar

Joined: Sun Jan 17, 2021 3:33 am
Posts: 91
Uhh, this weathering looks very good. The painting really highlights the details of the ship.


Report this post
Top
 Profile  
Reply with quote  
PostPosted: Sun Feb 02, 2025 3:13 pm 
Offline
User avatar

Joined: Tue Jan 26, 2016 7:59 am
Posts: 239
Lovely paint work!

_________________
King George V class Battleships in 3D


Report this post
Top
 Profile  
Reply with quote  
PostPosted: Sun Jun 29, 2025 9:23 am 
Offline
User avatar

Joined: Sun Oct 12, 2008 3:55 am
Posts: 622
Location: Budapest, Hungary
A serious illness hindered my work, but finally I was able to complete this build. After I had finished the painting process final assembly could commence. Railing was attached to the forecastle and quarterdeck plus the tiers of the superstructure. This step was not without unexpected difficulties. I used AK’s blackening agent in order to gain a metal-like, dark grey finish to the longitudinal of the collapsible railing without making them thicker. The photoetch of WEM ultrafine railing was immersed in the fluid apparently for too long as it lost its elasticity and became ‘hairy’, thus somewhat thicker. Stubbornly, I decided to plough with a railing which went amiss. The stanchions were painted 507C, and I attached lengths of the railing with PVA glue. Stanchions at the 507B panels were painted accordingly in situ.
Attachment:
2025-02-09 18.46.24.jpg
2025-02-09 18.46.24.jpg [ 1.87 MiB | Viewed 59 times ]

Attachment:
2025-02-17 21.36.53.jpg
2025-02-17 21.36.53.jpg [ 1.96 MiB | Viewed 59 times ]

Attachment:
2025-04-16 00.14.58.jpg
2025-04-16 00.14.58.jpg [ 1.26 MiB | Viewed 59 times ]

Attachment:
2025-04-16 00.17.52.jpg
2025-04-16 00.17.52.jpg [ 1.06 MiB | Viewed 59 times ]

As usual, PVA glue was used to simulate canvas-covered railing in the bridge and after superstructure.
Attachment:
2025-04-20 22.38.33.jpg
2025-04-20 22.38.33.jpg [ 1.59 MiB | Viewed 59 times ]

It was a nightmare to deal with this railing, necessitating constant adjustment after the slightest touch and prone to breakage. After this ordeal all went well.


Report this post
Top
 Profile  
Reply with quote  
PostPosted: Sun Jun 29, 2025 9:29 am 
Offline
User avatar

Joined: Sun Oct 12, 2008 3:55 am
Posts: 622
Location: Budapest, Hungary
Worthy of mention is the rigging supporting the masts which, fabricated out of stretched sprue, turned out remarkably well being thin and intricate enough, and the ship’s boats, most notably the cutters carried outboard, complete with jumping net (stretched sprue construction) and elaborate rigging plus gripes (lead foil) (these could have been made somewhat narrower to tell the truth).
Attachment:
2025-04-27 09.00.12.jpg
2025-04-27 09.00.12.jpg [ 938.26 KiB | Viewed 59 times ]

Attachment:
2025-05-15 10.36.53.jpg
2025-05-15 10.36.53.jpg [ 2.3 MiB | Viewed 59 times ]


Report this post
Top
 Profile  
Reply with quote  
PostPosted: Sun Jun 29, 2025 9:36 am 
Offline
User avatar

Joined: Sun Oct 12, 2008 3:55 am
Posts: 622
Location: Budapest, Hungary
I was really afraid of the masts, being pole masts with their rigging having a supporting role just like in the original ship and retaining the rake of them at the same time. Forward planning of the order of attaching the rigging and careful selection of rigging material (caenis, lycra and stretched sprue), each to the task they are suitable for let me complete the rigging with remarkable success.
Attachment:
2025-05-27 22.53.33.jpg
2025-05-27 22.53.33.jpg [ 1.57 MiB | Viewed 59 times ]

I only made concessions with regard to the antennae which were supposed to meet at one point (there twelve of them!) and from there one strand would lead to the aerial trunk. Well, there are two strands – this does not seem to be a major flaw to me.
Attachment:
2025-06-01 10.14.41.jpg
2025-06-01 10.14.41.jpg [ 1.1 MiB | Viewed 59 times ]

Attachment:
IMG_1231.JPG
IMG_1231.JPG [ 1.66 MiB | Viewed 59 times ]

Attachment:
2025-06-01 10.14.53.jpg
2025-06-01 10.14.53.jpg [ 1.08 MiB | Viewed 59 times ]

Attachment:
2025-06-01 10.15.19.jpg
2025-06-01 10.15.19.jpg [ 1.02 MiB | Viewed 59 times ]


Attachments:
2025-05-27 22.54.06.jpg
2025-05-27 22.54.06.jpg [ 1.8 MiB | Viewed 59 times ]
Report this post
Top
 Profile  
Reply with quote  
PostPosted: Sun Jun 29, 2025 9:44 am 
Offline
User avatar

Joined: Sun Oct 12, 2008 3:55 am
Posts: 622
Location: Budapest, Hungary
After flags (decals applies to aluminium foil, slightly weathered) were attached to the rigging the crew was prepared. I used 3D printed sailors from a number of manufacturers (Five Star, Triumph, ION and Black Cat Models) – a first for me, and I was completely satisfied with them. No more flat PE figures thickened with gel type superglue! 95 of them were glued to various positions on the ship’s decks thus completing the construction.
Attachment:
2025-06-13 16.29.30.jpg
2025-06-13 16.29.30.jpg [ 1.27 MiB | Viewed 59 times ]

Attachment:
2025-06-13 16.30.07.jpg
2025-06-13 16.30.07.jpg [ 3.19 MiB | Viewed 59 times ]

Attachment:
2025-06-13 16.30.11.jpg
2025-06-13 16.30.11.jpg [ 2.15 MiB | Viewed 59 times ]

Attachment:
2025-06-13 16.30.18.jpg
2025-06-13 16.30.18.jpg [ 2.24 MiB | Viewed 59 times ]

Attachment:
IMG_1237.JPG
IMG_1237.JPG [ 2.37 MiB | Viewed 59 times ]

Attachment:
IMG_1239.JPG
IMG_1239.JPG [ 1.63 MiB | Viewed 59 times ]

Attachment:
IMG_1241.JPG
IMG_1241.JPG [ 1.65 MiB | Viewed 59 times ]

Attachment:
IMG_1242.JPG
IMG_1242.JPG [ 1.97 MiB | Viewed 59 times ]

Attachment:
IMG_1243.JPG
IMG_1243.JPG [ 2.02 MiB | Viewed 59 times ]


I find this build thoroughly successful and look forward to the next member of the planned diorama – HMS Ajax.


Report this post
Top
 Profile  
Reply with quote  
Display posts from previous:  Sort by  
Post new topic Reply to topic  [ 26 posts ]  Go to page 1, 2  Next

All times are UTC - 6 hours [ DST ]


Who is online

Users browsing this forum: No registered users and 18 guests


You can post new topics in this forum
You can reply to topics in this forum
You cannot edit your posts in this forum
You cannot delete your posts in this forum
You cannot post attachments in this forum

Jump to:  
Powered by phpBB® Forum Software © phpBB Group