The Ship Model Forum

The Ship Modelers Source
It is currently Tue Apr 01, 2025 2:52 pm

All times are UTC - 6 hours [ DST ]


Post new topic Reply to topic  [ 39 posts ]  Go to page 1, 2  Next
Author Message
PostPosted: Wed Jul 25, 2012 9:27 pm 
Offline
User avatar

Joined: Sun Sep 21, 2008 9:56 pm
Posts: 344
Greetings!

This is another classic kit from Revell of the Forrest Sherman Class destroyers. Not certain of the scale, but often reported as 1/319. First issued in the 1950's, I built DD932 USS John Paul Jones as she appeared in early 1956 from the reissued Revell kit of USS Forrest Sherman (kit #H-463 from 1972). This kit has some very nice detail, but is also very crude in several areas. A large amount of scratch building and modification of the kit parts was required along with use of photo etch from various sets and many items from the spares bin. Finish included Floquil and Testors enamels, Krylon gloss clear, a black wash, and flat Krylon clear. UNI-Caenis 20 was used for the rigging. References included photos from several sources, especially a series of excellent images from NAVSOURCE.

Many thanks for having a look, your questions, comments, and suggestions and are always welcome.

Cheers,

Bill


Attachments:
IMG_0385.JPG
IMG_0385.JPG [ 98.13 KiB | Viewed 9390 times ]
IMG_0381.JPG
IMG_0381.JPG [ 146.2 KiB | Viewed 9390 times ]
IMG_0344.JPG
IMG_0344.JPG [ 125 KiB | Viewed 9390 times ]
IMG_0394.JPG
IMG_0394.JPG [ 116.85 KiB | Viewed 9390 times ]
IMG_0379.JPG
IMG_0379.JPG [ 120.13 KiB | Viewed 9390 times ]
IMG_0390.JPG
IMG_0390.JPG [ 124.9 KiB | Viewed 9390 times ]
IMG_0327.JPG
IMG_0327.JPG [ 125.59 KiB | Viewed 9390 times ]
IMG_0335.JPG
IMG_0335.JPG [ 114.95 KiB | Viewed 9390 times ]
IMG_0362.JPG
IMG_0362.JPG [ 106.33 KiB | Viewed 9390 times ]
IMG_0389.JPG
IMG_0389.JPG [ 107.87 KiB | Viewed 9390 times ]
Report this post
Top
 Profile  
Reply with quote  
PostPosted: Thu Jul 26, 2012 8:13 pm 
Offline
User avatar

Joined: Wed Apr 14, 2010 5:41 pm
Posts: 602
Location: North Carolina, USA
Bill,

An extraordinary build of this fine old model. She matches well with any newer kit thanks to your modelling skills. The Forrest Shermans and Buchanans were my favorites of Revell's destroyers.

Thanks for sharing your work,

Mac


Report this post
Top
 Profile  
Reply with quote  
PostPosted: Thu Jul 26, 2012 8:55 pm 
Offline
User avatar

Joined: Sun Sep 21, 2008 9:56 pm
Posts: 344
Thanks Mac for your kind words. This was a fun project and I enjoy the challenge of enhancing these older kits.

Some more images......


Attachments:
IMG_0374.JPG
IMG_0374.JPG [ 114.79 KiB | Viewed 9266 times ]
IMG_0377.JPG
IMG_0377.JPG [ 123.4 KiB | Viewed 9266 times ]
IMG_0382.JPG
IMG_0382.JPG [ 102.81 KiB | Viewed 9266 times ]
IMG_0384.JPG
IMG_0384.JPG [ 127.96 KiB | Viewed 9266 times ]
IMG_0388.JPG
IMG_0388.JPG [ 102.58 KiB | Viewed 9266 times ]
IMG_0391.JPG
IMG_0391.JPG [ 97.05 KiB | Viewed 9266 times ]
IMG_0392.JPG
IMG_0392.JPG [ 112.49 KiB | Viewed 9266 times ]
IMG_0403.JPG
IMG_0403.JPG [ 104.74 KiB | Viewed 9266 times ]
Report this post
Top
 Profile  
Reply with quote  
PostPosted: Thu Jul 26, 2012 9:26 pm 
Ditto to what Mac wrote, the Sherman Class was a unique design and cut a pretty picture knifing through water. The JPJ was homeported in San Diego when I was stationed aboard CG-29 - so I saw her up close and personal. You have done justice and more to the old kit.


Report this post
Top
  
Reply with quote  
PostPosted: Fri Jul 27, 2012 9:57 am 
Offline
User avatar

Joined: Thu Jul 05, 2012 9:20 am
Posts: 18
Location: San Diego, CA
I really like that. I remember her too when she was at SD. My Dad was RMC on the Gridley (CG/DLG-21) and we spent many a Sunday afternoon crawling all over the ship and eating lunch in the CPO mess.

_________________
The Fratellis are a myth....


Report this post
Top
 Profile  
Reply with quote  
PostPosted: Fri Jul 27, 2012 1:40 pm 
I built a Revel Forest Sherman kit when I was a kid. I was impressed with how nice a model could be built into although it didn't have enough guns for my tastes back then. It is one of the better old model kits.

Your model looks great. :thumbs_up_1: :thumbs_up_1: :thumbs_up_1:


Report this post
Top
  
Reply with quote  
PostPosted: Fri Jul 27, 2012 5:37 pm 
Offline
User avatar

Joined: Sun Sep 21, 2008 9:56 pm
Posts: 344
Thanks everyone for your kind comments. Being first issued in the later 1950's (1956?), this kit not surprisingly closely reflects the configuration of the early Forrest Sherman Class as built in the early/mid 1950's. Many of the kit details matched very well with the NAVSOURCE photos of DD931 and DD932 at the time of commissioning. I fondly remember building this kit as a lad back in the 1960's and recall how favorably it compared to other kits at the time. Very crude by today's standards, all of the basic things are there to make a decent model with some scratch building and a bit of work on the kit parts.

Cheers,

Bill


Report this post
Top
 Profile  
Reply with quote  
PostPosted: Fri Jul 27, 2012 6:25 pm 
Offline
User avatar

Joined: Tue Jan 11, 2005 1:40 pm
Posts: 8313
Location: New Jersey
Really nice build. Built this as a kid - loved the old box art.

_________________
Martin

"Tomorrow is the most important thing in life. Comes into us at midnight very clean. It's perfect when it arrives and it puts itself in our hands. It hopes we've learned something from yesterday." John Wayne

Ship Model Gallery


Report this post
Top
 Profile  
Reply with quote  
PostPosted: Sat Jul 28, 2012 7:57 pm 
Offline

Joined: Thu May 29, 2008 8:02 pm
Posts: 3837
A really nice build of a "Classic" Revell kit.

I don't know if you want to go to the extra work, but there was some "equipment" that Revell left off the SHERMAN class kit. Those wing platforms that go out to the deck edge between the stacks, had Mk 4 Torpedo Launchers for side launching Mk 32 ASW torpedoes. By the way, Mk 32 torpedoes were "thrown" overboard fins toward the bow.

Biggest headache in trying to show these on your model would be making the two Mk 4 launchers. NO ONE makes them in this scale and I'm unsure if they are available in any scale right now. You could model them covered in canvas as they normally were.

I don't have any "great" photos showing the Mk 4 Launcher installation on these destroyers. I have better photos of Mk 4 launcher installations on some other destroyer types. I really would like to find a direct overhead view of one of the SHERMAN class in early configuration.

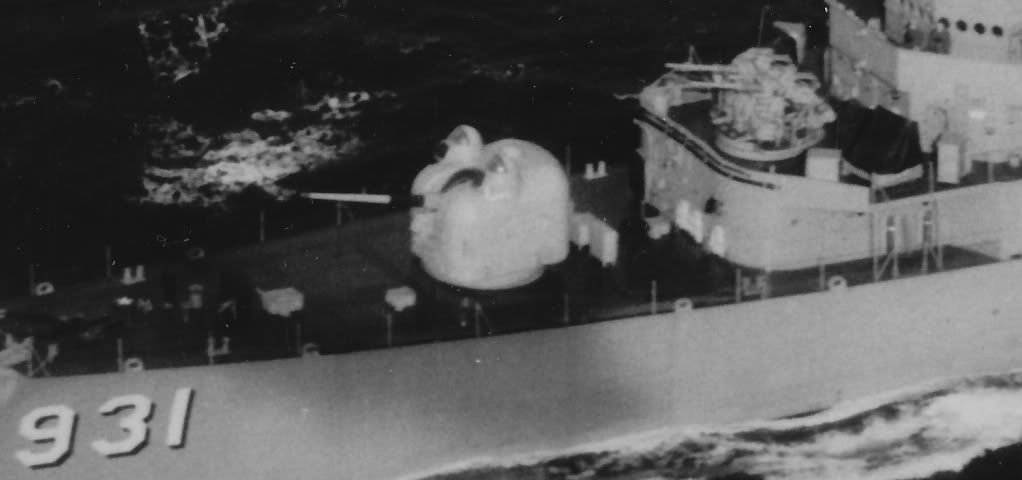
Photo of JOHN PAUL JONES shortly after her completion.
Image

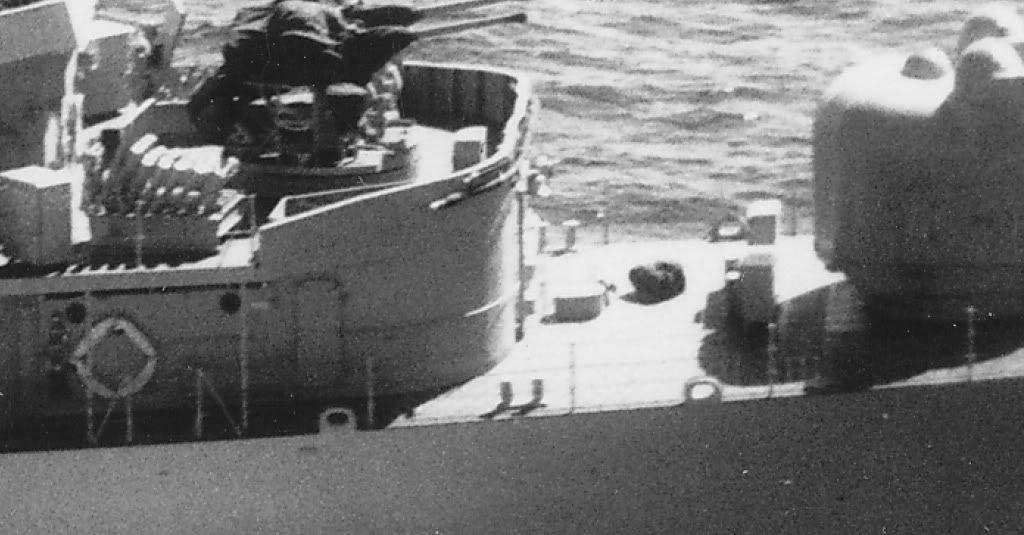
Close-Up of the midships platform area on JOHN PAUL JONES.
Image

Close-Up view of the Mk 4 launcher and crane on sister BLANDY (DD-943), August 1958. BLANDY didn't have the fixed torpedo tubes. The framed "rack" directly behind (inboard) of the Mk 4 launcher in this view is most likely the stowage rack for two Mk 32 torpedoes.
Image

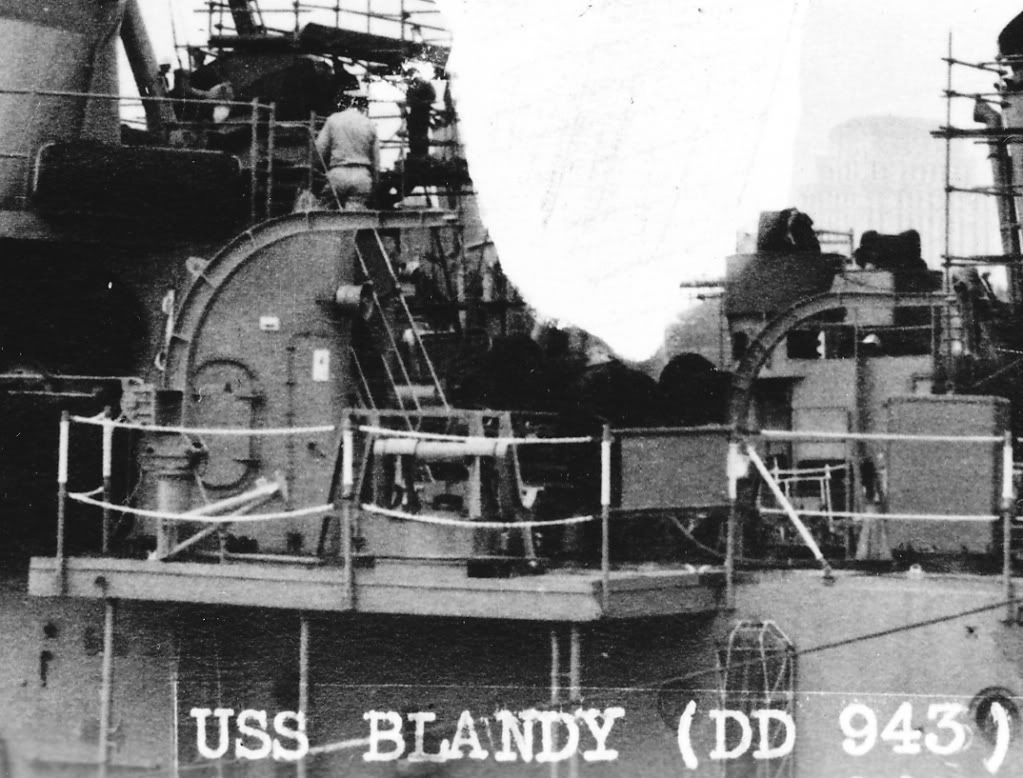
The rack likely looked like the "standard" stowage rack used on many FLETCHERS and other destroyer/destroyer escort types.
Image

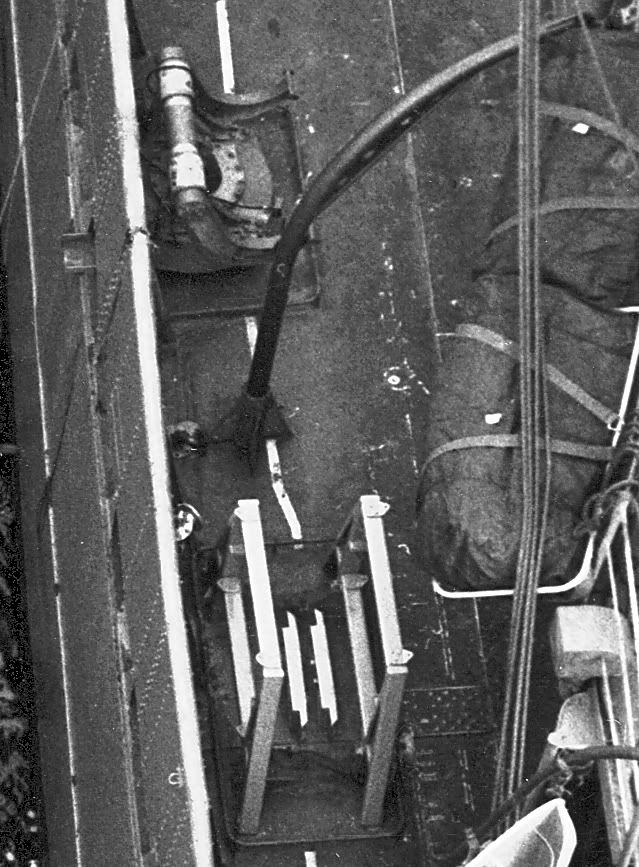
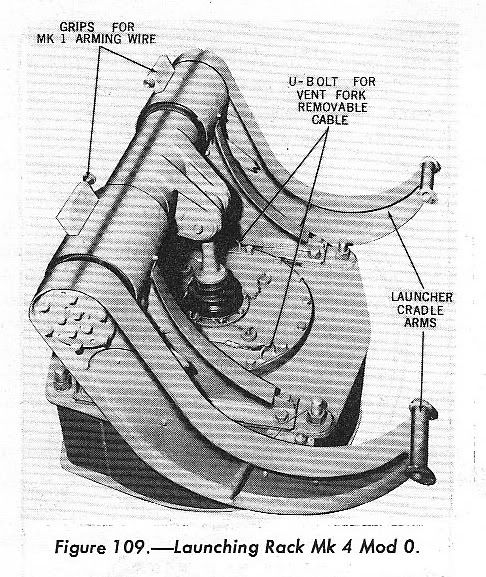
Illustration images from the Mk 2 Torpedo Launching System manual, which two Mk 4 launchers were part of.
Image

Image

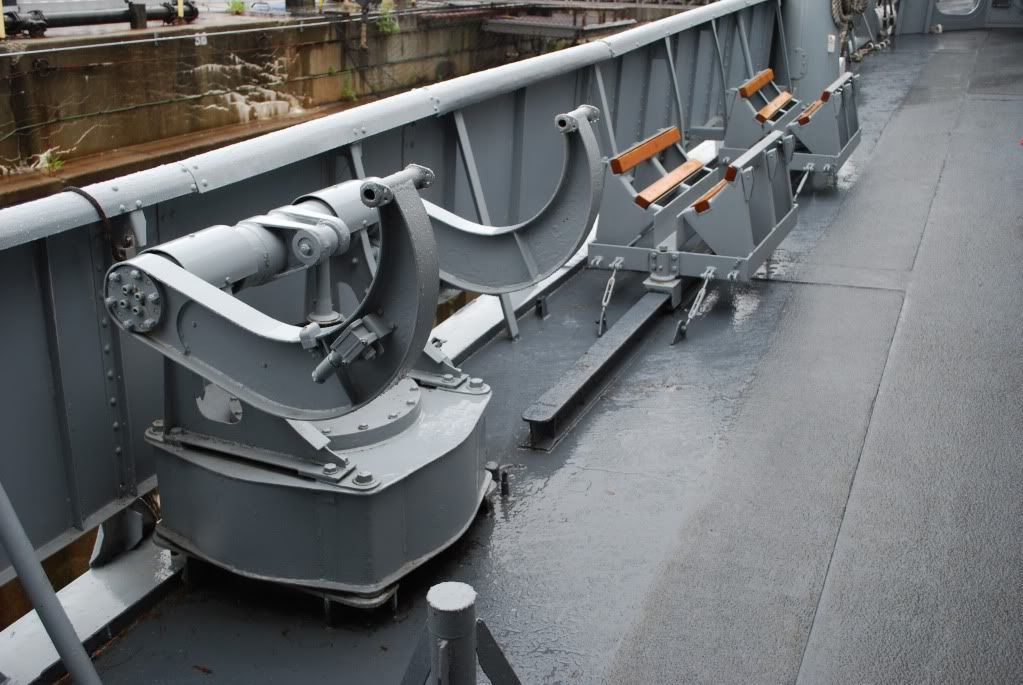
Here is picture of the Mk 4 Launcher as it was installed on the CASSIN YOUNG. The rail and trolly reload method wasn't used on the SHERMAN class. I can't tell exactly where it was and the configuration, but because of the location of the reload crane, likely the reloads were beside the fixed torpedo tubes.
Image


Report this post
Top
 Profile  
Reply with quote  
PostPosted: Sun Jul 29, 2012 10:17 am 
Offline
User avatar

Joined: Sun Sep 21, 2008 9:56 pm
Posts: 344
Hello Rick,

Many thanks for pointing this out and for the great photos. I completely missed those cradle launchers! I will definitely have to either scratch up a pair or as you suggested, show them as being covered.

Perhaps you can help with something else. The kit has some storage lockers molded onto the deck just aft of the 51 mount. I think Revell based these "lockers" on this photo (circled in red) of DD932 taken during an inclining experiment (I think). Anyway, I don't think these are a part of the ship. They seem too close to the gun mount and I suspect they are something to do with the inclining experiment or some other temporary item. I decided to leave these off the model, but I am really not 100% certain. What do you think?

Thanks for you help.

Bill


Attachments:
DD932.jpg
DD932.jpg [ 115.46 KiB | Viewed 9106 times ]
Report this post
Top
 Profile  
Reply with quote  
PostPosted: Sun Jul 29, 2012 12:17 pm 
Offline
User avatar

Joined: Sat Feb 26, 2005 7:32 pm
Posts: 960
Location: Seattle, Wa.
Wow!
This is another great DD build on your part Bill. You sure have a knack for building Deatroyers.
What do you have on the work bench now, or is that at secret?
Any chance of you doing a "work in progress" build for all of us to follow. I for one would like to see your build technique(s) in action.
Looking forward to your next build.

_________________
Gordon


"Then there was one patched-up carrier...."
Vice Admiral Thomas A. Kinkaid


Report this post
Top
 Profile  
Reply with quote  
PostPosted: Sun Jul 29, 2012 1:35 pm 
Offline

Joined: Thu May 29, 2008 8:02 pm
Posts: 3837
Bill,

The best overhead views I have showing that part of the ship for this class, is a portside view of SHERMAN in 1956 and another view of JOHN PAUL JONES from the starboard side. You are right that "most" of what is on the deck in the SHERMAN view you posted are either part of the Inclining experiment or just "stuff" laid out for stowage or installation. But, from these views you can see that there are a couple of Stowage Lockers ... for what purpose I have no idea. I suspect they serve some purpose for the 5-in mount since there is nothing else around or for stowing items needed for activities like underway resupply or firefighting. Anyway, placing the stowage lockers behind the 5-in mount kind of protects them from wave strikes. You can see that they are mounted up off the deck. The portside locker is taller and appears to be narrower. In views I have of this class after modernization, I don't see these lockers in this position.

As I started going through the "late 1950s" section of 80-G photos at NARA (not really ONLY 1950s images in that section) I found photos of the SHERMAN class as they were first built. I have a small "stash" of these Revell kits that I want to build as the various versions of the USS DAVIS, even though the hull shape is a little different, unless a better kit comes ago of course. :smallsmile: I started to convert one kit to DAVIS' last configuration as she appeared on her Great Lakes tour in 1978 and didn't get far.

SHERMAN during 1956.
Image

JOHN PAUL JONES during 1956.
Image


Report this post
Top
 Profile  
Reply with quote  
PostPosted: Sun Jul 29, 2012 2:05 pm 
Offline
User avatar

Joined: Sun Sep 21, 2008 9:56 pm
Posts: 344
Rick,

Those photos are fantastic - just what I needed to see. It seems that Revell got it right after all concerning those deck lockers. I will have to add those in addition to the torpedo launchers. Your help is invaluable and I do appreciate your sharing these photos and your knowledge about USN Destroyers. Once I get these few items added I will post some new images and submit a series of completion photos to gallery.

Cheers,

Bill


Report this post
Top
 Profile  
Reply with quote  
PostPosted: Sun Jul 29, 2012 2:39 pm 
Offline
User avatar

Joined: Sun Sep 21, 2008 9:56 pm
Posts: 344
Hi Gordon,

Thanks for your kind words, I really appreciate your having a look. I have so many projects already started now that I have promised myself not to start anything new until I get a few of these stalled builds back in action and completed. It is a bit odd, but when I start a online WIP, I never seem to finish the build! If I avoid the online WIP, then I somehow manage to complete the project. Anyway, before I start anything new I want to finish two large scale on-line WIP projects that I started years ago that have been stalled for ages. The first is USS Chevalier dd-451 in 1/144 scale using the Revell Fletcher Class kit that you can see here:

viewtopic.php?f=59&t=50630

and also here:

http://models.rokket.biz/index.php?topi ... 64#msg4164

The other on-line WIP, which I will probably complete first, is the Type VIIB U-Boat U-45 in 1/72 scale using the Revell Type VIIC kit and the Amati Type VIIB kit of U-47. Link here:

http://models.rokket.biz/index.php?topi ... 86#msg2086

When I get these two finished I plan to start a WIP here on a Perry Class FFG, probably USS Reid since my brother was CHENG on her back in 1991.

Thanks again!

Bill


Report this post
Top
 Profile  
Reply with quote  
PostPosted: Tue May 28, 2013 11:59 am 
Offline

Joined: Tue May 28, 2013 11:33 am
Posts: 2
I'm very impressed with this model!

I would like to make exactly one of these models (the USS Morton) -- the railings impress me the most. You bought them all separately, yes?
--Are they photo-etch? Do you know which set (so I can buy the same)?
--Any tips to cut and install them? This would be my first PE project...

Thank you!

--Telson (Morton)


Last edited by Telson on Tue May 28, 2013 9:13 pm, edited 1 time in total.

Report this post
Top
 Profile  
Reply with quote  
PostPosted: Tue May 28, 2013 3:10 pm 
Offline
User avatar

Joined: Sun Sep 21, 2008 9:56 pm
Posts: 344
Hello Telson,

Thanks for your kind words, I am pleased that you enjoyed the model. First to your questions. The railings you see in the photos are photo-etched brass and are not included in the Revell kit. As far as I know, there is no specific photo-etch set for this kit. I don't recall exactly which PE set I used for the railings, but I think it was the old (original issue) 1/350 Gold Medal Models (GMM) generic modern USN set. I took PE from several old sets I have laying about depending on what I needed so I can't be certain and my workroom is a perpetual disaster which defies all attempts at organization. The Revell kit is very old and features molded railings which were common at the time the kit was issued. They can be removed and other issues with the kit can be corrected or enhanced with some scratch building and use of items from the spares bin.

There are many very good tutorials on using PE which can help you get started. I always clean the PE fret first and generally use a #11 Exacto blade to separate the parts. Be sure that the PE fret is placed securely on a hard flat surface before you cut. Sometimes I will tape the part before I cut so that it does not fly away when released from the main fret. PE railing can be curved by rolling with a hard cylindrical object (such as the handle of Exacto knife) on a hard flat surface. Brass PE is very forgiving so just experiment. You can restore the railing by turning it over and rolling the bend flat again. For sharp turns in the railings (like 90 degree turns), I use two large Exacto chisel type blades. Place one blade almost flat on the part with the cutting edge at the point where the angle will occur and then carefully slide the second blade under the railing until the edge is also at the bend point and then gently lift the end of the blade until the desired angle is achieved. Again, if you screw it up, just roll the part flat and try again. When using generic PE railings, it is very important to plan ahead. Try to cut the railing so that stanchions end up where you want them, such as corners or where a vertical ladder is placed. Once all the railing sections are ready and have been test fitted, you can prime them before cementing them or after. I usually prime before cementing. I use CA glue to fasten PE, but there are several other methods that work well. Be sure to start the PE from the top and centre of the model and work down and out, this will help avoid damage. Invest in a quality tweezer and if you eyes are old (like mine), some kind of magnification device.

The best advice I can give when starting with PE is too just practice. Try to find some inexpensive partial sets or scrap and practice cutting, bending and using the CA. When you feel that you have the technique, then invest in the PE items you want.

Good luck, if you have any other questions, just ask. I am pleased to help and others here are very helpful also.

Cheers,

Bill


Report this post
Top
 Profile  
Reply with quote  
PostPosted: Tue May 28, 2013 9:12 pm 
Offline

Joined: Tue May 28, 2013 11:33 am
Posts: 2
Hi Bill,

Wow, thank you so much for such a speedy, comprehensive and helpful reply!

Special thanks for the tips about glue and how to bend the railings -- that's exactly what I was wondering about.

Much appreciated!
--Telson
:woo_hoo:


Report this post
Top
 Profile  
Reply with quote  
PostPosted: Tue Aug 13, 2013 4:56 pm 
Offline

Joined: Sun Aug 11, 2013 8:02 am
Posts: 6
Hello Bill,

Fine job of a fine looking ship with a challenging older kit. :thumbs_up_1:

Mike


Report this post
Top
 Profile  
Reply with quote  
PostPosted: Wed Aug 14, 2013 4:33 pm 
Offline
User avatar

Joined: Sun Sep 21, 2008 9:56 pm
Posts: 344
Hi Mike,

Thanks very much for your comments. I am pleased that you enjoyed my work with this kit. Many of these old kits have great potential with a bit of effort and I enjoy the challenge they represent.

Cheers,

Bill


Report this post
Top
 Profile  
Reply with quote  
PostPosted: Wed Aug 14, 2013 5:28 pm 
Offline

Joined: Sun Aug 11, 2013 8:02 am
Posts: 6
You're very welcome Bill!

You truley did a beautiful job of making this old kit come to life.

I was in Decatur Ill. last weekend for a family reunion, and while there I stopped in to pay a visit to the antique mall which is located in the old Wasbash train station. Looking through the many items for sale I came across an AHM kit of the USS Decatur. The box was opened so I took a peak in and it looked to be all there, so I made an offer and they accepted. When I returned home and upon further inspection, it was in fact missing a few parts like a propeller and shaft one of the gun turrets, a side bulkhead and one of the rudders. I tried casting them and except for the gun turret, the pieces didn't turn out very well.
I'm going to be searching for these parts or find another kit that I can get the parts from.

Seeing your work of art has been a real inspiration, and I'm looking forward to buliding the model myself. If I come close to what you have accomplished I will be very pleased indeed.

Best regards,
Mike


Report this post
Top
 Profile  
Reply with quote  
Display posts from previous:  Sort by  
Post new topic Reply to topic  [ 39 posts ]  Go to page 1, 2  Next

All times are UTC - 6 hours [ DST ]


Who is online

Users browsing this forum: No registered users and 50 guests


You can post new topics in this forum
You can reply to topics in this forum
You cannot edit your posts in this forum
You cannot delete your posts in this forum
You cannot post attachments in this forum

Jump to:  
Powered by phpBB® Forum Software © phpBB Group