The Ship Model Forum

The Ship Modelers Source
It is currently Thu Sep 26, 2024 5:08 pm

All times are UTC - 6 hours [ DST ]


Post new topic Reply to topic  [ 32 posts ]  Go to page 1, 2  Next
Author Message
PostPosted: Tue Apr 16, 2024 6:58 am 
Offline
User avatar

Joined: Fri Aug 12, 2022 8:50 am
Posts: 32
Ahoy, friends of the adhesive guild.
I'll show you the construction of an Imperial Japanese Navy (IJN) pre-dreadnought battleship Mikasa from the company Merit. Plus the etched part sets from Pontos and KA Models
First the basics.
Let’s glue the fuselage together and drilled holes for the stand nuts.

Attachment:
2.JPG
2.JPG [ 231.74 KiB | Viewed 930 times ]


This time I treated myself to the elegant stands from Pontos. Look really great.

Attachment:
4.JPG
4.JPG [ 348.36 KiB | Viewed 930 times ]


Next, the holes for the crampons. Nice straight through the drilling templates from Pontos and the usual drilling out of the portholes. After researching the few images available, I noticed that the porthole that sits on the model below the anchor hawse did not exist.
This was then closed with a round styrene profile.

Attachment:
8.JPG
8.JPG [ 268.86 KiB | Viewed 930 times ]


Another mistake that needs to be corrected. Merit made recesses in the fuselage to accommodate the etched piece gunports from the model in the correct location.
Since I’m using the pontos set here and the hinges of the gunport on the original ship were riveted onto the hull from the outside, I close them with styrene.

Attachment:
10.JPG
10.JPG [ 203.97 KiB | Viewed 930 times ]


Ok, let’s fill the holes that I don’t need due to the etched parts sets.

Attachment:
12b.JPG
12b.JPG [ 291.52 KiB | Viewed 930 times ]


I use styrene profiles to imitate the seams of the armor plates. Back then, people still riveted, not welded. However, the rivets can hardly be seen under the paint on the original. So that's enough for me.

Attachment:
13.JPG
13.JPG [ 323.08 KiB | Viewed 930 times ]


The same of course on the underwater hull.

Attachment:
16b.JPG
16b.JPG [ 431.19 KiB | Viewed 930 times ]


Continue with the basics.
A privacy screen must be created so that you cannot see the portholes from one side and the other side.
That’s why styrene plates were placed in the middle.

Attachment:
17.JPG
17.JPG [ 275.53 KiB | Viewed 930 times ]


The tubes for the anchor hawse were still missing.

Attachment:
17e.JPG
17e.JPG [ 269.13 KiB | Viewed 930 times ]


Nice and dark. That's how it has to be

Attachment:
17g.JPG
17g.JPG [ 263.81 KiB | Viewed 930 times ]

_________________
Greetings from Germany.
Jörg

Image


Last edited by Jölle on Fri May 10, 2024 12:00 am, edited 3 times in total.

Report this post
Top
 Profile  
Reply with quote  
PostPosted: Tue Apr 16, 2024 7:13 am 
Offline
User avatar

Joined: Fri Aug 12, 2022 8:50 am
Posts: 32
Let’s get to the inner values ​​of the ship.
I’m going about this a little differently than usual.
For me, the cannon barrels are attached to the model much later and the deck has to be closed early.
There are two reasons for this.
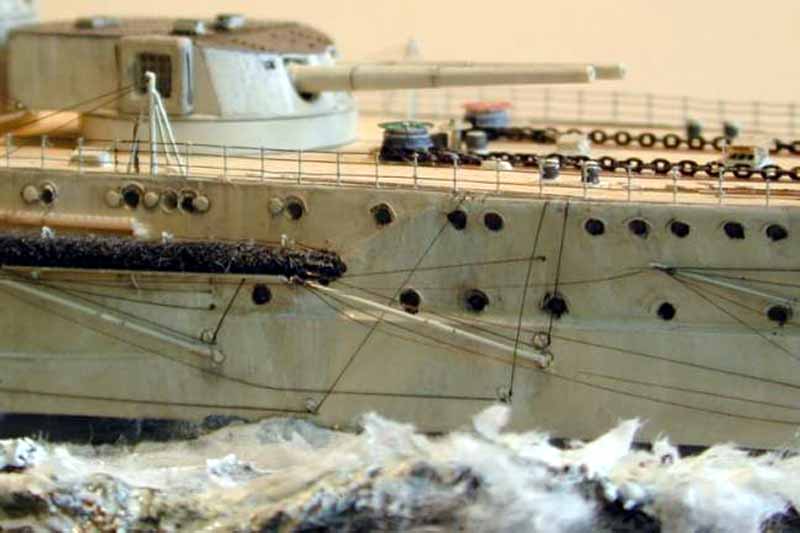
The special feature of the Mikasa is its casemates with the protruding gun barrels. They get in the way and you quickly get stuck with them as you continue building.
In general, I always attach large pieces very late.
I will also raise the hull to the next level earlier than usual. It’s about the upper row of casemates.
If you glue this fuselage part later, which is actually logical and intended, you can get to the internal structures much better.
But you also end up with a very unsightly slot that can no longer be removed.
More on that later.

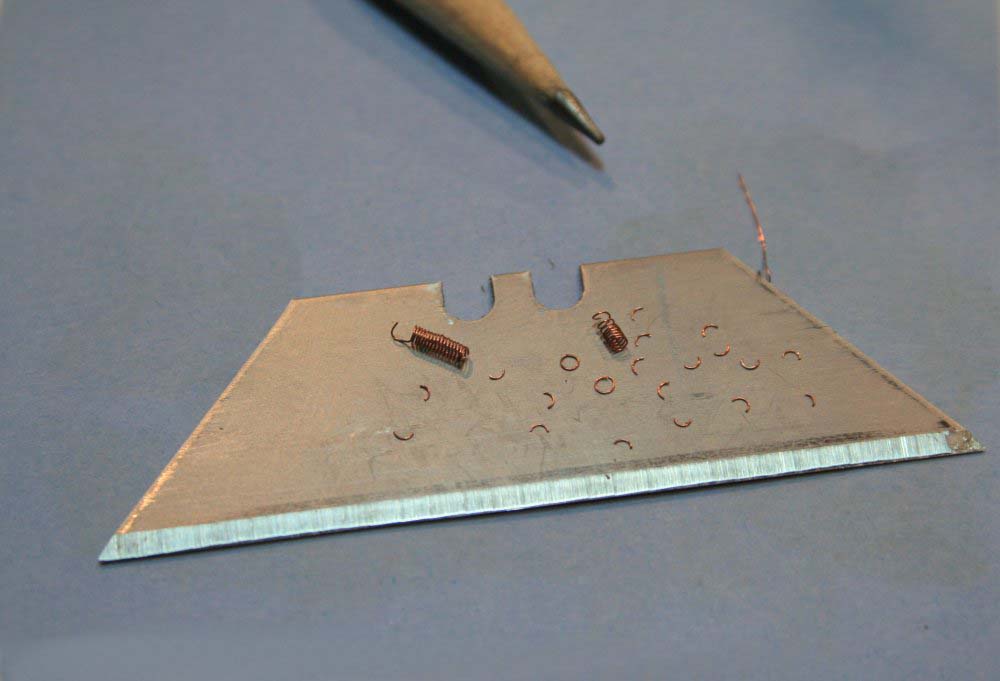
First I soldered the shields of the cannons on the bow and stern.

Attachment:
18.JPG
18.JPG [ 409.86 KiB | Viewed 926 times ]


Then, since you can’t see anything behind the shields anyway, I simply replaced the cannon body with a small piece of styrene pipe.

Attachment:
18a.JPG
18a.JPG [ 230.27 KiB | Viewed 926 times ]


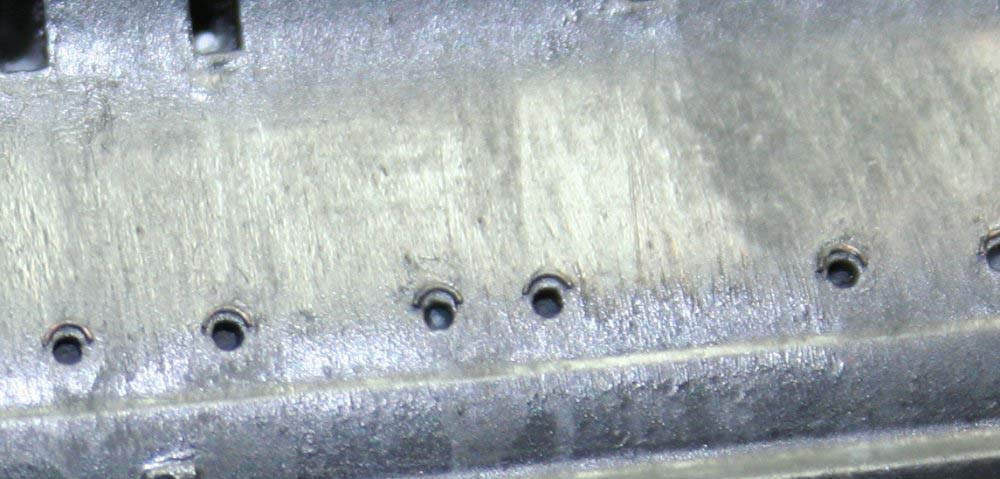
This was then glued in…

Attachment:
18b.JPG
18b.JPG [ 211.53 KiB | Viewed 926 times ]


…and I’ll simply put the barrel of the cannon through the hole later.

Attachment:
20.JPG
20.JPG [ 215.37 KiB | Viewed 926 times ]


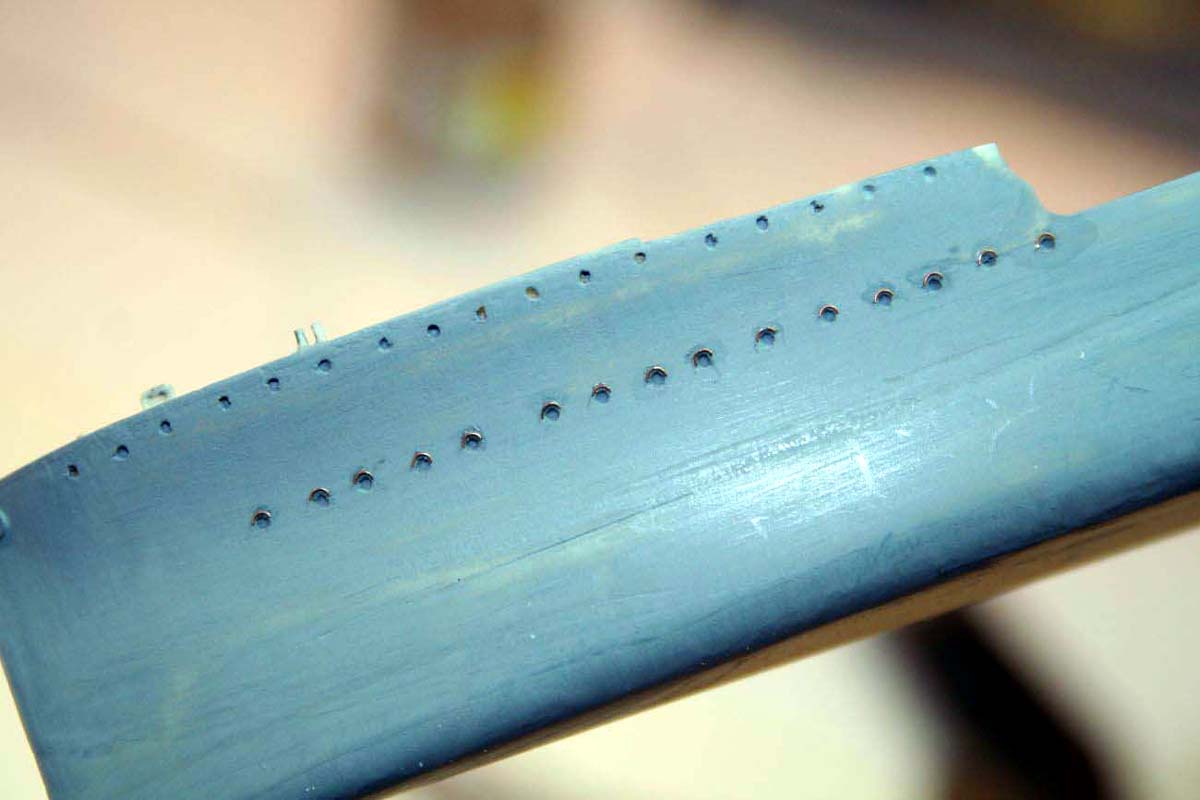
Now that all the cannons in the hull are installed, I can prepare the deck.
First say goodbye to unnecessary details. I got a small electric chisel, it simplifies things a lot.

Attachment:
19.JPG
19.JPG [ 422.44 KiB | Viewed 926 times ]


Great, deck ready.

Attachment:
20b.JPG
20b.JPG [ 498.95 KiB | Viewed 926 times ]


Let's start by painting the lower hull. First the preshading.

Attachment:
21d.JPG
21d.JPG [ 515.7 KiB | Viewed 926 times ]


And then tape it off. I’m doing this relatively precisely, even though I’m only in the basic color.
Of course I could spray the red without masking it off, but then too many layers would overlap afterwards and the whole thing would be too thick for me.

Attachment:
21e.JPG
21e.JPG [ 477.42 KiB | Viewed 926 times ]


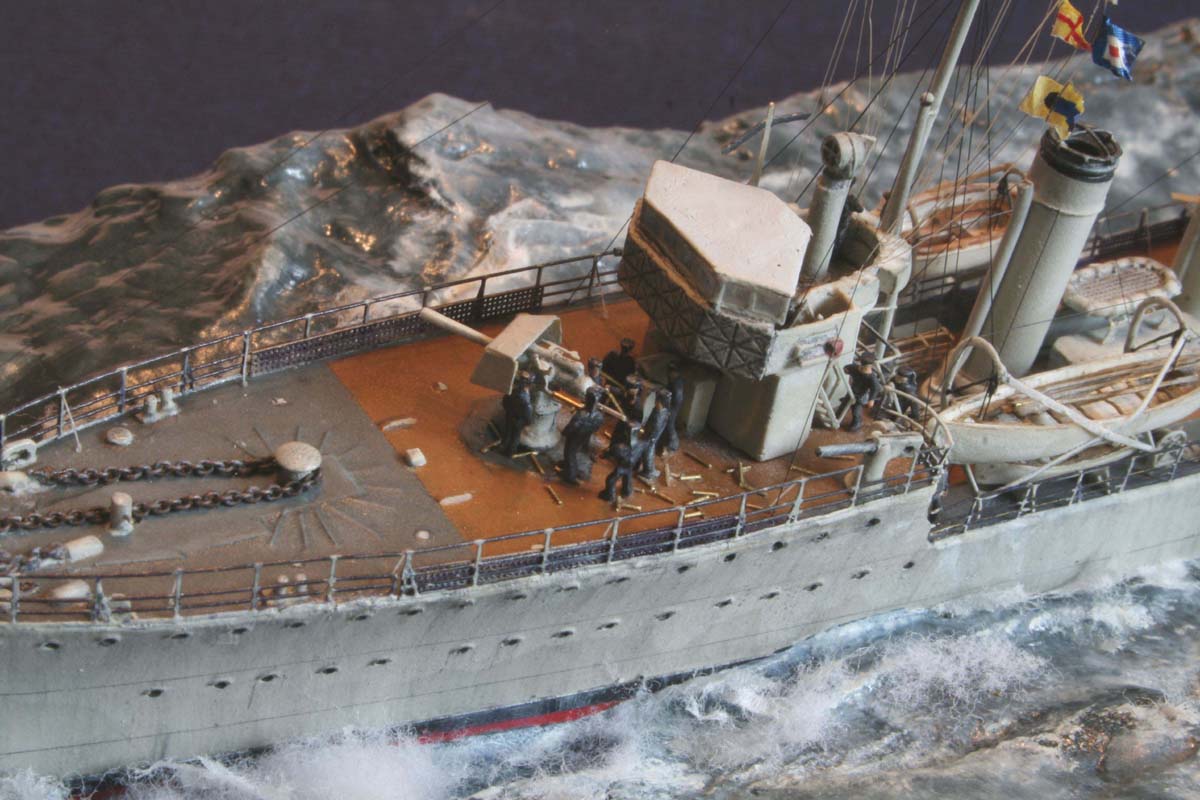
And now the antifouling paint is on the underwater hull.

Attachment:
22.JPG
22.JPG [ 441.09 KiB | Viewed 926 times ]


The waterline is running great. Profiles attached at the correct height. I really like the structure I made from the styrene profiles, and the preshading also comes into its own.

Attachment:
22e.JPG
22e.JPG [ 389.03 KiB | Viewed 926 times ]

_________________
Greetings from Germany.
Jörg

Image


Report this post
Top
 Profile  
Reply with quote  
PostPosted: Tue Apr 16, 2024 8:23 am 
Offline
User avatar

Joined: Wed Sep 28, 2011 12:04 pm
Posts: 1856
Location: Paris
I must admit, I don't know anything about the MIKASA and there seem to be surprisingly few photographs on the Internet. Even of her as museum-ship there are only a few bad ones and none, that shows the hull properly.

I looked, because I was wondering, why you put sort of 'battens' along the assumed seams of the armour-plates? I didn't see them on the (poor) photographs of the museum-ship and haven't seen anything comparable on other ships of the time. The armour-plates were normally bolted (not rivetted) onto a backing of teak (to dissipate and distribute the stressed from impacting shells) and shipbuilders usually took great care to create a flush hull (at least above the water) for the sake of aesthetics. That's while normal hull plating was arranged in the more expensive way with doublings behind the plate-seams and countersunk rivets.

_________________
Eberhard

Former chairman Arbeitskreis historischer Schiffbau e.V. (German Association for Shipbuilding History)

--------------------------------------------------------------------------------------------------------------------------------------------------------------------------------------------

Image Image Image Image


Report this post
Top
 Profile  
Reply with quote  
PostPosted: Wed Apr 17, 2024 3:02 am 
Offline
User avatar

Joined: Fri Aug 12, 2022 8:50 am
Posts: 32
Hello Eberhard.
I have to admit that I don't really know much about historical shipbuilding. I just really enjoy building ship models with the knowledge I have and trying to represent them artistically as best I can. And I knew that the armor plates were not welded at that time. Now the hulls of the catchy manufacturers are always smooth, which is of course not true. I have this in my Bismarck, which you can also find here in the forum , adopted like this. But it was also the first ship model that I built again after a long absence. And in retrospect I now find the fuselage a little boring.
I wanted to approach this differently with the Mikasa. Of course I am aware that there should be a seam between the panels and not a slat as you call it. However, a seam can hardly be represented sensibly in terms of model building. You could do this with a carving knife that you drag along a steel ruler. But I think it wouldn't look good.
That's why I decided to imitate the push the other way around. Just with thin profiles. And that's how what you see here came about.

_________________
Greetings from Germany.
Jörg

Image


Report this post
Top
 Profile  
Reply with quote  
PostPosted: Wed Apr 17, 2024 3:18 am 
Offline
User avatar

Joined: Fri Aug 12, 2022 8:50 am
Posts: 32
And it goes on to the upper casemates. Unnecessary holes closed again.

Attachment:
23.JPG
23.JPG [ 435.86 KiB | Viewed 877 times ]


So the etched parts battle could finally begin. The MK1 set has already scored its first points.
Shortly before I had sanded away the rather rough details, I thought about taking a quick photo of them. Pontus had not planned anything here. Incomprehensible, even if you can hardly see it on the finished model.

Attachment:
23b.JPG
23b.JPG [ 208.06 KiB | Viewed 877 times ]


So, one to zero for KA Models. Still processing the remaining door. Then the first superstructures can go on the deck.

Attachment:
23d.JPG
23d.JPG [ 372.1 KiB | Viewed 877 times ]


So I was able to add the next floor. Here are the pictures to show why I go to this length.
The slits in the four round casemates would still be manageable.

Attachment:
24c.JPG
24c.JPG [ 269.02 KiB | Viewed 877 times ]


But this one isn’t very nice.

Attachment:
24d.JPG
24d.JPG [ 356 KiB | Viewed 877 times ]


I think this is better.

Attachment:
25.JPG
25.JPG [ 314.37 KiB | Viewed 877 times ]


After sanding three times and prime, I am very satisfied.

Attachment:
25b.JPG
25b.JPG [ 259.27 KiB | Viewed 877 times ]


Then I built a dry dock for the Mikasa.

Attachment:
26.JPG
26.JPG [ 491.99 KiB | Viewed 877 times ]


This means it can be safely laid on its side, for example to work on the portholes.

Attachment:
26b.JPG
26b.JPG [ 508.91 KiB | Viewed 877 times ]


I can also attach sheet pile walls of different heights to further increase the protection at the top.

Attachment:
26c.JPG
26c.JPG [ 478.96 KiB | Viewed 877 times ]

_________________
Greetings from Germany.
Jörg

Image


Report this post
Top
 Profile  
Reply with quote  
PostPosted: Wed Apr 17, 2024 3:44 am 
Offline

Joined: Tue Feb 06, 2007 10:24 am
Posts: 2513
Location: Belgium
That is a great start Jörg! :thumbs_up_1: :thumbs_up_1: :thumbs_up_1:

I learned to use such a 'drydock' workbase from the books of Philip Reed, and I'm a big fan! Much less risk of damage during the build, and the sides are very convenient hand-rests too.


Report this post
Top
 Profile  
Reply with quote  
PostPosted: Wed Apr 17, 2024 9:20 am 
Offline
User avatar

Joined: Fri Aug 12, 2022 8:50 am
Posts: 32
Thank you Marijn.
Yes, this work aid is really of great value. I install large parts quite late in the construction anyway, because I'm a bit of a klutz and in the heat of the moment I like to destroy something that I've previously been sitting on for hours. And as you said, it's very comfortable for your hands to support.

_________________
Greetings from Germany.
Jörg

Image


Report this post
Top
 Profile  
Reply with quote  
PostPosted: Wed Apr 17, 2024 9:42 am 
Offline
User avatar

Joined: Fri Aug 12, 2022 8:50 am
Posts: 32
Next, onto the portholes. Some of them have grids and I had to find out exactly which ones are true.
The grid would only have had a right to exist at the height of the anchors. On this ship, the anchors were pulled back on board with the davits and an anchor could have hit the hull or the porthole. In addition, the anchor chains ran past the portholes.
So I looked at everything I had in detail again.

The fact is that during active service, here in 1921, the front portholes were barred. You can see this in the following and best quality picture of the ship that I have. It was taken in Vladivostok in 1921.

Attachment:
WladiwostokBug.jpg
WladiwostokBug.jpg [ 132.17 KiB | Viewed 848 times ]


Here the section is enlarged. So there were bars, but you can’t really tell whether all the lower portholes on the bow were barred.

Attachment:
WladiwostokGroßBug.jpg
WladiwostokGroßBug.jpg [ 95.7 KiB | Viewed 848 times ]


Then this picture of the stern, also taken in Vladivostok in 1921. So quite late in their active service. She was in this dry dock for repairs.

Attachment:
WladiwostokHeck.jpg
WladiwostokHeck.jpg [ 38 KiB | Viewed 848 times ]


Here the enlarged and brightened section shows that there were definitely no grilles in front of the portholes at the rear.

Attachment:
WladiwostockHeckHell.jpg
WladiwostockHeckHell.jpg [ 104.78 KiB | Viewed 848 times ]


So the question arises as to where this protective measure went. The anchor area would be logical. I found the solution in the following picture.

Attachment:
GitterDock.jpg
GitterDock.jpg [ 87.26 KiB | Viewed 848 times ]


The white arrow points to the same porthole in both photos. You can clearly see here that the portholes were protected with grilles right up to the anchor storage areas.

Attachment:
Gitterklein.jpg
Gitterklein.jpg [ 158.97 KiB | Viewed 848 times ]


And this is how I implemented this on my model.

Attachment:
Gitter1.JPG
Gitter1.JPG [ 349.12 KiB | Viewed 848 times ]


And at the rear

Attachment:
Gitter2.JPG
Gitter2.JPG [ 341.94 KiB | Viewed 848 times ]

_________________
Greetings from Germany.
Jörg

Image


Report this post
Top
 Profile  
Reply with quote  
PostPosted: Sun Apr 21, 2024 11:01 am 
Offline
User avatar

Joined: Fri Aug 12, 2022 8:50 am
Posts: 32
It was time for the final details to be added before painting. For me there are always very few. Most of it is only processed towards the end. This includes the grilles in front of the bow and stern cannons and of course the crampons.

Attachment:
29a.JPG
29a.JPG [ 363.68 KiB | Viewed 781 times ]


I don’t use the crampons on the etched part boards. I don’t like these one hundred percent because they are of course flat. So I prefer to take thin wire and bend it to size.

Attachment:
29c.JPG
29c.JPG [ 317.89 KiB | Viewed 781 times ]


In addition, crampons and steps were probably installed on the Mikasa.
Documented here in this old photo. The arrows point to the two species.

Attachment:
Steigeisen1.jpeg
Steigeisen1.jpeg [ 168.68 KiB | Viewed 781 times ]


And I would like to represent this with 0.2 or 0.3 mm thick wire. The thick wire is then filled with Micro Kristal Klear and I have a step.

Attachment:
Steigeisen5.JPG
Steigeisen5.JPG [ 281.92 KiB | Viewed 781 times ]


I finished all the rough work on the fuselage and was finally able to finish painting it.
After a proper preshading the whole thing now looks like this.

Attachment:
30.JPG
30.JPG [ 421.86 KiB | Viewed 781 times ]


What followed was an accentuation. Which means nothing other than that I painted fine details in a lighter gray.

Attachment:
30b.JPG
30b.JPG [ 426.59 KiB | Viewed 781 times ]


Which was a real fiddly job. The dry decals from Pontos are really impressive. The depth marks are razor sharp.

Attachment:
30c.JPG
30c.JPG [ 339.97 KiB | Viewed 781 times ]


Here too, water-soluble acrylic paints have a big advantage. Small slips can be removed immediately with water without leaving any residue.

Attachment:
30d.JPG
30d.JPG [ 342.18 KiB | Viewed 781 times ]


This gives a decent contrast to the preshading areas.

Attachment:
30e.JPG
30e.JPG [ 372.01 KiB | Viewed 781 times ]


Now i can start aging.

_________________
Greetings from Germany.
Jörg

Image


Report this post
Top
 Profile  
Reply with quote  
PostPosted: Sun Apr 21, 2024 2:04 pm 
Offline

Joined: Mon Apr 17, 2017 2:43 am
Posts: 231
Well done!! :thumbs_up_1:

_________________
http://www.3xblackcats.wordpress.com


Report this post
Top
 Profile  
Reply with quote  
PostPosted: Sat Apr 27, 2024 9:09 am 
Offline
User avatar

Joined: Fri Aug 12, 2022 8:50 am
Posts: 32
Many thanks, SG1.
At the moment my progress is very slow because I have to take care of my sick wife.
But I’ve already started aging.

Attachment:
31.JPG
31.JPG [ 486.91 KiB | Viewed 687 times ]


As always, very tedious. But the result that a little diluted dark gray paint leaves on a painted surface still amazes and fascinates me. Even after all the years I’ve been doing this.

Attachment:
31a.JPG
31a.JPG [ 378.83 KiB | Viewed 687 times ]


A little every day and I’ll report back when it’s done. :wave_1:

_________________
Greetings from Germany.
Jörg

Image


Report this post
Top
 Profile  
Reply with quote  
PostPosted: Mon Apr 29, 2024 5:59 am 
Offline
User avatar

Joined: Mon Jan 10, 2005 5:30 pm
Posts: 5440
Location: Nr Southampton England
Good Day

Good progress on Mikasa --pending the level of detail you wish to pursue

don' forget the ' eyebrows ) correctly called Rigoles
( basically water semicircular water gutters that prevented water running into port hole when open. )

You can see them above each porthole in your photos

You can easily make eyebrows in your 1/200 scale using wire wound into a spiral on the smooth part of appropriate size drill
then cut into circles and then cut again in to semi-circles !

apply the eyebrow semi- circles with matt varnish

( eyebrowheight above the portholes varied in different Navies...
Mikasa was English built so refer to similar era Royal Navy photos


see images below on my Bouvet in 1/350 and Mary Rose 1916 1/350

http://www.modelwarships.com/reviews/sh ... index.html

Image

Image


Image

Image


you can see the effect from above here, with paint they become more subtle :wave_1:


Image
Image

_________________
....I buy them at three times the speed I build 'em.... will I live long enough to empty my stash...?
http://www.modelshipgallery.com/gallery ... index.html

IPMS UK SIG (special interest group) www.finewaterline.com


Report this post
Top
 Profile  
Reply with quote  
PostPosted: Mon Apr 29, 2024 9:08 am 
Offline
User avatar

Joined: Fri Aug 12, 2022 8:50 am
Posts: 32
Hello Jim.
Thanks for the great trick.
I used the porthole rings from the Pontos Set, which I think give a good look.

Attachment:
28a.JPG
28a.JPG [ 93.68 KiB | Viewed 613 times ]


They look really good painted.

Attachment:
29g.JPG
29g.JPG [ 132.57 KiB | Viewed 613 times ]

_________________
Greetings from Germany.
Jörg

Image


Report this post
Top
 Profile  
Reply with quote  
PostPosted: Mon Apr 29, 2024 9:23 am 
Offline
User avatar

Joined: Mon Jan 10, 2005 5:30 pm
Posts: 5440
Location: Nr Southampton England
yes --they look good ! :thumbs_up_1:

cheers Jim Baumann

_________________
....I buy them at three times the speed I build 'em.... will I live long enough to empty my stash...?
http://www.modelshipgallery.com/gallery ... index.html

IPMS UK SIG (special interest group) www.finewaterline.com


Report this post
Top
 Profile  
Reply with quote  
PostPosted: Fri May 03, 2024 12:09 am 
Offline

Joined: Sun Feb 07, 2010 8:13 pm
Posts: 178
Hello:

Here is a photo of the bow of Mikasa that I took in 2018. I agree that it's hard to find photos of the Mikasa online, so I took LOTS of pictures of her. If people would like to see photos of other areas, please let me know. However, a lot of the ship above the main deck is no longer original...even the main turrets and guns are reproductions.

Mike


Attachments:
mikasa_1001.JPG
mikasa_1001.JPG [ 165.12 KiB | Viewed 556 times ]
Report this post
Top
 Profile  
Reply with quote  
PostPosted: Fri May 03, 2024 12:17 am 
Offline

Joined: Sun Feb 07, 2010 8:13 pm
Posts: 178
Hello:

And here's a photo of the stern.

Mike


Attachments:
mikasa_0804.JPG
mikasa_0804.JPG [ 197.07 KiB | Viewed 555 times ]
Report this post
Top
 Profile  
Reply with quote  
PostPosted: Fri May 03, 2024 12:47 pm 
Offline
User avatar

Joined: Fri Aug 12, 2022 8:50 am
Posts: 32
Hello mconnelley.
It's great that you have lots of photos, I would be interested in them. I envy you that you saw the ship in real life. I would also like to make that happen.
Yes, it's a shame that the Mikasa is no longer in its original condition. What should you expect? After all, it was downgraded to a dance hall.

_________________
Greetings from Germany.
Jörg

Image


Report this post
Top
 Profile  
Reply with quote  
PostPosted: Sun May 05, 2024 9:25 am 
Offline
User avatar

Joined: Wed Apr 23, 2008 7:40 pm
Posts: 1153
Location: New Jersey
I took a few hundred photos of Mikasa in 2017 if you need any as well. Much of the ship is no longer original, so there seems to be variance in where things should be.

_________________
Image


Report this post
Top
 Profile  
Reply with quote  
PostPosted: Sun May 05, 2024 1:45 pm 
Offline
User avatar

Joined: Fri Aug 12, 2022 8:50 am
Posts: 32
Thank you drdoom1337. That is exactly the problem with the museum ship, that the information is not reliable. I also got some pictures of her through a friend. Maybe I'll get in touch again if I'm looking for something specific.

I’m a little further along.

Attachment:
32.JPG
32.JPG [ 482.81 KiB | Viewed 478 times ]


The first round of aging is complete.

Attachment:
32a.JPG
32a.JPG [ 487.13 KiB | Viewed 478 times ]


There are three filters on the underwater hull.

Attachment:
32b.JPG
32b.JPG [ 394.98 KiB | Viewed 478 times ]


On the gray two.

Attachment:
32c.JPG
32c.JPG [ 391.82 KiB | Viewed 478 times ]


Also a first washing.

Attachment:
32d.JPG
32d.JPG [ 379.18 KiB | Viewed 478 times ]


Above and below.

Attachment:
32e.JPG
32e.JPG [ 413.91 KiB | Viewed 478 times ]


I’m quite happy with it.

Attachment:
32f.JPG
32f.JPG [ 368.32 KiB | Viewed 478 times ]

_________________
Greetings from Germany.
Jörg

Image


Report this post
Top
 Profile  
Reply with quote  
PostPosted: Sun May 05, 2024 6:54 pm 
Offline

Joined: Sat Jan 24, 2009 5:16 pm
Posts: 817
Location: Wisconsin
Nice work!


Report this post
Top
 Profile  
Reply with quote  
Display posts from previous:  Sort by  
Post new topic Reply to topic  [ 32 posts ]  Go to page 1, 2  Next

All times are UTC - 6 hours [ DST ]


Who is online

Users browsing this forum: MightyJJK and 22 guests


You can post new topics in this forum
You can reply to topics in this forum
You cannot edit your posts in this forum
You cannot delete your posts in this forum
You cannot post attachments in this forum

Jump to:  
cron
Powered by phpBB® Forum Software © phpBB Group