Page 3 of 6

Re: CV-9 Essex and CV-19 Hancock

Posted: Tue May 14, 2024 10:39 am
by StevenVD
Let's check out my airwing changes, today it's Helldivers and Hellcats.

Image

The wings are connected to the sprue with the leading edge, making for a difficult sanding exercise.

Image

The Pontos airbrakes are now installed on the Helldivers. The plastic ones have to go.

Image

Image

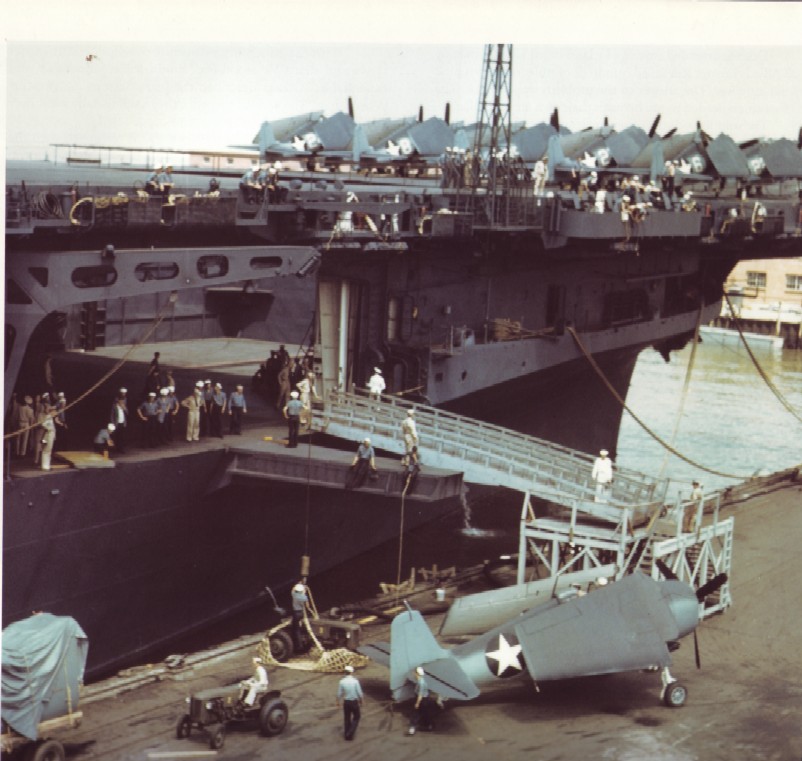
Pontos provides some for every Helldiver, also those without cockpit PE.

Image
( photo from https://www.britmodeller.com/forums/ind ... helldiver/ )

Image
( photo from https://www.britmodeller.com/forums/ind ... helldiver/ )

Image

The airbrake PE part is universally used for stretched and retracted wings and should be broken in half in the latter case (not cut like in the lower example!). The perforations are not through but are way better than in the kit.

Image

Here I made an obvious error, trying to make the brakes fit to the flaps. But then the etch line is on the wrong side. If you want to make this fit perfectly, you should not follow the kit airbrake edges and leave a part on, cutting perpendicular to the spar. I fill up the holes with CA.

Image

The Helldiver wings are apparently not meant to sit extended from the wing roots, they are about 30 per cent thicker. This is very visible on the top side. Therefore I sanded the glue face to make the top side flush, causing a visible step on the lower side. Also a wide seam shows on the right wing underside. I'll only make two of these stetched wing Helldivers.

Image

The wheel wells should be drilled out first before adding all the fiddly PE. With a drill, a milling device and some Tamiya Extra thin it's not so hard.

Image

The narrow part of the wheel well is a lot harder, it cost me one drill bit.

Image

And this are only the SB2C's, a lot more wells to go in the other types...

Image

Image

After this, the airbrakes are quite simple to attach. Sadly they are not thick enough to follow the airfoil, so I glued them flush to the top side. I feel they should have been made with an intermediary bending facet to make a C-shape rather than this V.

Image

For the landing wheels a receptacle with thinner fluid was used, especially the black styrene feels very greasy.

Image

The wheels are fixed using Trumpeter's superior slot system.

Image

Image

Then, the wheel well covers can be added.

Image

The Hellcat cowlings are a no-go for me.

Image

Compare how there's only one quite low cowling opening without oil cooler slit, not showing the Double Wasp shaft. As this is the most populous of the types, this must be corrected.

Image

The typical Trumpeter sprue node fits perfectly in the old cowling. And I keep a collection of those. Why you might ask?

Image

Having lots of identical parts can come in handy.

Image

The sprue is then removed.

Image

The front is sanded flat.

Image

A new center is chosen and drilled out in the cowling.

Image

Then the oil cooler is cut out manually from a smaller drill hole.

Image

It takes a while but these should stand up to the Dragon Hellcats that do have these features.

Re: CV-9 Essex and CV-19 Hancock

Posted: Wed May 15, 2024 3:30 am
by Edoardo81
Oh my God, what a work!!! Superb!!!! :woo_hoo:

Re: CV-9 Essex and CV-19 Hancock

Posted: Fri May 17, 2024 8:05 pm
by StevenVD
And there is more of the same, probably for a few days still before the painting can begin. I did go buy the necessary Gunze paint.

Image

Image

The Hellcats now all got the revised cowling cutout.

Image

To install the props I cut a brass tube. The wheel strut wells had to be cut out 84 times (42 Hellcats x2).

Image

They're on their wheels. It seems the black plastic won't weld to the grey, it only remains in place because of the fit in the grey plastic.

Image

Pontos gave me 32 pairs of wheel bay doors, so I made 10 more by tracing them on metal foil. These will be less detailed and used in the hangars.

Image

The cutting is done with a sharp knife.

Image

I have some spares now.

Image

All these are glued to the struts.

Image

The Pontos and some remaining WEM tailwheel PE was installed. The wheel wells had to be drilled carefully and initially I perforated two wings. Then it became second nature.

Image

Image

This WEM PE is for the Corsairs, that have rectangular wheel wells. This is hard to cut out, so I start with a drilled hole and continue with the knife. A PE tailwheel is missing here.

Image

Image

The wheel well covers are alle added.

Image

The Dragon Avengers had very nice detail on the landin gear, while Trumpeter is missing that.

Image

The tail wheels are done. Now their wings will have to be drilled for the wells.

Re: CV-9 Essex and CV-19 Hancock

Posted: Tue May 21, 2024 5:04 am
by StevenVD
Image

All these wings were drilled out, but one that I overlooked and that had to be done even after painting.

Image

Image

The landing gear is fixed.

Image

Propellers for Hellcats are the largest, the skinnier ones are for Avengers (I'll have to check the direction on those) and the four-bladed for Helldivers. But in the Pontos sets I only get to 32 Hellcats, being 10 short.

Image

In the bag are the three-bladed WEM Corsair props. Navsource shows these on the Essex Corsairs. The four-bladed optional ones seemed destined for the drawer.

Image

But with some arithmetics these six can be turned to 8 three-bladed ones.

Image

Now only a few Hellcats will miss the prop, some can even be taxiing.

Image

Image

The wings were painted Gunze grey first, but then I added white and the surface got too coarse. Some Pledge improved it but I might want to return to grey if I find the effort.

Image

Image

The plane bottoms in grey look better.

Re: CV-9 Essex and CV-19 Hancock

Posted: Tue May 21, 2024 7:42 am
by Walter Sonderman
Hi, Steven,

being a carrier-builder myself, getting the rather tedious job of building 80+ aircraft out of the way first before finishing the ship helps in finishing the whole project :smallsmile:

Cheers, Walter

Re: CV-9 Essex and CV-19 Hancock

Posted: Fri May 24, 2024 10:49 am
by StevenVD
Thanks, Walter, the most tedious part is now occurring, the gum needs to be draped around the fuselages to paint the top. I did this for the Avengers and Corsairs but it took half a day and I still didn't touch the Hellcats and Helldivers. I also got the news that L'Arsenal sent me some plane interiors. I will be able to put this in the Helldivers after closing down, but the other types don't allow for this.

Image

Some tape was reused for the hangar wall masking.

Image

Image

The deck was painted in Lifecolor deck Blue 20b with a modulation of black and orange and a highlight of Vallejo light blue.

Image

Image

After the tape removal and some pencil corrections, it's just the overspray to remove. A postwar picture of CV-31 shows that the walls in the elevator were painted in the camo, so I'll cover them.

Image

From the same period this picture of a side elevator is shown.

Image

These will now be pre-assembled. To fix them to the hull should in my opinion wait for the deck assembly. I hope that especially Hancock will not be out of center.

Image

These PE parts are the most impressive, they should not always be bent in the direction of the bend line. The rectangular part can only be produced according to the manual if you reverse the bend line. This caused a break in my first version.

Image

The two small jibs under the main part are almost invisible on the manual even if it is downloaded. They go on the outside, like in this modern picture right of the elevator edge.

Image

The partitions are a perfect fit because of the clever PE design.

Image

On the underside of the platform are PE covers to hide the ejector marks. These platforms can be tilted, so that would make this visible.

Image

The safety netting is then added, but only 4 parts no. 36 are included.

Image

That is also not fitting the purpose. Strangely part 10 used earlier for the smoke stack does fit perfectly and is present in the correct number.

Image

At detaching the DP guns the resin got slightly defaced. I first wanted to use Tamiya putty to repair it.

Image

But making straight edges in putty is not optimal.

Image

Therefore I stuck a scalpel edge to the guns with some CA glue.

Image

If this is broken off, the polished steel is often copied to the CA surface and only removal of some flash is needed. In this case the putty broke first so it was repeated.

Image

Both Pontos sets have the same gun parts. Some PE and the barrels will now be added.

Re: CV-9 Essex and CV-19 Hancock

Posted: Sat May 25, 2024 3:38 am
by marijn van gils
That's a huge amount of work! Especially at this level of quality... Great work Steven! :thumbs_up_1: :thumbs_up_1: :thumbs_up_1:


And since I didn't see you anymore after the awards ceremony: congratulations on winning best of show in Tienen with your drydock diorama a couple of weeks ago! Very much deserved! :thumbs_up_1: :thumbs_up_1: :thumbs_up_1:

Re: CV-9 Essex and CV-19 Hancock

Posted: Mon May 27, 2024 2:39 pm
by StevenVD
Thanks after all for your club's commendation, Marijn! I hope to see you again next weekend! As promised I'm planning to open the showcase for you then.

Now some fiddling on the 5 inch guns. In this aspect CV9 and CV19 are different.

Image

Essex seems not have had any blastbags on the double 5 inch mounts. Also it's unclear how they reached the top of them, as there are no ladders on the sides or front.

Image

Image

Hancock does have the blastbags on picture two. It has ladders on the front of the guns, both on the vertical and the sloping part. Picture 3 shows a blast shield on top of at least the front gun.

Image

Mounting the resin blastbags is so easy that I had done this before checking. With some effort the Essex guns had them removed. In that case I needed the longer type of barrel. 3 types are in the Pontos sets, the longsest one is for the single guns and the shortest for the blastbag option. Placing the elevating hinge with the barrel in the mantlet is not that easy, the glue never sets fast on the resin. Moreover a locator pin is missing so I had to compare to the blastbag guns.

Image

Image

Hancock's blast shields are added (met de blastbags) and the Essex ones got the bare blastbag frames in PE. Even these are missing on Navsource. The Veteran gunhouses have cast-on footrails under the doors, but I prefer the PE examples they left unused. The downside to these are the vertical bars holding the steps, but that's a small concession to the overall detail. On the Essex housings I added a frame to the roof.

Image

In the Trojca book I had found steps on the side of the housings and I had mounted all of these to the gun housings before seeing the above pictures. It seems none of them had any. If it wasn't for the large amount of work invested I would have them removed already.

Image

Parts needed for the 5-inch single guns, though not all are used.

Image

One long barrel for the single guns is missing from one of the Pontos sets and a shorter one was found in stead.

Image

An Albion Alloys messing tube is stuck to the barrel.

Image

Then a new pin is added after drilling out the tube.

Image

Again the CA takes time to cure on the resin. To prevent barrel droop, this tool is placed below.

Image

Front shield and fuze setter are present.

Image

And the railing is now completed. Some very small parts are not given for one side of the guns. I put them on the right side. The manual is again failing to show detailed positions.

Re: CV-9 Essex and CV-19 Hancock

Posted: Thu May 30, 2024 8:08 pm
by StevenVD
I removed the standard PE again and only left the ship specific detail.

Image

Then the long range radio antennas are built.

Image

Essex can be built as per the instructions. Pylons 2 and 5 have outriggers. After 3 and 5 there's a cable junction to the deck.

Image

A rigging scheme would have been welcome in the manual, the assembly drawings are difficult to analyze even if you get the subparts numbered. Is part 188 a cable mounting eye? Why only six of them?

Image

Hancock and the onter long hulls for that matter are totally different and not like the copy that Pontos made from Essex. No pylon number 3 is found. Part 187 is used as outrigger on all pylons and you have to fix this interchanging to the front and back sides of the pylons, always pointing away from the wires. How to replace the pylon nr.3 catwalk is not yet anticipated.

Image

At first I made all 10 pylons. They can't be installed lowered but for some scratchwork, I guess I'll leave them up.

Image

It's easy to bend.

Image

The ladders have unregular attachment points, these are like that for a reason.

Image

I bent the rungs of the ladders.

Image

Here the reason of the irregular shape, each point must be placed on a transversal profile, causing the tip not to be attached.

Image

With standard outriggers, but one can be left unused. The ladder will be reused in the 5 inch guns.

Image

Hancock needs this kind of outriggers.

Image

The bad assembly images made me bend all of these parts wrong, so after all bends broke loose I had to reassemble the subparts. I made a scheme of how it should be bent.

Image

Almost right here. These are now made ready to add to the hull once its finished.

Image

The deck ege elevator chain drive mechanism is shown here in CV32.

Image

The PE frames are unnecessary fiddly with these small holes and thend to break up while deburring.

Image

The ribs are to be inserted in the holes. Some are almost identical, I did these in two sessions.

Image

At bending the symmetry of the ribs is to be guarded.

Image

It should look like this.

Image

The rib connecting parts are diffently shaped on both sides.

Image

This assembly is also ready to attach to the hull.

Re: CV-9 Essex and CV-19 Hancock

Posted: Wed Jun 05, 2024 9:01 am
by StevenVD
A new update on the airwing.

Image

The Avengers are unmasked after the Sea Blue stage. These and the Helldivers had their stabilizers masked so the tail could be painted too.

Image

The Helldivers, Corsairs and part of the Hellcats could return to the box awaiting the last stage.

Image

The Helldiver wings and the clearpart planes were stripped. The wings didn't need to be white and the planes were too white.

Image

Those were then painted light grey.

Image

The gum was removed and some undercarriages repaired. I recommend CA glue for all Trumpeter black plastic undercarriages, they don't seem to get welded and half of them get unstuck.

Image

Both sides were painted blue, but the top side will eventually be painted darker blue.

Image

The wings of the Hellcats, Avengers and Corsairs were speckled withy white and are saturated with grey again.The complete planes were also painted blue.

Image

Later on I found some white wings among the grey ones. I should have worked more linear.

Image

Unmasking the completed planes.

Image

The props were painted yellow for the tips, now each of them needs to be masked twice for the black color.

Re: CV-9 Essex and CV-19 Hancock

Posted: Wed Jun 05, 2024 9:01 am
by StevenVD
doublepost, can be deleted

Re: CV-9 Essex and CV-19 Hancock

Posted: Wed Jun 05, 2024 9:01 am
by StevenVD
doublepost, can be deleted

Re: CV-9 Essex and CV-19 Hancock

Posted: Wed Jun 05, 2024 11:51 pm
by Tracy White
StevenVD wrote:A postwar picture of CV-31 shows that the walls in the elevator were painted in the camo, so I'll cover them.
The elevator bulkheads were indeed painted to match the flight deck camouflage. You can see a photo of CV-10 Yorktown's elevator wells painted the same 5-N Navy Blue as her hull in this photo on her Navsource page taken during loading of her air group prior to departure for her shakedown cruise. However, by summer of 1943 the Navy had directed that a 6-foot band of flat black be painted around the top. This was so the elevators could be lowered three feet at night for engine run-ups with minimal/no light leakage. I have a document here detailing this for CVLs and there are photos in support of this being used on big carriers like this photo of CV-13 Franklin on her Navsource page.

Re: CV-9 Essex and CV-19 Hancock

Posted: Thu Jun 06, 2024 7:55 pm
by StevenVD
Thanks for the info, Tracy, I know we discussed this in the Princeton topic, but I was not sure if these black zones would also feature in the Essex class. Now more on the airwing:

Image

The wings are painted Gunze Midnight Blue on top, like the remaining Princeton wings above.

Image

Some had to be redone because of orange peel, the paint had become very thick and was thinned with X20A (I don't have Gunze thinner).

Image

Image

Stabilizers painted with the tail masked in gum.

Image

A system to paint the wing but not the fuselage. A wooden plate covers the landing gear and a Tamiya flask prevents the crate from becoming airborne. The cardboard covers the fuselage with the left hand.

Image

Image

This was done with all planes but was in fact only required in the Hellcats, where a Sea Blue band separates the wing from the fuselage.

Image

Gum masking needed to paint the top, as this did not look sharp enough if done freehand.

Image

In the Helldivers the Midnight Blue continues over the wing and fuselage.

Image

Image

Image

The Avengers still need to be completed, but tape is needed for the vertical tailplane. I am still expecting the WEM cockpits, so the project can go ahead...

Re: CV-9 Essex and CV-19 Hancock

Posted: Tue Jun 11, 2024 7:27 pm
by StevenVD
I followed Tracy's advice and started to mask the elevator shafts.

Image

I suppose I can use Sea Blue in Hancock as it's present in the camo pattern, but in the later Essex camo I only had the choice between light grey or dull black. I chose the latter because it contrasted the least with the black strip that had to sit on top, so a complete black wall. After all there existed a camo that was completely dull black.

Image

The Avengers got a Midnight Blue tail stripe, masked with tape on the tailplane. The Corsair underwing planes needed to become Sea Blue. To avoid underspray they rest on a layer of gum.

Image

This means it will soon be decal time.

Image

But before indulging on this I put myself before the eightysomething yellow propellers that had to be meticulously masked. If done with tape, this would be a messy job and the diameter is too small for a circle cutter. Therefore I used a metal roundel set. The lower roundel is to lift the prop from the paint table and helps in aligning the prop with the second roundel, that being the mask has a 1 mm smaller hole than the prop diameter. The top roundel is lifted and the prop replaced, until all are finished on one side and the other side is done. About every four replaces the lower roundel is cleaned.

Image

Image

This way I managed to finish all Helldivers and Avenger props both sides, costing me at least two hours.

Image

Hancock's elevator got its camo and black boot and I decided to do this on the rear elevator sidewall too, it's close to the platform. Almost every action in the hangar causes overspray somewhere, even with two rows of tape.

Image

Image

The Essex elevator with the black camo. I decided to remove deck blue overspray from the walls but caused new overspray on the deck. To end the vicious circle I used a pencil on the floor.

Image

Yay, the final WEM cockpit set arrived by mail!

Image

This means six extra Helldiver-cockpits.

Image

And seven Hellcats, without any cutting.

Image

But the Dragon Avengers needed to be milled to receive the PE.

Image

The windscreen was hollowed out and then there was a lot of squeezing and filing to get the slightly oversize interior in. I'm now left with four unused Avenger cockpits, but these can't be retrofitted to the Trumpeter Avengers. And there are the six Corsair pits, oversize but maybe to be adapted for some Hellcats.

Image

Re: CV-9 Essex and CV-19 Hancock

Posted: Thu Jun 13, 2024 7:19 pm
by StevenVD
The interiors of the airwing are all painted Vallejo Interior Green with a removable masking for each type, transferred to the next plane:

Image

I didn't prime the last PE additions blue, so there can be some color difference in the green.

Image

Image

Most props are painted now too, a few were too fragile for the roundel method.

Image

Time for the decals. Having two generic Pontos decalsets covers the entire airwing plus the extras, even with the callsigns for the ships. The first eleven ships of the type are provided.

Image

I was able to use 196 of the 198 50-inch wing roundels in the combined sets. I have to repaint one wing that was painted upside down and one Hellcat wing is MIA.

Image

The tail roundels are then applied, but this is a lot harder in some of the types. The round is too narrow and the decals don't bend all the way with the fuselage, even with Daco Sol on them.

Image

Image

Image

The callsign position was also deciding which plane went where. All Corsairs had to go to Essex, so they got a horizontal stripe.

Image

The other types were divided quite equally. A horseshoe stands for Hancock.

Image

Image

Image

The tail stripes were trimmed with scissors.

Image

Now the plane numbers need to be applied, so some research is needed.

Re: CV-9 Essex and CV-19 Hancock

Posted: Mon Jul 01, 2024 6:08 pm
by StevenVD
To reshape the canopies to fit to the WEM cockpit PE while they're designed to be closed up, has taken some courage to begin with. I knew it can be done since the Princeton project, but that had only half the number of planes. The bomber canopies had to be cut up with a circular saw, regularly being propelled to the floor in the direction the saw was spinning. These I can retrieve though, wielding the duster as a pro. After cutting them up I often have to grind them down to win some space for the overscale WEM cockpit partitions.

Image

Image

So part of these had to be clipped short to make the canopies fit. The grind marks on the glass can be removed with Tamiya glue. To fix the glass I use CA glue.

Image

Image

The fighters with closed canopy were quite easy.

Image

But the opened Hellcats don't look the part even with the thoroughest of grinding.

Image

If I remember correctly, on Princeton I removed part of the spine to make this flush.

Re: CV-9 Essex and CV-19 Hancock

Posted: Tue Jul 02, 2024 1:44 am
by Edoardo81
Oh my God, what a work!! Congrats for the details!!!! :worship_1:

Re: CV-9 Essex and CV-19 Hancock

Posted: Tue Jul 02, 2024 3:54 am
by Pieter
In my '700 builds I cut out a clear peace of blister packaging material and fold it. Much thinner than the kit supplied canopy.

Re: CV-9 Essex and CV-19 Hancock

Posted: Wed Jul 03, 2024 3:15 pm
by StevenVD
Thanks, Edoardo. And I think I found the improvement for the canopies, Pieter, but maybe not where you'd expect it.

Image

Taking a better look on these Hellcat canopies, I recognized that shape. But I had to go for an 1/700 used WEM Yorktown PE set and take out the 2-bar railing.

Image

Cut out 4 stanchions and remove the middle bar and start bending.

Image

The bending can be done over a semi-curved diamond file.

Image

The PE was to be painted before assembly.

Image

Being a framework only, this canopy could pivot over the edge of the cockpit and remain flush with the pit. Glass could the be added with CA glue, fixing it in place.

Image

Image

Image

All Trumpeter Hellcats were finished like this, the Dragon ones still had clearparts that needed to be hollowed.

Image

The Corsairs were also manageable with their clearpart, with some pressure applied on the thinned part until it gave. All planes in the airwing now have the glass.

Image

Placing the number decals, I found a sorry mistake in the Ponos Hancock Helldiver tailfin indications. They position the number above the sign, but in all pictures I found this was the other way around. So I had to correct it on about 10 planes. The decals could be undone after moistening and rubbing with a knifepoint.

Image

I recreated all Helldivers I found on the pics, now over to the Avengers.