Page 29 of 41
Re: USS Indiana BB-58 Scratchbuild in 1/96 - 1944
Posted: Mon Feb 25, 2008 8:32 pm
by JWintjes
Bill,
good to hear again from you! Keep up, and keep up the good work!

Jorit
Re: USS Indiana BB-58 Scratchbuild in 1/96 - 1944
Posted: Tue Mar 18, 2008 5:51 pm
by Jefgte
Come back Bill

Reopen your Shipyard
Jef
Re: USS Indiana BB-58 Scratchbuild in 1/96 - 1944
Posted: Wed Jun 04, 2008 11:41 pm
by TommyL
Need to see a post from you Bill.
TommyL.
Re: USS Indiana BB-58 Scratchbuild in 1/96 - 1944
Posted: Thu Jun 05, 2008 12:04 am
by kennylibben
I second that motion...
Re: USS Indiana BB-58 Scratchbuild in 1/96 - 1944
Posted: Thu Jun 05, 2008 3:35 pm
by Francisco P. de Nanclares
Yes, please.
Re: USS Indiana BB-58 Scratchbuild in 1/96 - 1944
Posted: Thu Jun 05, 2008 4:07 pm
by Guest
I had a message a few days ago from Bill, he is finding things difficult getting back to the site, His new delemer is his bother has cancer, so he has other things on his mind.
I dont think bill will mind that I told you, as you were all inquiring about him. ron h
Re: USS Indiana BB-58 Scratchbuild in 1/96 - 1944
Posted: Thu Jun 05, 2008 4:19 pm
by guest
Bill delete my message if you need to , was not sure you would be on site. ron h
Re: USS Indiana BB-58 Scratchbuild in 1/96 - 1944
Posted: Tue Jul 14, 2009 10:25 pm
by Bill Waldorf
Are we ready to continue on this?????? It will be soon...............
Re: USS Indiana BB-58 Scratchbuild in 1/96 - 1944
Posted: Wed Jul 15, 2009 8:43 am
by DrDull
Missed you, Bill. More than ready.
Re: USS Indiana BB-58 Scratchbuild in 1/96 - 1944
Posted: Wed Jul 15, 2009 2:29 pm
by JIM BAUMANN
Sooo--does this mean that the carrier is nearly done...?
EXCELLENT-- looking forward to seeing the Indy getting completed!
JB
Re: USS Indiana BB-58 Scratchbuild in 1/96 - 1944
Posted: Fri Sep 25, 2009 4:08 pm
by Dave Wooley
Hi Bill saw you on the board , any news on the build. Just asking .
Dave Wooley
Re: USS Indiana BB-58 Scratchbuild in 1/96 - 1944
Posted: Fri Sep 25, 2009 8:32 pm
by Bill Waldorf
Dave Wooley wrote:Hi Bill saw you on the board , any news on the build. Just asking .
Dave Wooley
Hello Dave Wooley!!
Funny you should ask........Got the shop cleaned up after the Santee build and I am back in progress on the BB-58. Got the camera charged up and I'll be ready to shoot soon! Stay tuned. By the way, Kiev looking outstanding as usual! Can't wait to see her completed with those a/c.
Re: USS Indiana BB-58 Scratchbuild in 1/96 - 1944
Posted: Mon Sep 28, 2009 7:29 pm
by Bill Waldorf
Hello again all
! If you follow this scratchbuild forum, you are probably aware that I have been busy on the USS Santee Escort carrier project. Having completed and delivered the model, with all concerned "happy", it was time to get back to this big South Dakota Class BB. I really don't like to stop one project mid-stream and start another. You tend to lose momentum on the first, and devote all powers to the second. The Santee was a special project for me, so the BB got put on hold. I have now re-grouped and got a new game plan for completing this first battleship project that I have attempted. My last photo post was Jan 14,2008, so it's been a while. If you go back to pg.36, I'll try to pick up where I left off. I am in the process of building the superstructure area of the ship. It's a fairly large structure with 11 different levels and lots of "stuff" in between. Hundreds of details on a battleship. I won't get 'em all, but I'll try to get alot! I've made a bit of progress over the last couple weeks, after getting back in the groove on this. Let's take a look...................

- Here's the first level of the superstructure. I have added the wood decking here which is .020 walnutt veneer with the plank lines burned in with a laser. This will be the only deck on the structure to get wood, the rest are steel. Work has also started on details such as w/t doors, portholes, ladders, etc. This first level, as well as all others, is made from a 1" thick balsa board. The shape was pulled from the plans, then transferred to the balsa material. I then cut it out with a bandsaw. I then "wrapped" the sides of the piece with .010 stryrene sheet. The decking was then applied. Note I have covered the seam where the deck and sides meet with some .125 abs angle stock. This will help support the railing later.
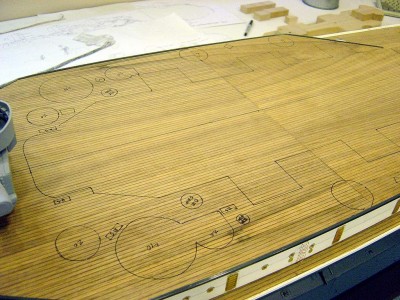
- This photo shows the layout of most of the things that will be added to the deck, such as gun and director tubs, cable reels, r/s lockers, etc. I made a template from the plans to mark the locations of all these things. I then trace the template onto the deck. This saves alot of time versus measuring every piece for placement. The plans are pretty accurate, for 1/96 scale, so the template should be accurate. Thats not always the case, as sometimes the drawings are not correct. I try to cross check with photos of the ship where possible, to at least be close.

- I'll pan around here and show some details I have added thus far. Here's the paravane mount on the #2 turrent, pt. side. There is another one stb. and two more behind the breakwater. Paravane is cast metal. The structure in the center of the turrent mount will become the deck office. I'll use the same procedure, wrapping the sides with styrene, add the deck or roof, then add the details.

- A close up of the porthole and ladder rungs. Portholes are brass p/e from Tom's MW. The ladder rungs or grab irons as they are sometimes called, are HO scale frieight car parts from A-Line. There are lots of these ladder rungs around the ship so it was easier to purchase them ready made, rather than bend each one. I'd be here forever! I made a small jig for the correct spacing and drilling to install the rungs. Attached with C/A.

- Some other details here. W/T doors from Tom's and are very nice brass p/e. (I hope they stay in business) Note the louvered vents and hoods. I vac-formed these from small patterns I made. There are lots of vents around, too, so I made several patterns of the various vent shapes, this is one of them. Vertical ladder is styrene.
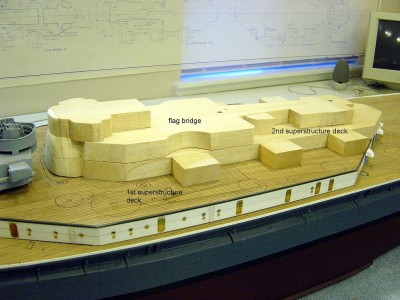
- As I noted above, all the levels are fabricated from 1" balsa board. Here you can see two more levels ready to be sanded and then wrapped, then details added. The decks, made from sheet styrene will be sandwiched in between each level where applicable. I'll work my way up using this procedure all the way. Note the area just behind the turrent. This is the conning tower base. The shape is not quite correct, so more work needs to be done on it. Those square blocks sticking out from deck #2 are the twin 5" gun foundations. A lot of those vents are mounted on these foundations, coming later.

- Aft view of the beginning superstructure,looking fwd. Again note the air vents. These ships did'nt have a/c. Must have been hot and uncomfortable. Battleships are not built for comfort!
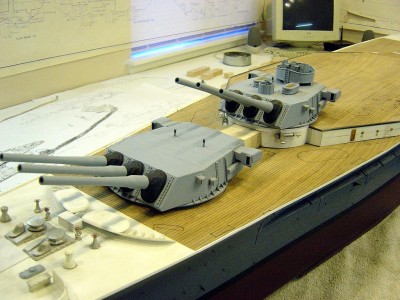
- Could'nt resist taking another shot of the #1 and #2 turrents. These are resin castings I made. The procedure is shown earlier in this thread.

- Another view of the turrents. I've seen these for real on the Alabama, and they are impressive!

- Here's a full view of the progress to date. She's a big ship, over 7 feet long. Getting heavier as I go along too!
Well, it's starting to look like a battleship, anyway! Lot's to do yet so stay tuned!! More to come!!
Re: USS Indiana BB-58 Scratchbuild in 1/96 - 1944
Posted: Mon Sep 28, 2009 9:27 pm
by russclark
its nice to see you back at the indiana,looking very nice. i like the look of the p/e portholes they look a lot better than my homemade ones,i will look for some in 1/200 or 1/192
Re: USS Indiana BB-58 Scratchbuild in 1/96 - 1944
Posted: Tue Sep 29, 2009 3:52 am
by Dave Wooley
Re: USS Indiana BB-58 Scratchbuild in 1/96 - 1944
Posted: Tue Sep 29, 2009 6:51 am
by Bill Waldorf
Hello again Dave
Thanks for the comments. In answer to your questions, I'll use .010 styrene to cover the deck houses on the sides, and .030 or .040 for the decks. I'm using medium viscosity C/A for adhesive and accelerator when needed. I find this system really bonds the stryrene to the wood very well. I tried an experiment with this and I tried to pull off the styrene, it came off with alot of the wood attached to it, so I have to assume the bond is good. The plank lines on the wood decking are "burned" in with a laser. The plans I'm using are from Floating Drydock among other sources. There were 4 ships in the South Dakota class, South Dakota, Massachussetts, Indiana, and Alabama. The main difference between the ships is the placement of the 20 and 40mm guns, life boats and some other minor items. One query is the ships boat crane. I believe Indiana only had one in the timeframe I am building, early 1945. There originally were two, as with her sister ships. At some point the portside crane was removed for some reason..... Indiana went through several refits and upgrades, and I have no exact depictions of her in early 1945. As I stated earlier, I'll get it as close as possible! I believe the representation the model will show is correct. HTH...........Bill W.
Re: USS Indiana BB-58 Scratchbuild in 1/96 - 1944
Posted: Tue Sep 29, 2009 6:58 am
by Dave Wooley
Hi Bill Thanks for your detailed reply .
Dave Wooley
Re: USS Indiana BB-58 Scratchbuild in 1/96 - 1944
Posted: Sat Oct 03, 2009 6:44 pm
by mark_sch
Bill,
Excellent progress. Can't wait to see her finished.
Mark
Re: USS Indiana BB-58 Scratchbuild in 1/96 - 1944
Posted: Tue Oct 06, 2009 8:38 pm
by Bill Waldorf
Hello again all
. Here's this weeks update on the Indiana build. I am working on level 2 of the superstructure. One of the pesky little items is the ships boat crane. I decided to build the crane now, as it goes on this level. Some other details added, too. Let's take a look.............

- In this photo notice the crane. In 1942, Indiana, as well as the other ships in her class, carried two boat cranes, as pictured here. Note the crane just under the mainmast and the three men standing on the deck in front of the cranes base. The base is covered in this photo, and appears to be metal.

- Note in this photo, the lower part of the crane is now open. You can see some of the machinery there. The covering in the first photo appears to be steel. In the second photo it is gone. Not sure why it was removed. In any event by 1944, Indiana only carried her starboard boat crane, as did Massachussets. The port side crane was removed to make room for more AA and as a weight saving measure.

- Here's the crane again. I don't have any detailed drawings of this, so I used the photos I have for reference in the details. The plans show the general shape, thats about it.
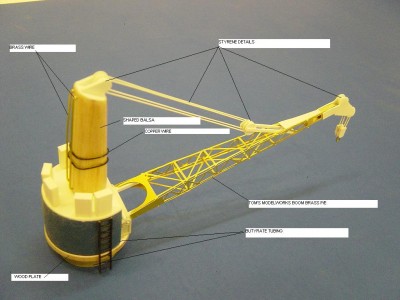
- I've noted here the materials used to make the crane. A note on the boom from Tom's MW. I feel that it is too thin. It's very easy to bend it out of shape, almost impossible to solder, and difficult to work with. Not to knock the company, but it would be alot easier and look better if the part was a bit thicker. Just my opinion. I did the best I could with it. The piece is not totally accurate, rather generalized for cruisers and BB's. They were all slightly different.

- Here's another view. I'll add more rigging after paintwork.

- Here it is on deck in it's approximate location.
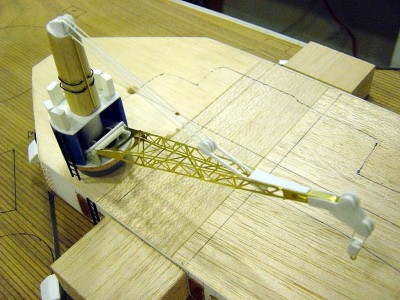
- Another view.

- A shot of the completed deck office just below #2 turrent, I mentioned in my previous post. Sides were wrapped with .010 styrene, while the roof is .020. W/T doos were then added as well as other details. Stb. view here.

- Portside view here. The davits were scavenged from a Revell Corvette kit. Small mushroom shaped parts are vents, cast metal.

- Adding more details to this next level. The same goes for the rest all the way up, one by one. It's easy to miss something! As I said, lot's of "stuff" on a Battleship!
Well there you have it, another update. Hope you enjoyed! Back to construction.............Stay tuned! I continue on........
Re: USS Indiana BB-58 Scratchbuild in 1/96 - 1944
Posted: Tue Oct 06, 2009 10:31 pm
by SweeperSkipper
Absolutely Stunning work, Glad to see you back at it.
I am taking lots of notes.