Page 37 of 103

Re: 1/144 Kiev by Dave Wooley

Posted: Sun Mar 22, 2009 6:45 pm
by J. Soca
Awesome job Dave :thumbs_up_1: :thumbs_up_1:


Jose

Re: 1/144 Kiev by Dave Wooley

Posted: Mon Mar 23, 2009 3:56 am
by Dave Wooley
Thanks for all your kind comments. I will be the first to admit this project for me has taken on a momentum all of its own . Although when I first started I had an idea of what would be involved . It's the volume of detail , which on a carrier you would not have thought possible. But the more you look at the photos the more you see the more you see the more you TRY to include on the model and don't always succeed but then that's part of what modelling is about. :thumbs_up_1:
Dave Wooley

Re: 1/144 Kiev by Dave Wooley

Posted: Mon Mar 23, 2009 9:40 am
by russclark
hi dave ,i have a question for you . what do you use to make small circles in styrene. i use a leather punch for stuff up to 1/4 " ,but for stuff 1/4" to 1.5 " i make the circle with a compass,then cut it out with sissors and sand it round,this does not make a very neat circle,it is also very slow.what process do you use.thanks

Re: 1/144 Kiev by Dave Wooley

Posted: Mon Mar 23, 2009 11:17 am
by Dave Wooley
Hi Russ good to hear from you. The device used for cutting circles is a
"compass cutter" . This can cut styrene sheet down to about 10mm in
radius and up to 3mm thick , Below that I follow you. Above 3mm thick I
use the cutter to mark then the modeling knife does the rest.The device
can also cut thin sheets of ply
Image
Dave Wooley

Re: 1/144 Kiev by Dave Wooley

Posted: Mon Mar 23, 2009 12:15 pm
by russclark
Dave Wooley wrote:Hi Russ good to hear from you. The device used for cutting circles is a
"compass cutter" . This can cut styrene sheet down to about 10mm in
radius and up to 3mm thick , Below that I follow you. Above 3mm thick I
use the cutter to mark then the modeling knife does the rest.The device
can also cut thin sheets of ply
Image
Dave Wooley
thanks dave i have seen one of these at a dollar store in town, for a buck i will give it a go . :thumbs_up_1:

Re: 1/144 Kiev by Dave Wooley

Posted: Mon Mar 23, 2009 3:19 pm
by ozpirate
Dave Wooley wrote:Image
Dave Wooley
Never seen this tool before. Where can I get one? If I can't find one here maybe you can help. Do they still sell this tool in the UK?
Mick

Re: 1/144 Kiev by Dave Wooley

Posted: Mon Mar 23, 2009 3:37 pm
by Dave Wooley
Hi Mick yes the cutter is readily available in the UK and is available at models shops , craft stores and certainly at the model shows . It also comes with a supply of blades.
Dave Wooley :thumbs_up_1:

Re: 1/144 Kiev by Dave Wooley

Posted: Tue Mar 24, 2009 1:50 pm
by pinarhobi
Dave;

I can not believe my eyes. I really congratulate you. Had a great job.

Re: 1/144 Kiev by Dave Wooley

Posted: Fri Apr 03, 2009 3:16 am
by roy allen
Two questions please Dave

1) i need to do some soldering on my Medusa build in the next few weeks and believe it or not i have never had cause to solder anything in my entire life. I have just purchased a soldering iron for the purpose and was wondering if you could run me through the basics please. I've had a go, but i would rather jump of a cliff than show the results on here :doh_1:

2)As this is the first time i have ever posted my builds live so to speak, can you tell me how you manage to get your pics so big when mine are half the size. :huh:

By the way, Ron and youself are to blame for me going back to scratchbuilding after a 25 year break, i will make you both walk the plank for this :bash_2: , as i can see it becoming an obsession.

As always i bow to the master scratchbuilder

Roy

Re: 1/144 Kiev by Dave Wooley

Posted: Fri Apr 03, 2009 7:44 am
by Dave Wooley
roy allen wrote:Two questions please Dave

1) i need to do some soldering on my Medusa build in the next few weeks and believe it or not i have never had cause to solder anything in my entire life. I have just purchased a soldering iron for the purpose and was wondering if you could run me through the basics please. I've had a go, but i would rather jump of a cliff than show the results on here :doh_1:

2)As this is the first time i have ever posted my builds live so to speak, can you tell me how you manage to get your pics so big when mine are half the size. :huh:

By the way, Ron and youself are to blame for me going back to scratchbuilding after a 25 year break, i will make you both walk the plank for this :bash_2: , as i can see it becoming an obsession.

As always i bow to the master scratchbuilder

Roy
Hi Roy Good to hear from you. Soldering is not difficult. Providing you stick to some basic rules. First and in a nut shell the job to be soldered needs to be clean as this does effect how the solder flows and works with the flux and metals involved. The other important element is heat. Using an electronic soldering iron helps as the heat setting can be pre-set. Other factors are type of solder and flux. Were possible I will "tin" the job. This is applying solder to both parts that are to be soldered together. If possible don't apply the heat source direct to the job but allow the parts to heat up so the solder "flows� into the joint and were possible try to avoid applying solder directly to the job. As this can produce weak "dry joints� The idea is to keep the amount of solder around the job to the minimum , This reduces the amount of "salvage" unwanted material on the job that needs to be removed after soldering.
Generally I stick to brass which to be quite frank is easy to solder and certain metals like litho plate {aluminum base} are difficult. For that you need a dedicated solder which goes under the name of "ALUSOL" .Unfortunately this contains lead. I think most solders are now leaded free. There are many different types of Flux {Flux prevents oxidization forming on the parts being soldered} from the likes of "Bakers fluid� to powder to paste this is usually applied when the job is to be soldered. Lastly and once the soldering is completed and the salvage removed {using wet and dry] the entire job needs to be thoroughly cleaned in soapy water and an old discarded tooth brush to remove any traces of flux. In a nut shell there you have it. The only other way is practice. I would suggest that before you solder the parts you want on the model, get yourself some scrap pieces and just practice. In fact it�s like air brushing, practice and more practice.
Regarding the photos on the site, I reduce all of mine from a very high resolution but by percentages and transfer these to Photo bucket it seems to work. You can of course do all the reducing and cropping in Photo bucket if you wish.
I hope all of the above helps, it�s of course only a guide but if there is any other questions please ask. Enjoy your soldering
Dave Wooley
:thumbs_up_1:

Re: 1/144 Kiev by Dave Wooley

Posted: Fri Apr 03, 2009 8:11 am
by ARH
Roy said, By the way, Ron and youself are to blame for me going back to scratchbuilding after a 25 year break, i will make you both walk the plank for this , as i can see it becoming an obsession.


Roy , Even when im not around I get the blame, :heh: :heh: Its good to see you have ago, like you say, it can become an obsession.

At the moment I have lost my obsession with my builds, hopefully it may return one day :thumbs_up_1: .

Re: 1/144 Kiev by Dave Wooley

Posted: Sat Apr 04, 2009 2:15 am
by roy allen
Hi Dave,
thanks for the advice, :thumbs_up_1: will have a little play when i get the chance

Off to RAF Cosford tomorrow for the SHROPSHIRE Model show, Finewaterlines first showing at this show so looking forward to it.

Roy

Re: 1/144 Kiev by Dave Wooley

Posted: Sat Apr 04, 2009 7:06 am
by Dave Wooley
The next stage is to turn the hull around to veneer the starboard side
immediately below and above the walkway. As mentioned earlier in this
thread the reason for this is to allow the fitting of flush vents along the
side of the hull . Also each of the vents are painted a different shade of grey
to the hull and as such this method allows the vents to be fitted later in
the painting cycle .
The styrene veneer above the walkway being fitted.
Image
Here the veneer for the vents is being added immediately below the walkway.
Image
Styrene veneer being added to the side of the hull leading to the bow.
Image
With the styrene veneer fitted fillers is applied and �feathered� into the edge
of the veneer. This produces a sharp and accurate line whilst following the
contours of the hull.
Image
Dave Wooley More to come. :thumbs_up_1:

Re: 1/144 Kiev by Dave Wooley

Posted: Sun Apr 05, 2009 6:13 pm
by Dave Wooley
The next major step was to prepare the hull for painting . As the GRP hull had
undergone considerable re-shaping { see early posts] there was a need to
apply a generous application of fillers which required plenty of preliminary
sanding down. To assess the level of success or otherwise only a coat of
primer would indicate if more fillers was required.
The primer is acrylic based and goes under the trade name High Build.
Image
Image
It was obvious after the first coat that the hull required more fillers .
This was applied and once again sanded down with wet and dry .
Image
Many of the imperfections of shape and surface finish were removed .
Image
Image
The timber flight deck also gets the primer treatment.
Image
As this paint is only a primer there remains plenty of rubbing down until the
surface is completely free from imperfections , if that�s in any way possible.
The area around the shafts and rudder has received only one coat of primer
and the results look quite promising .
Image
With the primer on the next job is to locate and fit such fine detail to the deck
that will be very difficult at a later stage , for example the deck track network
and the SS-N-12 loading rails . These are the major items but require partial
assembly of the superstructure and deck housings to ensure that the tracks are
marked out correctly . Once the track is down if by chance the crane or any
other deck fitting obstructs the rails , which is possible because they are very
close then it will make life very difficult at a later stage to rectify the errors.
Image
Using a compass the circular track between the RBU 6000 launches is marked out .
This will eventually lead right aft .
Image
The track leads down the starboard side
Image
Image
Also the starboard boat recess was temporarily fitted into place . This part of
the built will be amongst the first items to be painted, it will then be fitted into
the recess before the hull receives it�s final coat .
Image
The deck rail track is marked out and the superstructure can be removed but
one last look before doing so. There remains however a considerable amount of
work on the superstructure before paint can be applied.
Image
Next time the jig and methods used for fitting the deck track and the SS-N-12
missile loading rails
Dave Wooley

Re: 1/144 Kiev by Dave Wooley

Posted: Sun Apr 05, 2009 6:37 pm
by Reid
oh my gosh!! u are almost done!! that looks amazing! :woo_hoo: :woo_hoo:

Re: 1/144 Kiev by Dave Wooley

Posted: Sun Apr 05, 2009 10:46 pm
by desron48
exelent dave.......model building at it's finest...... :thumbs_up_1: ...joe

Re: 1/144 Kiev by Dave Wooley

Posted: Mon Apr 06, 2009 2:41 am
by ARH
Well Dave, I have to say , this build is one of the best thats been on the board, full step by step build, when fully finished it needs to be a STICKY at the top of the board, ron h :woo_hoo: :woo_hoo: :woo_hoo: :woo_hoo:

Re: 1/144 Kiev by Dave Wooley

Posted: Mon Apr 06, 2009 4:08 am
by Dave Wooley
ARH wrote:Well Dave, I have to say , this build is one of the best thats been on the board, full step by step build, when fully finished it needs to be a STICKY at the top of the board, ron h :woo_hoo: :woo_hoo: :woo_hoo: :woo_hoo:
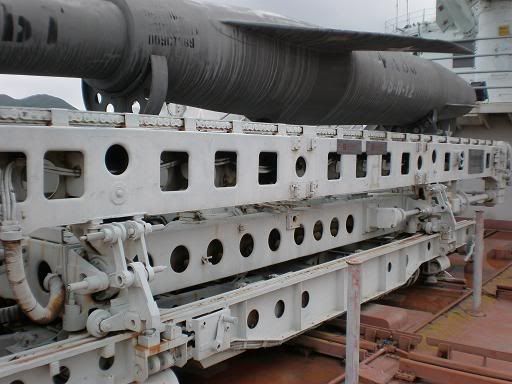
Hi Ron Thanks for your comments . A bit to go yet . It's the old boggy , were do you draw the line. The more I look at the photos the more I say " must put that in" I've got this photo of the "pram" for moving the SS-N-12 missiles into their lainch tubes. Its the most extraordinary piece of engineering hardware I've seen , a real challenge to make but do I need it to be there ? :thumbs_up_1:
Dave Wooley

Re: 1/144 Kiev by Dave Wooley

Posted: Mon Apr 06, 2009 9:38 am
by Dave Wooley
Dave Wooley wrote:
ARH wrote:Well Dave, I have to say , this build is one of the best thats been on the board, full step by step build, when fully finished it needs to be a STICKY at the top of the board, ron h :woo_hoo: :woo_hoo: :woo_hoo: :woo_hoo:
Hi Ron Thanks for your comments . A bit to go yet . It's the old boggy , were do you draw the line. The more I look at the photos the more I say " must put that in" I've got this photo of the "pram" for moving the SS-N-12 missiles into their lainch tubes. Its the most extraordinary piece of engineering hardware I've seen , a real challenge to make but do I need it to be there ? :thumbs_up_1:
Dave Wooley
This is part of the pram for moving the SS-N-12 Sandbox missiles into the launch tubes , is this a challenge or punishment? .
Image
Dave Wooley

Re: 1/144 Kiev by Dave Wooley

Posted: Mon Apr 06, 2009 1:26 pm
by GTDEATH13
Wonderful work as always...

I do not know if it is a punishment or a challenge for you but it definately is a must see for me...

looking forward to the contsruction. By the way, is it the same pram with the one aboard the Kkirov battlecruisers, just before the forcastle on the port side?