Page 46 of 103
Re: 1/144 Kiev by Dave Wooley
Posted: Fri Jul 31, 2009 5:11 pm
by ARH
Hi Kalkurap First off thank you for your comments but the real credit for the way the build is presented goes to ARH .It's through his encouragement that I was able to develop some of the methods for presenting a build on a dedicated site such as this. It is only when I arrived on this site some 7 years ago that I saw for the first time how this was done. It was a different technique to that in the model magazines which I was familiar with and required a different approach. I really appreciate your comments as they are indeed words of encouragement, and we all need that from time to time .I can understand that a build such as this may not be of interest to all , I would be amazed if it was but hopefully the methods used can be adapted and applied on other types of models.
Dave Wooley

.[/quote]
Thanks for your kind words Dave, yes you may have followed my way but the way you have built this one and showed it is a credit to you and your skills, nothing to do with me.
looking forward to seeing more very soon.


[/quote]
I dont think my mate Dave is talking to me.

Re: 1/144 Kiev by Dave Wooley
Posted: Fri Jul 31, 2009 6:23 pm
by Heinkel51
Again absolutely brilliant work.

Re: 1/144 Kiev by Dave Wooley
Posted: Sat Aug 01, 2009 3:29 am
by Dave Wooley
Hi Ron Sorry about that I was away yesterday doing a bit of work for the "magazine " ,I was getting to know " Mr William Froude" the pioneer of ship -model research .

Dave Wooley
Re: 1/144 Kiev by Dave Wooley
Posted: Fri Aug 07, 2009 5:11 pm
by Dave Wooley
Moving on to the next fitting to be completed . I�ve already mentioned some
aspects of this twin arm SA-N-3 launcher earlier on in this build but I�ve compiled
a more details build sequence here .One of 2 SA-N-3 twin arm launchers as fitted to Kiev.
One forward on the forecastle the other aft of the superstructure.

The selection of materials that will form the mounting, body, launcher arms,
various sizes of circular sections fitted to the arms and wire for soldering up the
safety rail to be fitted atop of the launcher body, more on that later.

The launcher arms marked ready for trimming to shape . The mounting formed
from a combination of styrene tube and . fillers.

A leather punch Ideal for producing very small discs which are part of this launcher.


The arms and mounting plus 2 of 6 discs cut to size

Parts of the body of the launcher, left and right sides, top and bottom were
lifted from the drawing and cut to size.

Mounting and launcher body are prepared . various items such as the L shaped
connector arm that joins the launcher arms to the body are cut to size

The assembled launcher body .

Tubes are added to the widest point of the body .These will provide fixing points
for the L shaped connecting arms.

Dave Wooley more to come.
Re: 1/144 Kiev by Dave Wooley
Posted: Fri Aug 07, 2009 5:29 pm
by Timmy C
Hey Dave, have been meaning to ask, what are you using to cut the thicker pieces of styrene like the launcher arms? Jigsaw? Or do you just sand them to shape?
Re: 1/144 Kiev by Dave Wooley
Posted: Fri Aug 07, 2009 6:08 pm
by Dave Wooley
Hi Timmy I have a hand held tool for cutting thicker styrene which I'll be posting up but the launcher arms were cut using a curved blade cutting knife .
Dave Wooley
Re: 1/144 Kiev by Dave Wooley
Posted: Sun Aug 09, 2009 3:39 am
by Dave Wooley
Along with the guillotine the simple hand held tool I use for cutting strip styrene.

Dave Wooley
Re: 1/144 Kiev by Dave Wooley
Posted: Sun Aug 09, 2009 3:37 pm
by johndon
Great work Dave, what I really like about your work is that (my cack handedness apart) you make it look like anyone can do it

John
Re: 1/144 Kiev by Dave Wooley
Posted: Mon Aug 10, 2009 7:25 am
by Dave Wooley
johndon wrote:Great work Dave, what I really like about your work is that (my cack handedness apart) you make it look like anyone can do it
John
Thank you John . I really appriciate that, I firmly hope that it does look easy so as ANY modeller can master the methods for them themselves.
Dave Wooley
Re: 1/144 Kiev by Dave Wooley
Posted: Mon Aug 10, 2009 1:38 pm
by Dave Wooley
Moving on to the launcher arms . Here the various fittings were added to each arm .

. I�ve also introduced square perforated nickel mesh for the inspection platform
at the rear of the launcher body. It�s malleable easy to cut and use .

Each of the parts laid out for the next stage of assembly.

Next job using 0.31 brass wire is to form the foot hand grips that go onto the
side of the pillar. Using the end of a pair of tweezers bend and form each grip.
Tweezers have a tapered end this allows for adjustment to the width prior to bending
Cut to size using a curved blade


Using a small pin vice { finger drill} The next job involved spacing out and drilling
into the pillar for the foot /hand grips .

All the grips in place .

The basic assembly thus far . The perforated mesh has been added but no launch
rails, as yet to the underside back end of the launcher arms.

Dave Wooley More to follow.
Re: 1/144 Kiev by Dave Wooley
Posted: Mon Aug 10, 2009 4:11 pm
by ARH
Re: 1/144 Kiev by Dave Wooley
Posted: Mon Aug 10, 2009 5:39 pm
by Dave Wooley
Hi Ron Thanks . Not long now to the Boat Convention?. For those unaware of this UK event it is one largest gatheings of it's kind in the UK both R/C and statically . Including a small but nice stretch of sailing water .
Dave Wooley
Re: 1/144 Kiev by Dave Wooley
Posted: Tue Aug 11, 2009 2:12 am
by mitchell300
Nice made dave

Re: 1/144 Kiev by Dave Wooley
Posted: Tue Aug 11, 2009 3:11 am
by roy allen
Hi Dave,
the hand held cutter you use is i think the same one i use. Cant remember where i brought it from but it's very useful
When and where is the boat convention, please.
Roy
Re: 1/144 Kiev by Dave Wooley
Posted: Tue Aug 11, 2009 12:16 pm
by Dave Wooley
Hi Roy Yes I was given this as prize in a draw. One of the most uesful tools for working styrene I have.
Dave Wooley
Re: 1/144 Kiev by Dave Wooley
Posted: Tue Aug 11, 2009 12:21 pm
by Dave Wooley
Next part of this mini �fitting� build is to solder up the grip rail that surrounds
the top of the launcher body. I have shown in detail how this is done in other
parts of this build the methodology remains the same.

One side of the two grip rails prepared from 0.31 brass wire ready to be fitted.
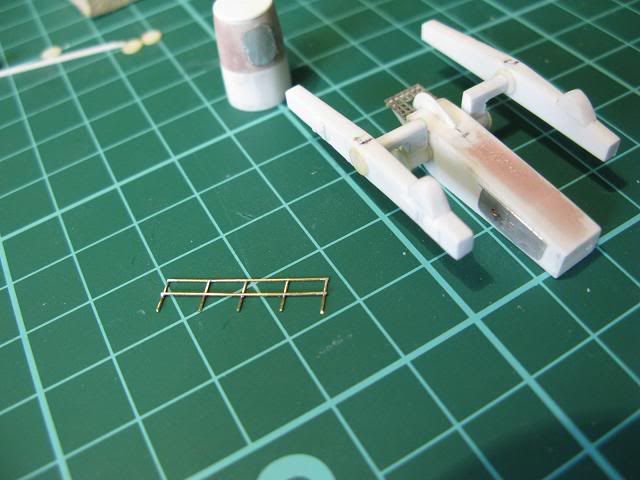
Each of the positions for the rails were drilled out using a pin vice . {finger drill}

To complete the launcher the underside missile launch rails where added.

Two launches prepared and ready to be fitted to each pillar .

Combined at last the launcher body, arms and pillar .

One final task was to add { I forgot] the extension rail to the rear platform ,
then a single coat of paint. One job less!

That�s it for this launcher. I�m considering fitting , at least on one launcher a
SA-N-3 missile but for now back to the superstructure and gazing the fore and
aft bridges , including the flyco position , now that will be a test of will. All prior
to adding most of the fittings to that part of the build.
Dave Wooley more to come.
Re: 1/144 Kiev by Dave Wooley
Posted: Tue Aug 11, 2009 12:28 pm
by Capit�o Norbert
Hey Dave nice pictures.
i would like to ask if you use light soldering
cause your soldering parts are extremely very well made.

Re: 1/144 Kiev by Dave Wooley
Posted: Tue Aug 11, 2009 1:35 pm
by Cadman
Awesome work. I vote for at least one missile on the rail.
Re: 1/144 Kiev by Dave Wooley
Posted: Tue Aug 11, 2009 2:11 pm
by Dave Wooley
Capit�o Norbert wrote:Hey Dave nice pictures.
i would like to ask if you use light soldering
cause your soldering parts are extremely very well made.
Hi Norbert My solder is low temperature multi core . From time to time I'll use solder paste .
Dave Wooley
Re: 1/144 Kiev by Dave Wooley
Posted: Tue Aug 11, 2009 2:20 pm
by Dave Wooley
Hi Tim Thanks for your comments always appriciated . Yes I like the idea of including the missiles gives the thing purpose. The big challenge is the SS-N-12 carrage . Now that will have it's rocket for sure! Awsome piece of hardware
Dave Wooley
The more I do the more I want to do .