Pomeranian Rahschlup 1846 � 1/160 scale � Baltic trader

Post a reply

Confirmation code
Enter the code exactly as it appears. All letters are case insensitive.
Smilies
:smallsmile: :wave_1: :big_grin: :thumbs_up_1: :heh: :cool_1: :cool_2: :woo_hoo:
View more smilies

BBCode is ON
[img] is ON
[url] is ON
Smilies are ON

Topic review
   

Expand view Topic review: Pomeranian Rahschlup 1846 � 1/160 scale � Baltic trader

Re: Pomeranian Rahschlup 1846 � 1/160 scale � Baltic trader

by JIM BAUMANN » Mon Jul 06, 2026 4:02 pm

Its certainly coming on now--appears to be taking shape!!

Re: Pomeranian Rahschlup 1846 � 1/160 scale � Baltic trader

by wefalck » Mon Jul 06, 2026 1:21 pm

The number of visits to this building-log has exploded the last few weeks. Not sure, whether these were real visits or the result of 'bots' doing web-crawling ...

In between two heat-waves hitting Paris over the last three weeks I managed to overcome my lethargy and spend a bit of time in the yard.

Stern-davits
Theses vessels typically carried a small tender in stern-davits. It was used for general work around the vessel and ferrying people and lighter goods between the anchorage and the shore.

Image

The davits were fashioned from pieces of 2 mm x 2 mm styrene rod. In a first step, these were slotted with a 0.2 mm saw on the milling machine for the halyards. These slots than were capped with small pieces of styrene. Finally, the curved shape of the davits was elaborated with fine files. The davits were cemented onto the capping rails.

A connecting piece was fashioned from a pieces of styrene rod 0.5 mm x 1.0 mm. This piece also serves as a support for the boom, when it is lowered.

Two cleats for the boat halliards were carved from styrene strip and cemented to each davit.

Image

Bow monkey-railing
The capping rail at the bow on such vessels was surmounted by a kind of monkey-railing. Into this monkey-railing fairleads for hawsers and for the down-hauls etc. for the jibs are cut. This piece was bent from a 0,5 mm x 1,5 mm styrene strip, cut to length and cemented in place. The further shaping took place in situ.

With all these pieces in place, the rails etc. were painted white.

Image

At this moment also the deck was permanently glued in place. Before that it was assured that the mast could be stepped at the correct angle and the hole for the mast opened to the correct diameter.

To be continued (heat permitting) …

Re: Pomeranian Rahschlup 1846 � 1/160 scale � Baltic trader

by wefalck » Thu Jun 25, 2026 4:08 am

For larger areas, flame-polishing is another method, but there may be slight optical distortions due to uneven thickness.

Re: Pomeranian Rahschlup 1846 � 1/160 scale � Baltic trader

by EJFoeth » Thu Jun 25, 2026 3:55 am

Same here, the heat wave torturing France is heading here for the coming days with a chance we'lll see 40 degrees locally. Still trying to clean freshly vacuumed hulls though, hope they stay in shape in the heat :big_grin:

I had some perspex windows made for a cavitation tunnel once but they were not as perfectly smooth as one would want (so not polished so nice I guess). Used them for optical measurements and always wondered if the quality would affect that, but in any case too late now. Hence I was slightly triggered by you action...

Re: Pomeranian Rahschlup 1846 � 1/160 scale � Baltic trader

by wefalck » Thu Jun 25, 2026 2:51 am

Thanks EJFoeth. I was surprised myself, when I first tried it this way some 20 years ago. As my father worked in the pharmaceutical branch of the company that manufactures the original Plexiglas (then Rhöm GmbH, now called Evonik), I obtained in the early 1980s their complete handbook for working with Plexigals, including the various polishing techniques. In the past I used the classical techniques of sanding and then polishing with polishing paste. These green silicone rubber bits with some polishing compound imbedded make the job on small parts much simpler.

With temperatures close to 40°C outside and 33°C in my study/workshop, the shipyard had to close down, hoping for more clement condistions next week :oops: :mad_2:

Re: Pomeranian Rahschlup 1846 � 1/160 scale � Baltic trader

by EJFoeth » Tue Jun 16, 2026 1:53 pm

Good progress, I like the polishing step that seems to, hmm, polish really well.

Re: Pomeranian Rahschlup 1846 � 1/160 scale � Baltic trader

by wefalck » Tue Jun 16, 2026 12:53 pm

Cabin-skylight

Although I had already made this a while ago, I was not really satisfied with the product and decided to have another go. The skylight is a relatively low affair in order to clear the helm and also to not get into the way with deck-work in this area, such as tending the main boom-sheet. There are various designs for such skylights, but essentially, they consist of a gabled roof-structure in which the glass-panes are protected with metal bar. A contemporary example can be found in the illustration below.

Image
The Norwegian jægt HAABET (1849). Source: Town archives of Trondheim - https://www.flickr.com/photos/trondheim ... 3539132719.

Getting the bars, made from 0.1 mm copper-wire, straight and equidistant is a challenge. After several failed attempts, I decided to mill shallow grooves into the acrylic glass plug as a guide for the bars and this worked.

The plug for the skylight was milled from a piece of acrylic glass. Nothing special. The gabled roof was milled with the help of the angle-adjustable mini-vice. The fly-cutter already leaves a very smooth surface that is then polished by a couple of passes with a silicone rubber bit.

Image
Adjusting the vice to the 10° angle to be milled with the help of a template

Image
Fly-cutting the gabled-roof surfaces

Image
Polishing the surfaces

Then shallow grooves for the bars were milled with a pointed burr. Unfortunately, I forgot to take a picture of this set-up.

The frames for the bars were cut out from thin cardboard with the laser-cutter and the pre-painted. The bars from 0.1 mm brass-plated copper-wire were lacquered onto ‘roof’ structure, using the grooves as guide, taking care to only apply lacquer to areas that will be underneath the frame. The bars were trimmed to length and the pre-painted frames were lacquered on.
Overall, I am reasonably happy now with the result.

Image

Image
The finished skylight, ready to installed.

To be continued …

Re: Pomeranian Rahschlup 1846 � 1/160 scale � Baltic trader

by wefalck » Sat Jun 13, 2026 8:10 am

A sign of Life from the Shipyard

The last few weeks since the posting at the end of April have been crazy with travelling. I have been two weeks to Switzerland, a week to Denmark, and another week in Spain, mainly for business reasons.

I extended that business-trip to Copenhagen by a few days in order to re-visit a few museums in and around the city, including the M/S Museet for Søfart in Helsingør, the Vikingeskibs Museet in Roskilde, and the Krigsmuseet in Copenhagen that now houses the naval collection from the Holmen.

It being the long Pentecost-weekend, there turned out to be a sailing ship gathering in the harbour of Helsingør in front of the Kronborg Castle (of Hamlet’s fame). Among the various schooners, galiots, and smacks (jagts) there was also JENSINE af HADERSLEV (https://www.jensine.dk), a Danish jagt originally built in 1852, so more or less contemporary with the Rahschlup. She has the kind of livery that I have chosen for my project.

Unfortunately, JENSINE was sort of parked in third row, so I could get close to her. However, there are a few shots from this event below.

Image

Image

Image

In between travels, I continued to work on small bits and pieces, but nothing has progressed to a stage that can be shown yet.

Updates to come soon …

Re: Pomeranian Rahschlup 1846 � 1/160 scale � Baltic trader

by EJFoeth » Thu Apr 23, 2026 3:36 am

That is a very nice barrel!! Very interesting to see how it was made.

Re: Pomeranian Rahschlup 1846 � 1/160 scale � Baltic trader

by DrPR » Tue Apr 21, 2026 10:02 pm

Eberhard,

I make close up macro photos of my modeling work, and parts that look very nice at arm's length show huge imperfections in the photos! But on the completed model these flaws just aren't noticeable.

Nice work on the barrel. Again, I have tool envy seeing what you do with your watchmaker's lathe.

Re: Pomeranian Rahschlup 1846 � 1/160 scale � Baltic trader

by wefalck » Tue Apr 21, 2026 2:20 pm

Some more deck details

There were some deck details of which the location puzzled me a bit. These included the down-pipes into the chain-locker for the anchor-chains (to be discussed later), the chimney(s) for the stove(s) in the crew- and captain’s quarters, the mandatory drinking-water barrel, and to some extent the bilge-pump (also to be discussed later).

Chimney
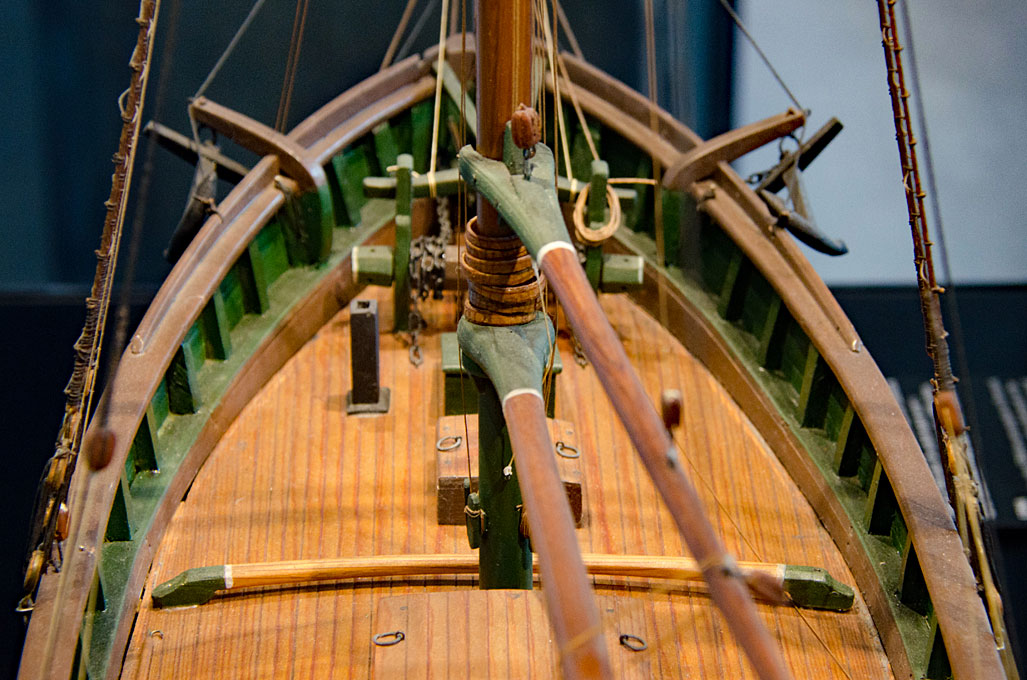
By the middle of the 19th century small cast-iron stoves were in common use on ships like the Rahschlup. Looking at illustrations of the time, the more traditional square, sheet-metal lined wooden chimneys were gradually replaced by round sheet-metal stove pipes. The chimney could be removed and the passage through the deck closed with a cap, so that they would not get in the way when handling the anchors or sails.
I found a good image in my collection of a model of a Jagt in the Museet for Søfart in Helsingør/Danmark, that shows exactly the sort of arrangement that I had in mind.
Image
Model of a Jagt in the Museet for Søfart in Helsingør/Danmark

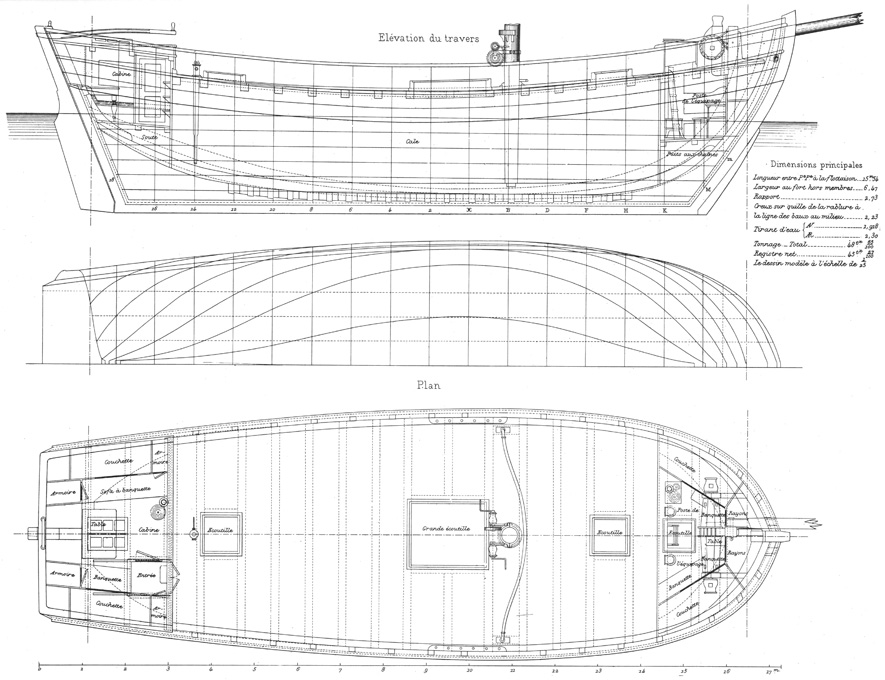
Perhaps the best illustration of the interior arrangement is that of ‘Caboteur Danois’, i.e. a Danish ‘jagt’, from Paris’ ‘Souvenirs de la Marine’ (Planche 213). It gives even more details than the drawings for DE FIRE BRØDERE and CASTOR from Nielsen‘s ‚Danske Bådtyper‘.
According to this the stove in the crew quarters is placed next to the access ladder, at the rear bulkhead, while the placement of the one in the captain’s quarters depends on the layout of that cabin. Again, it is likely placed against the forward bulkhead.
Image
Caboteur Danois (jagt), Pl. 213 of the Souvenirs de la Marine by E. de Pâris

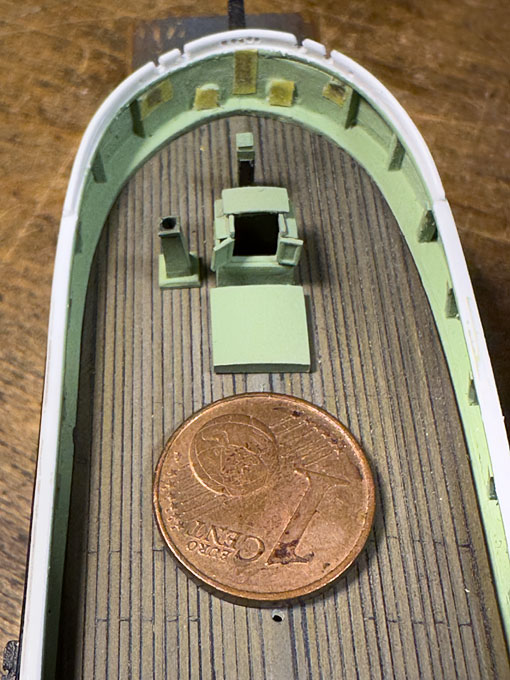
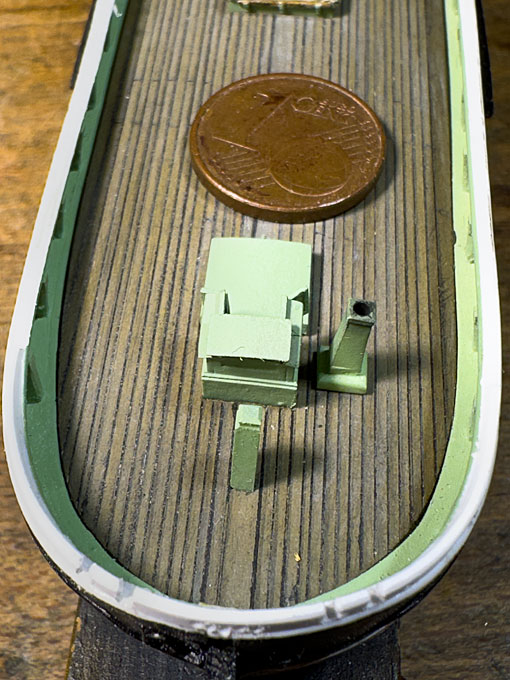
As the model will be shown moored alongside a quay, the chimney will be rigged and will be placed on the port side of the crew companionway. Although, I envisage a summer setting, it is shown, because the stove would have been used for cooking as well.
I am not sure, where the stove for the main cabin would have been placed, but I am showing it as closed with a cap on the port side of the companionway.
The forward chimney was milled from a piece of 2 mm x 2 mm polystyrene rod with the base as a separate piece cut from 1 nm x 3.2 mm polystyrene.
Image

Image

Drinking-water barrel
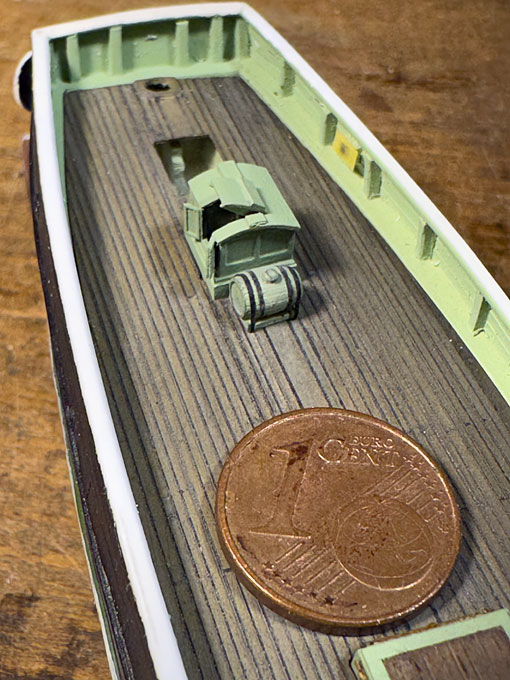
According to pictorial evidence, the placement of the barrel was quite variable, probably at a place where it did not get in the way of the operation of the ship and where it was somewhat protected. Often it was placed near the bulwark or near a companionway. As there is quite a distance between the main cabin companionway and the main hatch, I put it in front of the companionway.
The barrel was turned from a length of 4 mm acrylic rod, giving a barrel of of about 60 cm diameter, which appeared about right according to photographs of the time. With a length of about 5 mm (= 80 cm) such a barrel would hold about 200 l, which should be sufficient for a few days for a crew of 5 to 6.
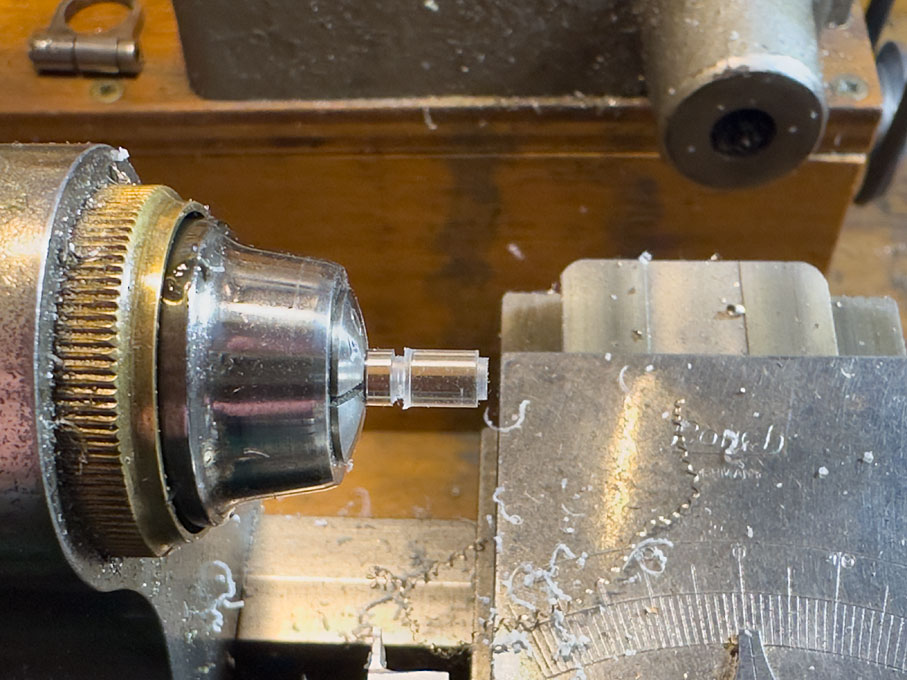
Image
Determining the overall dimensions of the barrel

The curvature of the barrel was turned with the help of the radius turning attachment I made some years ago, held in the quick-change tool-post (QCTP). The geometries were worked out on my CAD software, i.e. the radius of the curvature was set to 9 mm and the minimum diameter would be 3 mm. Accordingly, a step with 3 mm diameter was turned on each side of the blank and then the attachment set to the middle of the future barrel. The whole radius turning tool was lowered in steps until the tool arrived at the minimum diameter.
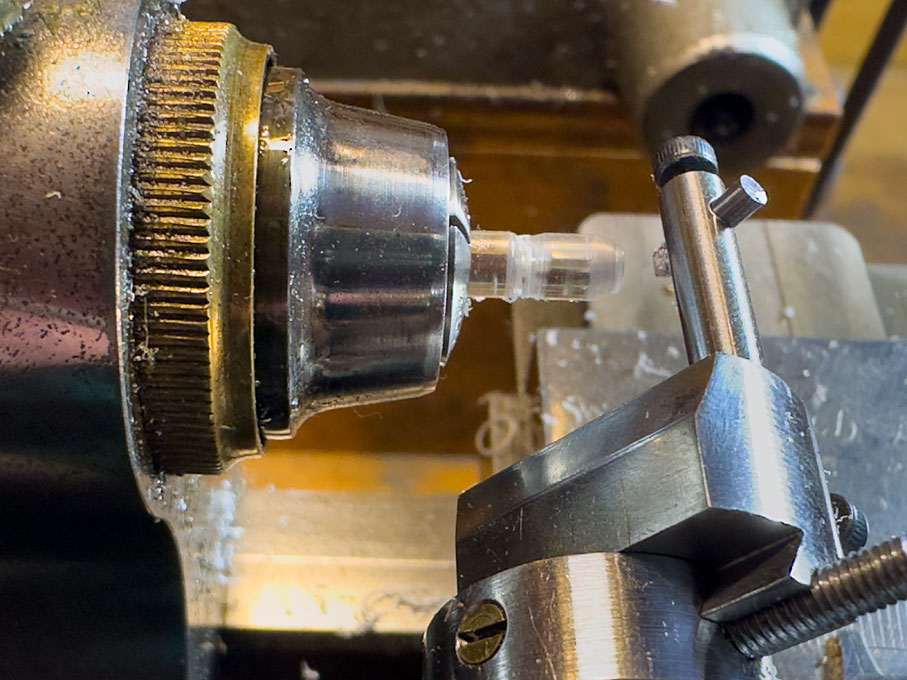
Image
Initial steps of turning the curvature with the radius turning tool
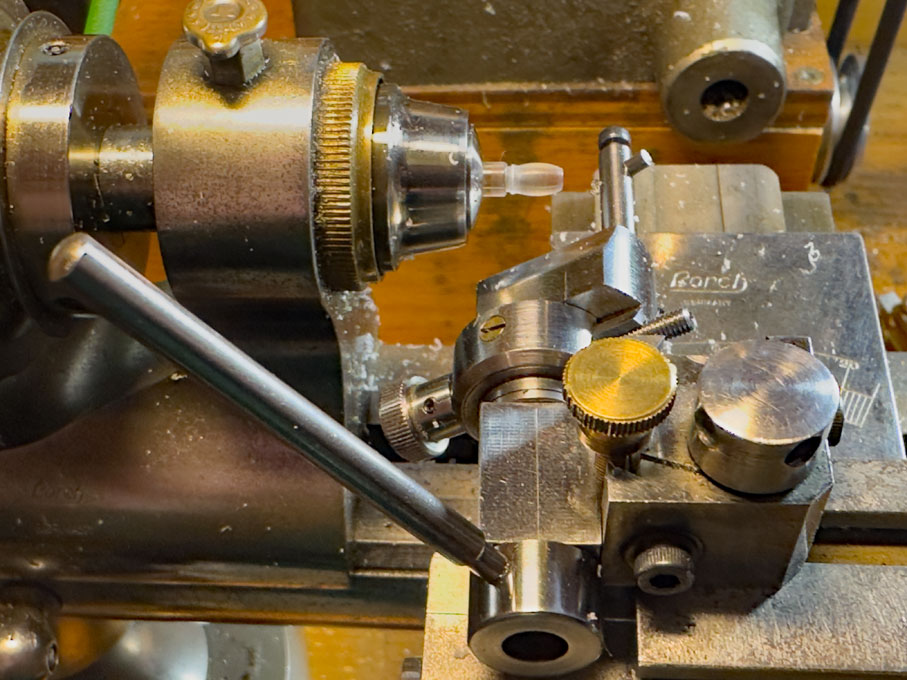
Image
Final shape of the barrel

Without changing any other settings, the cutting tool was turned by 90° so that it cut lengthwise. The radius now was reduced by 0.1 mm to lightly engrave the staves. An Internet-consultation revealed that the staves should be about 10 cm wide at the large circumference. For a 60 cm diameter barrel this results in about 20 staves. Using the built-in dividing disc of the watchmakers lathe these 20 staves were engraved one by one.
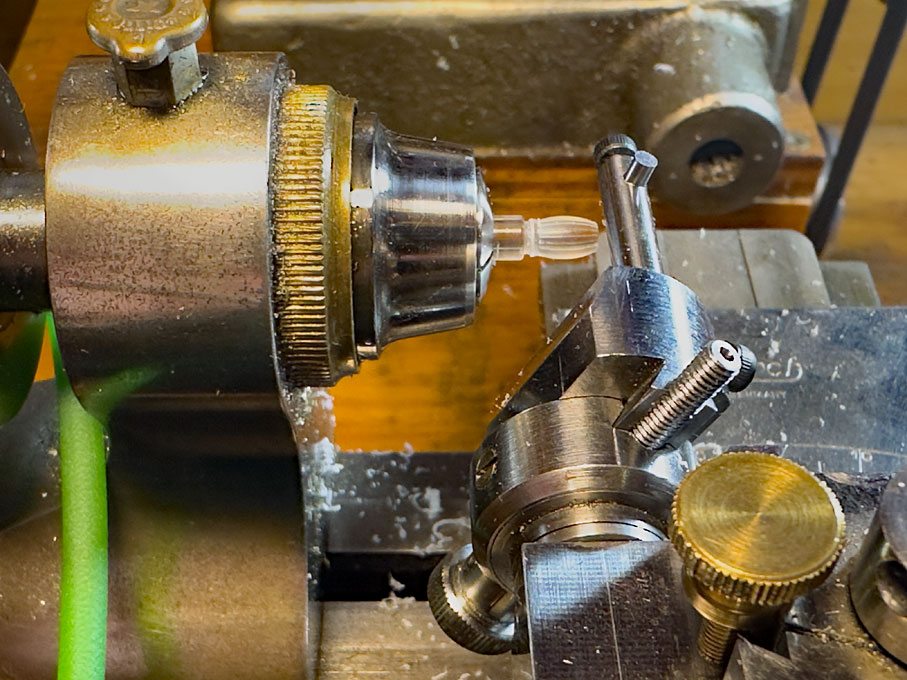
Image
Engraving the staves

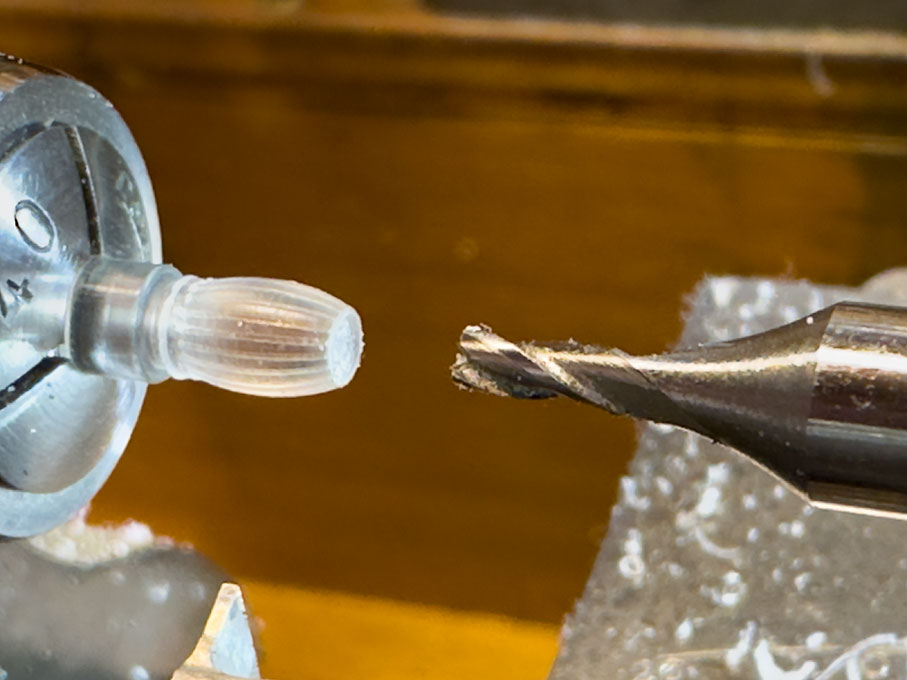
The recesses for the lids were simply cut with an end-mill that cuts over the centre. Holding the barrel once it has been parted off the stock was a bit tricky, but the watchmakers’ collets pinch at the front, so that even bulbous parts can be held for light operations.
Image
Cutting the recesses for the lids

The cradle was fabricated from tiny pieces of various polystyrene profiles.
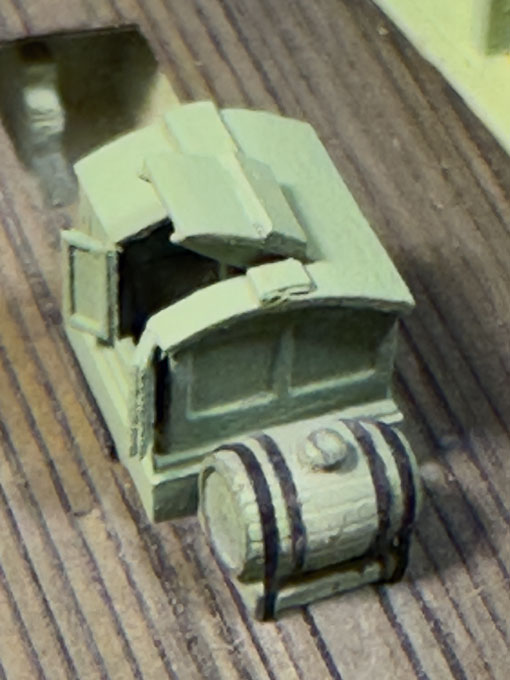
Barrel and cradle were given a base-coat of the same green as the other deck furniture. The barrel-hoops and the retaining straps are thin pre-painted strips of paper.
Image
The painted water barrel at its future location
Image
… and a horribly sobering close-up shot of the water barrel

To be continued …

Re: Pomeranian Rahschlup 1846 � 1/160 scale � Baltic trader

by wefalck » Mon Apr 13, 2026 2:38 pm

Jim, I would have indeed used decal strips (as I did on SMS WESPE), if the colour didn't need to go around the edge of the wale. OK, perhaps a white decal strip and then painting over it and the edge ... I could still do that.

Re: Pomeranian Rahschlup 1846 � 1/160 scale � Baltic trader

by JIM BAUMANN » Mon Apr 13, 2026 2:29 pm

ahoi wefalck

Looking nice!-- I also loathe masking for its--in my hands anyhow--lack of precision !

I think you may obtain a sharper definition / demarcation of the white lines using thin decal striping

images below are from the 170 mm loa model of 1891 HMS Hood
Image


Image

Re: Pomeranian Rahschlup 1846 � 1/160 scale � Baltic trader

by wefalck » Sat Apr 11, 2026 2:36 am

Thanks, Marijn,

Indeed, enamels would have been an option, I still have a box full of decade old Humbrol tins. As I always stored them upside-down, they may be still good. However, I never liked the mess of cleaning brushes with them too much, even though I discovered early on in my life, that washing powder meant for wool (the German 'Rei') works very well and saves on expensive thinners.

The other option I had in the back of my mind was oils, but their long drying times is a drawback, also it can be shortened by using turpentine instead of lineseed oil as medium.

Good brushes help indeed. Unfortunately, sable-brushes are ruined quite quickly by acrylics and are not recommended. I usually use the Da Vinci brand synthetics. Buying brushes is another matter. Even in shops one often finds that they are already damaged.

Re: Pomeranian Rahschlup 1846 � 1/160 scale � Baltic trader

by marijn van gils » Fri Apr 10, 2026 5:12 am

Great job on the paintwork Eberhart! Especially the striping; not easy in this scale... :thumbs_up_1: :thumbs_up_1: :thumbs_up_1:

Another paint type that I find very useful for brush-applied basecoats that need adjusting (like the stripes or the stern carvings) is enamel. I always liked Humbroll, but with all the formula changes I prefer Revell nowadays.

Just like gouache, it can be removed or 'pushed around' with a damp brush (but white spirit instead of water of course) after application. But not forever like gouache, so it is best to apply a small area, adjust with the damp brush, paint the next area etc.
The main advantages over gouache: it is waterproof, so it doesn't need a protective coat, and it is easier to obtain a smooth surface.

I have also found that for detail painting, one of the most important factors is the quality of the brush. So far, I haven't found anything better than the Winsor & Newton series 7. Expensive, but such a joy to paint with...


When applying thin and long decals, it can help to cut them in shorter sections and apply those one at a time. Of course, that can make it a bit more difficult to make the line perfectly follow the curve of the sheerline without any minor kinks, which is really important for these lines.

I'm looking forward to the next steps!

Re: Pomeranian Rahschlup 1846 � 1/160 scale � Baltic trader

by wefalck » Thu Apr 09, 2026 7:17 am

Thanks, I am aware of 'retarders', but I have actually never used them, as the fast drying in most cases is a desirable property.

The Vallejo and Schmincke acrylics that I am using just require water for thinning. Other brands may use a mixture of water and alcohol as solvents and then one can use alcohol for thinning. Using an incompatable solvent for thinning can lead to a breakdown of the acrylic emulsions and coagulation. Acrylics using alcohol as solvent are likely to dry even faster.

Re: Pomeranian Rahschlup 1846 � 1/160 scale � Baltic trader

by Pieter » Thu Apr 09, 2026 7:05 am

Nice paint work. About acrylic paint drying too fast, all marks of acrylic paint offer a 'retarder' that makes the paint dry slower without attacking the piant layer below it. Acrylic 'thinners' do attack older paint layers which can be useful sometimes, for weathering for example or for doing carrier decks. I used acrylic thinner on my HMS Glory.

Re: Pomeranian Rahschlup 1846 � 1/160 scale � Baltic trader

by wefalck » Wed Apr 08, 2026 3:28 pm

The work again was interrupted by two business-related trips abroad that were almost back to back …

Painting continues

I am not a great friend of masking, but some masking and covering was be unavoidable. The wale and the hull below the waterline were sprayed in Vallejo model air 71.077 (wood). After the paint had the chance to thoroughly dry because of my absence, these areas were masked off with the yellow Tamiya tape – the waterline was eye-balled and the tape applied slightly above the designed waterline, as it is custom. Also, all openings in the bulwark were taped off from the inside to prevent the hull paint from entering. The hull then was sprayed in black.

Image
The masked hull

Image
The basic colour-scheme after demasking showing the need of some touch-up

Image
The basic colour-scheme after adjusting the colours of the wale and the underwater body

At this stage I worked on the wale to give it the appearance of oiled wood. The base-coat was worked over with Staedtler PITT artist brush pen 180 ‘raw umber’ to give the ‘wood’ more depth and a slightly more brownish tint. The hull below the waterline was given several washes in Schmincke aerocolor ‘burnt umber’ to simulate the colour of wood treated repeatedly with wood tar (Stockholm tar) – wooden ships not venturing south beyond the Channel at that time did not need a specific protection against Terredo navalis.
The edges of the wale were painted white, extending slightly onto the vertical surface. Originally, I was not too concerned about getting a clean edge on the wale, as the edges were meant to be separated by dark green stripes from the scraped part of the wale. However, the overall width of the wale is only 2 mm, so having five different coloured bands, with the middle one even being wider was a technical challenge and the optical weight did not seem to be right. In consequence, I opted for the colour scheme as seen on the Danish jagt in C.W. Eckersberg’s painting below

Image
A jagt (‘The Sea’), C.W. Eckersberg, 1831, Louvre, Paris

Somehow, I am struggling with brush-painting acrylic paints, because they dry too fast. Getting a clean white edge was difficult. Therefore, I resorted to white gouache, which allows corrections to be made even later with a humid brush. In this way, I managed to get a reasonably clean separation between the white stripe and the scraped part – but at the expense of this not being waterproof. It had to be protected, therefore, by a thin spray of satin acrylic varnish.
The green stripe required several attempts. The original idea was to produce painted strips of decal. To this end 0.7 mm wide strips were cut from a clear inkjet-printer decal sheet. The strips were taped to a piece of cardboard covered in clingfilm and then spray-painted with the airbrush. First, I choose a green too dark, that was barely visible on the black of the hull. The next version with a lighter green (Vallejo model air 71.094 ‘green zinc oxide’) would not separate from the clingfilm cleanly and detach from the decal sheet. Also applying the long narrow decal without breaking it proved very difficult (perhaps I don’t have enough practice in handling decals). Finally, I spray-painted a wide strip of thin tissue paper in Vallejo 71.094 and cut this into the narrow strips required. These were applied to the hull using clear satin varnish.

Image
The final colour scheme of the hull.

At this stage also the mouldings on the transom were picked out in white – another exercise in holding my breath and a lot of touching up. Painting 3D surfaces is much more difficult than painting on a flat sheet.

Image
A stern-view

To be continued ...

Re: Pomeranian Rahschlup 1846 � 1/160 scale � Baltic trader

by wefalck » Sun Apr 05, 2026 4:01 am

HAPPY EASTER to all !

More on painting coming soon ...

Re: Pomeranian Rahschlup 1846 � 1/160 scale � Baltic trader

by JIM BAUMANN » Wed Mar 11, 2026 4:07 am

Ah now-
-with the flaked canvas,... the main hatch does look far more interesting!

pencils are my best friend too

good work!

JIM B :wave_1:

Top