1/350 HMS Barham (1941)

Fully Documented builds that have been completed and moved from the Online Scratchbuild section.

Moderators: MartinJQuinn, JIM BAUMANN, HMAS, Tiny69, Dave Wooley

Dino Carancini
Posts: 429
Joined: Wed Oct 11, 2006 5:46 am

1/350 HMS Barham (1941)

Post by Dino Carancini »

I was not sure of being able to make a online scratchbuild post, my English is poor, but the importance of the feedback here at MW.com is too much tempting, so, why not, lets try it!

I love the QE class for a lot of reasons, they were all different, their life was long two wars, they took part in a lot of actions in the Mediterranean theatre, with the "R" class they are the most representative british battleship design of WWII ... and a lot more...

The beginning is set in November 2006 when I found a copy of the Profile Morskie n.44. I was reading the online scratchbuilt forum here at MW.com and I begun to think about a large ( ... large is relative to my home storage capabilityes :eyebrows: ) british battleship for my collection.

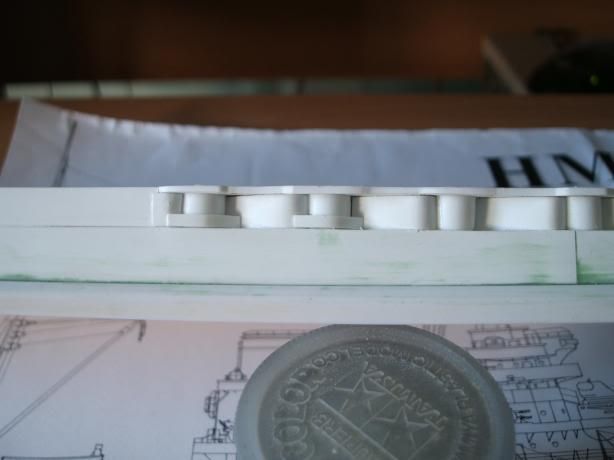
Soon the history of HMS Barham attracts my sympathies, but the profile Morskie was not enought, it still lacked to me a copy of "British Battleships of WWII" ... in this stage my wife was decisive, she found a copy of the book for Cristhmas ... probably I will never know how much she paid for it :heh: !

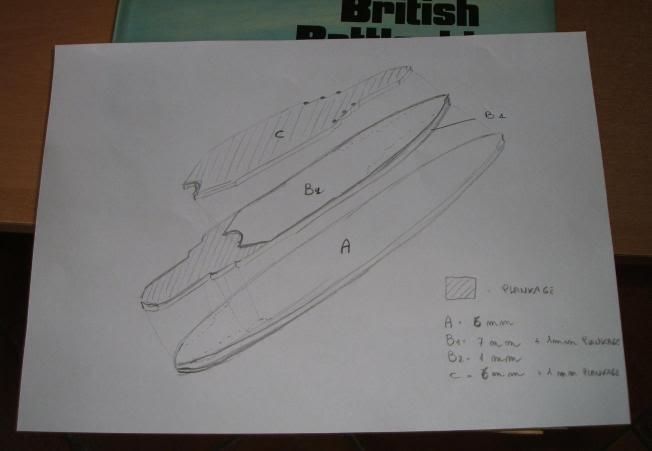
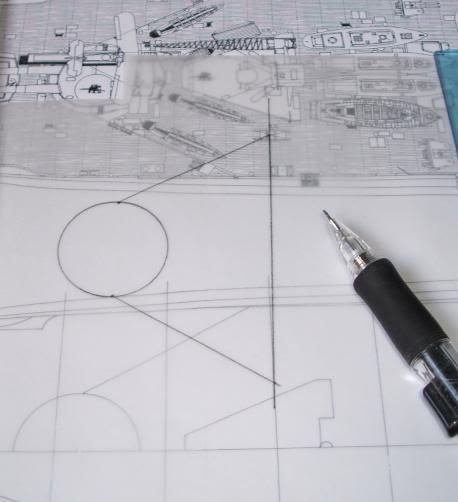
So I was ready to start studying the project :

Image
Dino Carancini
Posts: 429
Joined: Wed Oct 11, 2006 5:46 am

Post by Dino Carancini »

A few month later me and my friend Marcello decided to start the building.

I planned to realize the hull with three layers of balsa wood glued with rapid "white glue", this acts in about 5 mins.

Image

First we cut every layer, and then we glued them, this is the result:

Image

The hull was still rude, but my base to start the building was ready. In the 1/700 Exeter I used only one piece of balsa and a lot of spray putty in order to smooth the surfaces.

The scale of the Barham allowed me to change and to use some plasticard to cover the hull. This was made in order to have a plastic smooth surface were to be able to add the necessary details.

This operation was made with 0.25 mm, 0.5 mm plasticard and CA glue.

Image
Dino Carancini
Posts: 429
Joined: Wed Oct 11, 2006 5:46 am

Post by Dino Carancini »

Maxim's POW and Steve's Dorsetshire were a "gun shot" for me.

I begun to think about a wood main deck, but I realized that for this first "big" model it was too much for my modeling skills, I had need of something simpler...

I chosed a simplified version of the pattern, I needed to start with something simple in order to be able to complete it, I need to make mistakes to learn how to make things, so the final chose was for a 1X1 mm wood strip cut in the length of 30 mm.

I understand that this was out of scale, but for the first time form me was acceptable.

Image

The second problem were the borders around the superstructure and barbettes, my decision was to omit it and to cover all the deck in only one solution. In this phase a did a lot of mistakes, but learned how too and next time I'll be able to build a more realistic wood planking.

This is the result:

Image
Dino Carancini
Posts: 429
Joined: Wed Oct 11, 2006 5:46 am

Post by Dino Carancini »

The hull structure was almost finished, she still lacked the bow, the stern, the hull plates detail and the Bulges. I decided to add the small details later to avoid any damage handling the hull.

The bow and the hull plating was made with 0.25 mm plasticard, it is not to scale, but I'll sand it in order to reach the correct proportions.

Image

Bulges were made with 2.0 mm plasticard in only one piece P/S. This operation took me 3 days of work, also if in a waterlined QE BB we see only a small part of bulges, the shape was a pain for me.

Image
Dino Carancini
Posts: 429
Joined: Wed Oct 11, 2006 5:46 am

Post by Dino Carancini »

After the bulges it was time for a bit of fun.

I went to Marcello laboratory to start milling the barbettes and to make some test for the 15" gun barrel.

Barbettes were an easy task, we milled a solid resin cylinder and then we cut it to measure.

The barrel was another thing :eyebrows: fist try was made again with a resin cylinder, but we had just a few minutes before to realize that resin was not right to reach the thin diemeter of the 15" barrels.

Second try was made with a alluminium cylinder, this time the result was a bit better, but I think I will not use our barrel, when ready I'll buy CNC barrels in Germany.

My need of fun was not satisfied, so I decided to build the MKI mount for the 15". For this operation I used the usual materials from Evergreen while the canvas covers were made with Milliput.

As a side note the Profile Morskie plan has a mistake about the towers 'cause it shows rivets on the roofs, we saw that on MKI there were not.

This is the result:

Image

Image
Dino Carancini
Posts: 429
Joined: Wed Oct 11, 2006 5:46 am

Post by Dino Carancini »

...back to the hull!

This is the "up to date" stage, I'm building the armor around the 6" shields. Again the Profile Morskie is wrong. Checking the Raven/Roberts drawings on British Battleships of WWII I saw that the armor belt around the 6" gun deck was smoth while the Morskie represents it with chines on the side.

As usual I trust A/R drawings so I modeled the armor smooth:

Image
User avatar
Dave Wooley
Posts: 4131
Joined: Sat Jan 22, 2005 10:18 am
Location: Liverpool

Post by Dave Wooley »

Yet another superb 1;350 scratch build like the Royal Oak the Barham is a ship we seldom see modelled. Thanks for posting
Dave Wooley
User avatar
Edward Pinniger
Posts: 461
Joined: Wed Jan 18, 2006 1:05 pm
Location: UK

Post by Edward Pinniger »

Looking very good so far! Your technique of hull construction looks to have been very effective; how easy did you find the process of adding the styrene sheet to the balsa "core"?

This class of ships is one I'd like to scratchbuild myself one day, though probably in a larger scale. I want to get more experience building smaller ships, though, before I attempt something as large and complex as a battleship.
User avatar
Torpedo
Posts: 322
Joined: Thu Feb 22, 2007 4:06 am
Location: Berlin, Germany

Post by Torpedo »

Dino, what a wonderful report! Nice to see what progress you made and how the ship is "growing"...

Don't worry about your english - I know the problem. For me it's fine, but I am only a foreign "Kraut" :cool_2:
Uli "Torpedo" Setzermann

http://www.marine-forum.de - Das Kaiserliche Marineforum

Currently Building: SM TrpBt B-110, SM TrpBt S-37
Upcoming: SMS Derfflinger
Dino Carancini
Posts: 429
Joined: Wed Oct 11, 2006 5:46 am

Post by Dino Carancini »

EPinniger - To add styrene sheets over balsa is simple ... sometime too much simple, CA will rush when it touch the balsa wood :eyebrows: , so "one shot one kill" when you put in place the sheet must be in it's right position no way to change it.

In this way, if needed, you can add some irregularity to the hull just modelling the balsa before to glue the styrene, this could be useful for modern ships without armor.

Torpedo - .. mate you ispired me :heh: , usually I'm a lazy modeler, but after your translation work I decided to start my post!

Dino
User avatar
Jefgte
Posts: 542
Joined: Fri Aug 26, 2005 6:53 am
Location: France

Post by Jefgte »

What a great project...

:thumbs_up_1: :thumbs_up_1: :thumbs_up_1:

Barham is a very nice BB with tragical spectacular End

Very nice deck & well detailled hull.


Bravo Dino
Current 1/700 WL
HMS Repulse
User avatar
Torpedo
Posts: 322
Joined: Thu Feb 22, 2007 4:06 am
Location: Berlin, Germany

Post by Torpedo »

Dino, that's what it's all about. Inspiration! I can't show my wife the progress - she only asks me WHAT has changed - so I am getting on YOUR nerves :heh:

Serious. You're doing a great job not only modelling, but also describing your work. Good, that I inspired at least someone!
Uli "Torpedo" Setzermann

http://www.marine-forum.de - Das Kaiserliche Marineforum

Currently Building: SM TrpBt B-110, SM TrpBt S-37
Upcoming: SMS Derfflinger
User avatar
ArizonaBB39
Posts: 1321
Joined: Sat Jan 08, 2005 7:29 pm
Location: Tempe, Arizona
Contact:

Post by ArizonaBB39 »

Dino, the ship is looking very nice so far. That is a very interesting way to build the hull, you've inspired me to say the least. Hmm....now to find the time to scratchbuild something! Keep us updated for sure!
User avatar
Filipe Ramires
Posts: 1185
Joined: Mon Jan 10, 2005 5:56 pm
Location: Lisbon, Portugal

Post by Filipe Ramires »

That's quite a good job Dino!!! :thumbs_up_1:
"Build few and build fast,
Each one better than the last"
John Fisher
User avatar
Avery Boyer
Posts: 934
Joined: Mon Apr 24, 2006 4:56 pm
Location: Berks County, Pennsylvania
Contact:

Post by Avery Boyer »

Very nice, can't wait to see more! :thumbs_up_1: :thumbs_up_1:
"It is best to remain silent and let others assume you are dumb than to speak up and remove all doubt"

http://nssavannah.wordpress.com/
User avatar
Laurent
Posts: 481
Joined: Wed Nov 08, 2006 9:13 am
Location: Li�ge , Belgium

Post by Laurent »

Hi Dino ,

all I wanted to say has already been said ... :thumbs_up_1:

Regards ,

Laurent
Scared of Nothing , Always Thirsty

Just call me the "Cereals Box Killer" , I guess :big_grin:
User avatar
JIM BAUMANN
Posts: 5680
Joined: Mon Jan 10, 2005 5:30 pm
Location: Nr Southampton England

Post by JIM BAUMANN »

very good Dino--having seen the super job you did with Exeter--I am sure this will again be a atmospheric model when completed!

check your inbox for a PM

Best wishes

Jim B :wave_1: :wave_1:
....I buy them at three times the speed I build 'em.... will I live long enough to empty my stash...?
http://www.modelshipgallery.com/gallery ... index.html

IPMS UK SIG (special interest group) www.finewaterline.com
User avatar
Laurence Batchelor
Posts: 1376
Joined: Sun Jan 23, 2005 6:20 am
Location: Warwickshire, England

Post by Laurence Batchelor »

Very nice Dino, does this mean in between university work I must keep an eye out for Barham material? :cool_2:
Dino Carancini
Posts: 429
Joined: Wed Oct 11, 2006 5:46 am

Post by Dino Carancini »

Laurence Batchelor wrote:Very nice Dino, does this mean in between university work I must keep an eye out for Barham material? :cool_2:
... Laurence ... I didn't dare to ask it ... but you are welcome :heh: , anyway no need to hurry, it's a long project and I'll take my time to finish it. I'm still collecting some material for you about the Regia Marina unit dislocation during WWII. I forgot to say that my provider changed my e-mail now it's d.carancini@alice.it

@ Jim: Thank you for your help :thumbs_up_1:
Dino Carancini
Posts: 429
Joined: Wed Oct 11, 2006 5:46 am

Post by Dino Carancini »

Time to put in place X barbette. First I need somethink to check its position:

Image

With this copy of the plan, drawn over a transparent sheet, I glue the barbette in the correct position:

Image

I proceed drawing the walls over a 0.25 plasticard sheet:

Image

...once cut this "thing" will be one of the walls near X barbette:

Image
Post Reply

Return to “Completed Builds [Fully documented]”