It takes me forever to build kits out of the box, let alone scratchbuild!! Nice stuff Dino - keep those pictures coming.mike mccabe wrote:She's coming along really well Dino, I'm amazed at how quickly you can scratchbuild, it takes me for ever.
Mike
1/350 HMS Barham (1941)
Moderators: MartinJQuinn, JIM BAUMANN, HMAS, Tiny69, Dave Wooley
-
MartinJQuinn

- Posts: 8515
- Joined: Tue Jan 11, 2005 1:40 pm
- Location: New Jersey
Martin
"Tomorrow is the most important thing in life. Comes into us at midnight very clean. It's perfect when it arrives and it puts itself in our hands. It hopes we've learned something from yesterday." John Wayne
Ship Model Gallery
"Tomorrow is the most important thing in life. Comes into us at midnight very clean. It's perfect when it arrives and it puts itself in our hands. It hopes we've learned something from yesterday." John Wayne
Ship Model Gallery
-
Dino Carancini
- Posts: 429
- Joined: Wed Oct 11, 2006 5:46 am
Back to the hull ...
As you can see my work process isn't linear, but I think that's better to do things when you are inspired, there are more possibilities that the results will be good.
I passed this week end painting the light cruiser Abruzzi 1/700, yes I was in the need to paint something , and now, after a long brain-storming I chosed to finish the vertical surfaces of the hull.
This is the first time I build a ship with wooden deck and I never though before about how to paint it. That's a problem 'cause I'll paint the ship with airbrush and I don't want to become crazy masking all the details on the wooden deck, so I'll finish the plastic and vertical parts of the hull and I'll paint it before to add the small details ( mushrooms etc ) on the main deck.
Here are the anchor holes, first I mark the position as usual :

...than I proceed drilling the holes, this is the stage that make me worry, if I do something wrong I could destroy the plankage on the bow :

without to breathe I did all the holes and I built an anchor dummy to test my work before to refine it.

here is the final touch :


As you can see my work process isn't linear, but I think that's better to do things when you are inspired, there are more possibilities that the results will be good.
I passed this week end painting the light cruiser Abruzzi 1/700, yes I was in the need to paint something
This is the first time I build a ship with wooden deck and I never though before about how to paint it. That's a problem 'cause I'll paint the ship with airbrush and I don't want to become crazy masking all the details on the wooden deck, so I'll finish the plastic and vertical parts of the hull and I'll paint it before to add the small details ( mushrooms etc ) on the main deck.
Here are the anchor holes, first I mark the position as usual :
...than I proceed drilling the holes, this is the stage that make me worry, if I do something wrong I could destroy the plankage on the bow :
without to breathe I did all the holes and I built an anchor dummy to test my work before to refine it.
here is the final touch :
-
Cadman

- Site Admin

- Posts: 3624
- Joined: Sat Jan 08, 2005 4:31 pm
- Location: Plattsburg, Missouri

-
Dino Carancini
- Posts: 429
- Joined: Wed Oct 11, 2006 5:46 am
Six inc. guns and guns armor...
Just a litle premised, since I planned the building of the Barham I knew that at this point another one of the "approved" mistakes would be revealed. Most of those mistakes are related to the wooden main deck, as in this case.
The deck above the secondary guns on the QE class was thin, I have estimated about 20 cm from drawings and photos, this means about 0.50 mm in 1/350, now you can understand that this would make almost impossible to use wood strips for the plankage.
I accepted the compromise of a greater thickness of the deck over the 6" guns even if the balance of the model will be worse.
I know that someone will not agree with me, but ...
Now back to the model, to build the 6" guns I used a copper tube cut of the desired lengh, and a polystirene tube to create the canvas covers.

The polystirene is glued to the copper barrel with CA than all the gun ( barrel + cover ) can be glued over the 6" shileds with standard plastic glue.

once glued over the shield I use a larger amount of plastic glue to melt the canvas covers and to create a smooth effect.

Just a litle premised, since I planned the building of the Barham I knew that at this point another one of the "approved" mistakes would be revealed. Most of those mistakes are related to the wooden main deck, as in this case.
The deck above the secondary guns on the QE class was thin, I have estimated about 20 cm from drawings and photos, this means about 0.50 mm in 1/350, now you can understand that this would make almost impossible to use wood strips for the plankage.
I accepted the compromise of a greater thickness of the deck over the 6" guns even if the balance of the model will be worse.
I know that someone will not agree with me, but ...
Now back to the model, to build the 6" guns I used a copper tube cut of the desired lengh, and a polystirene tube to create the canvas covers.
The polystirene is glued to the copper barrel with CA than all the gun ( barrel + cover ) can be glued over the 6" shileds with standard plastic glue.
once glued over the shield I use a larger amount of plastic glue to melt the canvas covers and to create a smooth effect.
-
Rob

- Posts: 1067
- Joined: Fri Jan 14, 2005 10:08 am
- Location: Cornwall
- Contact:

-
Dino Carancini
- Posts: 429
- Joined: Wed Oct 11, 2006 5:46 am
No updates for the Barham this week, the hull is almost ready to be paint, so the DNC ( my wife ) approved the building of a new display case to be put in our living room, here a photo still without the glass opening:

The new show case can store three 1/350 capital ships, at the moment only the Barham is planned, and two cruisers, first will be the WEM HMS Sheffield.
Dino
The new show case can store three 1/350 capital ships, at the moment only the Barham is planned, and two cruisers, first will be the WEM HMS Sheffield.
Dino
-
Dino Carancini
- Posts: 429
- Joined: Wed Oct 11, 2006 5:46 am
I had some spare time today, not a lot out of the week end, but I added some details in the fore part of the 6" deck:

This part of the hull is the characteristic that I like more in "QE" and "R" class, their lines have something of proud and rude elegance, far from the futuristics lines of Italian battleships of same era, like Duilio and Cesare, but they transmit a feeling of power also if shorter than the later built "35000 tons" battleships.
This part of the hull is the characteristic that I like more in "QE" and "R" class, their lines have something of proud and rude elegance, far from the futuristics lines of Italian battleships of same era, like Duilio and Cesare, but they transmit a feeling of power also if shorter than the later built "35000 tons" battleships.
-
Dino Carancini
- Posts: 429
- Joined: Wed Oct 11, 2006 5:46 am
Back on the Barham!
I'm building the decks of the fore superstructure, at this stage I just need the main shape of the decks and relative offices, before to detail them I must trim all the sandwitch of decks.
Here the main parts:

I will use a copper tube of 1 mm of diameter to set all the centers of the structures, than I'll add some small pieces of plasticars to fix their positions.

Of curse the main mast is larger than the copper tube that I'm using to give some mechanic resistance to my structure, to simulate the main mast I will cover the brass tube with a styrene tube, this will give to the main mast the right diameter and second but not for importance will let me add details using plastic cement insted of CA glue.
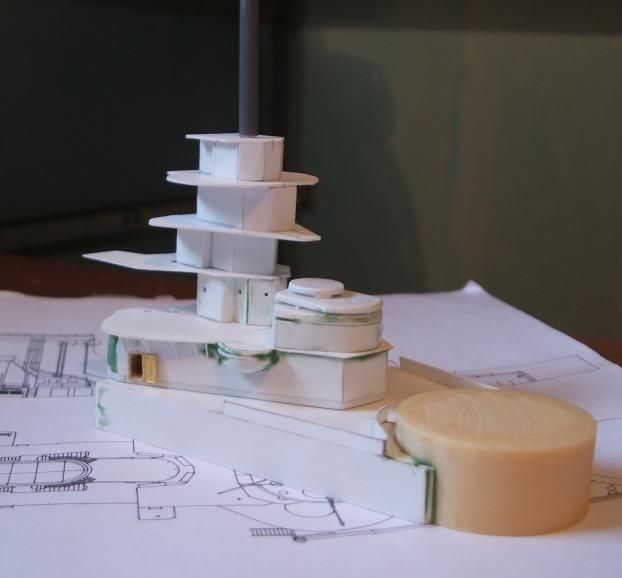
The complete structure will be movable, this will allow to detail each deck separately, and to paint them without problems .... I hope
Dino
I'm building the decks of the fore superstructure, at this stage I just need the main shape of the decks and relative offices, before to detail them I must trim all the sandwitch of decks.
Here the main parts:
I will use a copper tube of 1 mm of diameter to set all the centers of the structures, than I'll add some small pieces of plasticars to fix their positions.
Of curse the main mast is larger than the copper tube that I'm using to give some mechanic resistance to my structure, to simulate the main mast I will cover the brass tube with a styrene tube, this will give to the main mast the right diameter and second but not for importance will let me add details using plastic cement insted of CA glue.
The complete structure will be movable, this will allow to detail each deck separately, and to paint them without problems .... I hope
Dino
-
ArizonaBB39

- Posts: 1321
- Joined: Sat Jan 08, 2005 7:29 pm
- Location: Tempe, Arizona
- Contact:
-
Schnellboot

- Posts: 72
- Joined: Wed Nov 29, 2006 3:25 am
- Location: Croatia
-
coaster

- Posts: 136
- Joined: Mon Oct 10, 2005 1:28 am
- Location: Portugal
- Contact:
-
Dino Carancini
- Posts: 429
- Joined: Wed Oct 11, 2006 5:46 am
Thank you guys!
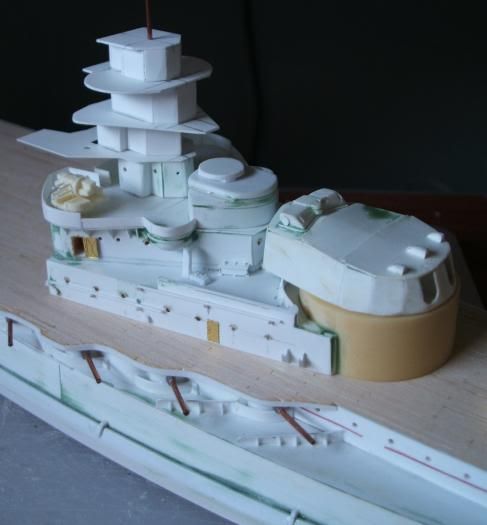
Small update, lets begin the fun detailing the superstructure decks, but first a look at fittings just arrived from the Admiralty in England ( ...uhm the DNC doesn't know how much it will cost the final fitting of HMS Barham, but better leave the things this way )

I glued the "B tower deck with the conning tower deck, I noticed that the quality of my previous works wasn't so good, I needed a lot of putty and sanding, but the overall look goes for me.
Here a pair of photos with the details and a dry fit test with WEM quad pom pom.

Small update, lets begin the fun detailing the superstructure decks, but first a look at fittings just arrived from the Admiralty in England
I glued the "B tower deck with the conning tower deck, I noticed that the quality of my previous works wasn't so good, I needed a lot of putty and sanding, but the overall look goes for me.
Here a pair of photos with the details and a dry fit test with WEM quad pom pom.
-
Dino Carancini
- Posts: 429
- Joined: Wed Oct 11, 2006 5:46 am


-
Schnellboot
- Posts: 72
- Joined: Wed Nov 29, 2006 3:25 am
- Location: Croatia
-
ArizonaBB39
- Posts: 1321
- Joined: Sat Jan 08, 2005 7:29 pm
- Location: Tempe, Arizona
- Contact: