1:75 diving support vessel Well Enhancer

In progress online builds of Scratchbuilt ships of all scales. Remote Control and Static Display.

Moderators: MartinJQuinn, JIM BAUMANN, HMAS, Tiny69, Dave Wooley

tweety777
Posts: 591
Joined: Fri Sep 25, 2009 6:28 am
Location: Near Veenendaal, The Netherlands
Contact:

Re: 1:75 diving support vessel Well Enhancer

Post by tweety777 »

Update:
Image
As I decided that I won't sail with Well Enhancer before the wheelhouse has all it's panels, being filled, sanded and painted, and it must be able to hold the mast firmly.
Image
The lower row of panels is applied, but before the sailing can start I want to have the wheelhouse filled, sanded and painted properly.
Image
Starts to look like a wheelhouse now.
Image
Today I modified the bottom of the mast to make it fit at the centreline rather then off the centreline as it did before.
Image
Overall view of last friday.
Image
The rear funnel has a sort of ventilation shaft mounted at the rear, but I build that covering the entire breadth of the funnel.
Today I decided to trim it the right size.
When that is done I will apply plastic sheets to cover the wooden base like I did with the superstructure.
Image
I started to demolish the lot with a hobby-knife.
Image
Placed the first 3 plastic panels.
Image
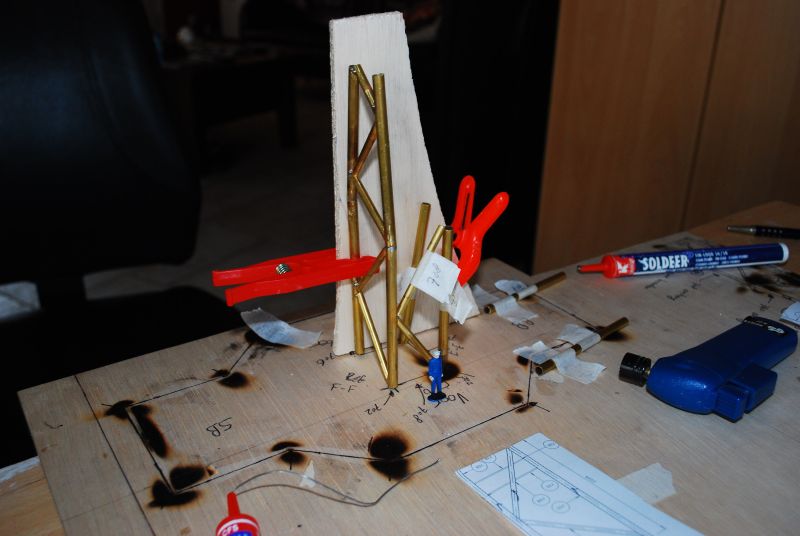
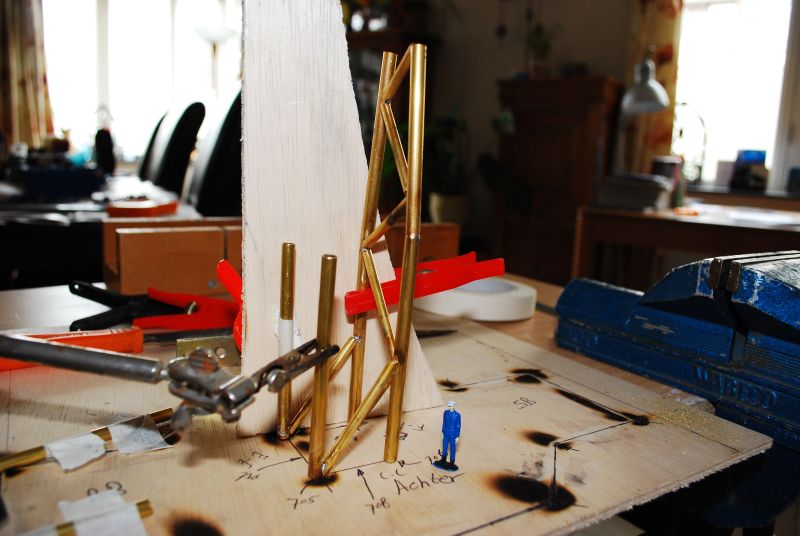
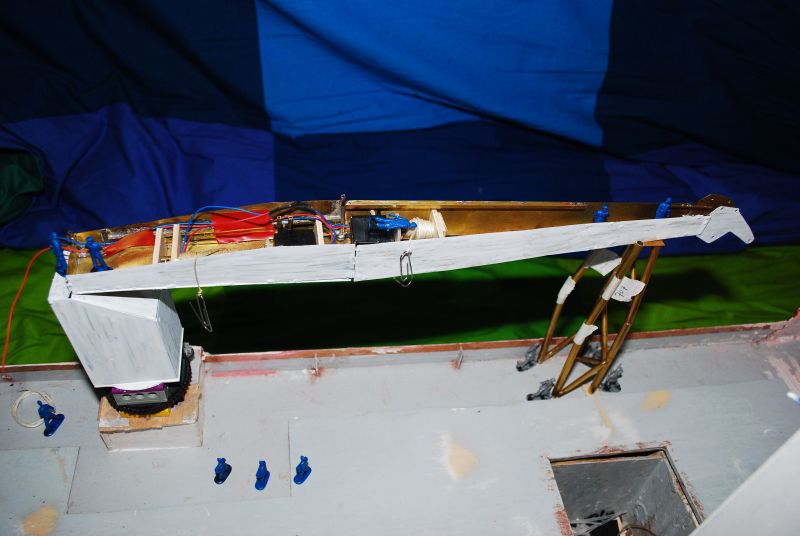
In order to prevent the bridgedeck from bending when the mast is standing on top of it I decided to build some reinforcement inside the superstructure.
Image
That's it for now.

Greetings Josse
Making a complete new Well Enhancer, again scale 1:75.
User avatar
GTDEATH13
Posts: 1205
Joined: Tue Jan 01, 2008 7:15 am
Location: ATHENS, GREECE

Re: 1:75 diving support vessel Well Enhancer

Post by GTDEATH13 »

Looking good... Have you finished work on the hull? :thumbs_up_1: :thumbs_up_1:
NIKOS (NICK)
???? ?? ??? ???????? ??????
(GREAT IS THE NATION THAT MASTERS THE SEAS)
tweety777
Posts: 591
Joined: Fri Sep 25, 2009 6:28 am
Location: Near Veenendaal, The Netherlands
Contact:

Re: 1:75 diving support vessel Well Enhancer

Post by tweety777 »

Thanks.

The work on the hull is pretty much finished indeed.
When the RC-equipment is being build in I will need to make a few inlets in the hull and I still need to make some portholes.
Bulwarks are still on the to-do-list.

Greetings Josse
Making a complete new Well Enhancer, again scale 1:75.
tweety777
Posts: 591
Joined: Fri Sep 25, 2009 6:28 am
Location: Near Veenendaal, The Netherlands
Contact:

Re: 1:75 diving support vessel Well Enhancer

Post by tweety777 »

Update:
Image
More supports for the wheelhouse.
Image

Image
Put the crew in position for a photoshoot.
Image
"Rotterdam sited captain".
Image
Or maybe the Panama Canal, the mountains are quite a bit too close for Rotterdam....
Image

Image
I still haven't seen anyone cleaning the decks.....
Image
Apart from the cleaners the rest of the crew is working pretty hard.
Image
Pulling the platform in place.

Greetings Josse
Making a complete new Well Enhancer, again scale 1:75.
User avatar
Ticonderoga
Posts: 652
Joined: Mon Feb 22, 2010 7:54 pm
Location: Mudgeeraba, Qld Australia

Re: 1:75 diving support vessel Well Enhancer

Post by Ticonderoga »

Looking good Josse

Andrew
:wave_1: :wave_1:
Ex RAN. Anzac, Duchess, Vampire, Yarra, Betano, Bombard, Brisbane, Swan, Melbourne (Carrier), HMS Leander
tweety777
Posts: 591
Joined: Fri Sep 25, 2009 6:28 am
Location: Near Veenendaal, The Netherlands
Contact:

Re: 1:75 diving support vessel Well Enhancer

Post by tweety777 »

Update:
Image
Today I opened my can of metalprimer to protect my brass against the weather and to make sure that the coloured paint won't fall of easily.
Image
Painted the crane-house both on the inside and on the outside, as this can dry while in it's normal position.
I started the painting so I can start painting the new platform, but I just realise I didn't take any pictures of that.
Image
As I just was painting I decided I could paint the mast as well, but I couldn't paint the entire mast as that will gice trouble in future soldering work.
Image
Also painted the crane-arm a bit, though not so much that putting it down somewhere would leave paint on the floor.

Besides the painting i've also started filling the wheelhouse, so maybe i'll start sanding that tomorrow.

Greetings Josse
Making a complete new Well Enhancer, again scale 1:75.
tweety777
Posts: 591
Joined: Fri Sep 25, 2009 6:28 am
Location: Near Veenendaal, The Netherlands
Contact:

Re: 1:75 diving support vessel Well Enhancer

Post by tweety777 »

Update:
Image
Today I tried to sand the wheelhouse, but the somewhat weak plastic panels made that very hard to do.
Therefore I decided it was time reinforce the wheelhouse.
Here i'm turning a square bar into a U-bar which will be placed in 1 of the nasty corners of the wheelhouse.
Image
The first frames in the wheelhouse.
Image
I placed the first frames vertical, but later on I found out that horizontal frames will take less material, so from then on I changed to horizontal framing.
Image
Here the U-bar is finished.
Image
Right now the front half of the wheelhouse has got it's frames.
The rear half will have to wait till I got new supplies.
I also added to brass bars to the casings to stop the deck laying on top of it from falling forwards or backwards.

Greetings Josse
Making a complete new Well Enhancer, again scale 1:75.
tweety777
Posts: 591
Joined: Fri Sep 25, 2009 6:28 am
Location: Near Veenendaal, The Netherlands
Contact:

Re: 1:75 diving support vessel Well Enhancer

Post by tweety777 »

Update:
Image
I made some adjustments on the searchlight to make it able to control elevation.
The + wire is now used to make the searchlight elevate, while the -wire is attached to the metal parts to remove it's wire, making it look far better now.
Image
More reinforcements under the bridgedeck.
Image
Bought some new supplies including a plastic flat bar of only 2mm wide and 0,5mm thick with which I will make the window supports which will hold the glass itself.
Placing these parts is pretty tough as these small parts easily get full of glue, making it hard te have them stick the wheelhouse rather then either my fingers or the tools that I use to put them in place.
Image
Also bought some brass bars to finish the reinforcement of the wheelhouse.
While applying these bars I put some wait on the ends of the bridgedeck to make it flat again as it has bended upwards towards the ends.
The new bars and window supports will help to keep the bridgedeck in shape.

Greetings Josse
Making a complete new Well Enhancer, again scale 1:75.
Egberth
Posts: 94
Joined: Mon Nov 17, 2008 12:38 pm

Re: 1:75 diving support vessel Well Enhancer

Post by Egberth »

I would really suggest to sand and fill (and sand and fill and sand and fill ...) the hull and the superstructure and to straighten the windows already now before further detailing. It will be hell to do it later, when all details tend to break off (or are in the way) while sanding.
tweety777
Posts: 591
Joined: Fri Sep 25, 2009 6:28 am
Location: Near Veenendaal, The Netherlands
Contact:

Re: 1:75 diving support vessel Well Enhancer

Post by tweety777 »

Hello Egberth,

Thanks for the advice.

The hull looks realistic to me.

The wheelhouse and superstructure needed to be reinforced to be able sand and fill it properly, but work on that will continu soon enough.
As long as details aren't placed on board there is no harm making them.
This searchlight is build over a year ago if i'm not mistaken.

Greetings Josse
Making a complete new Well Enhancer, again scale 1:75.
tweety777
Posts: 591
Joined: Fri Sep 25, 2009 6:28 am
Location: Near Veenendaal, The Netherlands
Contact:

Re: 1:75 diving support vessel Well Enhancer

Post by tweety777 »

Update:
Image
After having sanded and filled the lower row of panels I started building the upper row of panels.
Image
I thought that adding window supports would be pretty tough on the upper panels, so I started adding the window supports before placing the panel.
Image
Added window supports on the first panel.
Image
In order to stop light to shine through the panels I applied some silver paint at the inside to stop the light.

Greetings Josse
Making a complete new Well Enhancer, again scale 1:75.
tweety777
Posts: 591
Joined: Fri Sep 25, 2009 6:28 am
Location: Near Veenendaal, The Netherlands
Contact:

Re: 1:75 diving support vessel Well Enhancer

Post by tweety777 »

Update:
Image
Because the panels at the sides of the wheelhouse don't have any windows I was able to build and place those without making it hard to place the other panels properly.
Image
Put in the crew and interior to show what it will look like when the outside is finished.
Image
As it takes a while for the paint to dry I started working on the panels that will come on the other side of the wheelhouse.
At this moment these panels have also been painted silver, but I forgot to make a picture of that.
Image
As the paint still needs some 6 hours to dry I continued working on the rear funnel.
Image
Starting to look like a funnel.

Greetings Josse
Making a complete new Well Enhancer, again scale 1:75.
tweety777
Posts: 591
Joined: Fri Sep 25, 2009 6:28 am
Location: Near Veenendaal, The Netherlands
Contact:

Re: 1:75 diving support vessel Well Enhancer

Post by tweety777 »

Update:
Image
In order to dryfit the crane arm properly I started working on the boomrest.
I made an edge on the end of the tube to help the solder to connect 2 tubes properly.
Image
This boomrest is a pretty complex 1 as it has 2 legs which are bended over 2 of the ships axis, which makes it very hard to determine the angle at which the 2 parts come together.
Fortunatly that leaves 2 legs that are bended over only 1 axis, of which the angle is perfectly shown in the drawings.
First step is to build the 2 legs that are bended over 1 axis, and apply the supports that will later on be connected to the remaining 2 legs, but first the first 2 legs need to be connected.
Image
As paper burns more easy then plywood I decided to make the drawing on a piece of plywood so I can build this complex construction properly.
Image
This is one of my better pieces of soldering.
Image
Also added the lower part of the second leg.
Image
Placed the panels which I made this morning.
Image
Seeing the crew you'd get the impression that Well Enhancer is about to set sail, but unfortunatly she isn't.
Image

Image
The roof of the wheelhouse fits a lot better now too.
Image
That's it for today.

Greetings Josse
Making a complete new Well Enhancer, again scale 1:75.
tweety777
Posts: 591
Joined: Fri Sep 25, 2009 6:28 am
Location: Near Veenendaal, The Netherlands
Contact:

Re: 1:75 diving support vessel Well Enhancer

Post by tweety777 »

Update:
Image
Added another support.
Image
This is where it will be placed.
Image
Last one with even more supports fitted.
Only 1 to go here.

Greetings Josse
Making a complete new Well Enhancer, again scale 1:75.
User avatar
GTDEATH13
Posts: 1205
Joined: Tue Jan 01, 2008 7:15 am
Location: ATHENS, GREECE

Re: 1:75 diving support vessel Well Enhancer

Post by GTDEATH13 »

Looking good... I like the fact that you are revising things you have already built and improve them... :thumbs_up_1: :thumbs_up_1: :thumbs_up_1:
NIKOS (NICK)
???? ?? ??? ???????? ??????
(GREAT IS THE NATION THAT MASTERS THE SEAS)
tweety777
Posts: 591
Joined: Fri Sep 25, 2009 6:28 am
Location: Near Veenendaal, The Netherlands
Contact:

Re: 1:75 diving support vessel Well Enhancer

Post by tweety777 »

Update:
Image
Now that the first 2 legs are connected it was time to modify the base to continu working towards the other legs.
Image
Simple yet effective: put a few nails through the wood, and place the tubes on those, then you can apply the supports.
Image
Unfortunatly this piece didn't fit all too well.
Some sanding and filling will have to solve this problem.
Image
Last panel for the wheelhouse has been build and painted.

Greetings Josse
Making a complete new Well Enhancer, again scale 1:75.
tweety777
Posts: 591
Joined: Fri Sep 25, 2009 6:28 am
Location: Near Veenendaal, The Netherlands
Contact:

Re: 1:75 diving support vessel Well Enhancer

Post by tweety777 »

Update:
Image
Build a small boomrest-factory in the livingroom to continu the work on the boomrest.
Later on in this update will be some photo's of the ship in action in a fake sea...
Image
Made a support to help keeping the parts straight while attaching new parts.
Image
Fixing the parts properly turned out to be one tough job.
The support is holding the leg straight that isn't being worked on, otherwise I don't have enough room to solder it together firmly.
Image
Unfortunatly 1 leg turned out to be just a bit too short.
This photo makes it look like it's far from straight, but it isn't all that bad.
Image
Put the crane-arm on top of the boomrest to show what it will look like.
Image
As the topplate has now been installed the last 2 tubes can be modified to fit.
Image
Inspection on it's way to the bowthruster.
Apparently the inspector didn't really care about the progress, but more about the fact that the bowthruster still hasn't been repaired.
Image

Image
"Let's see if any oil has dropped on the floor of the dock"...
Image
And now the overall views.
Image
As the ship is sailing pretty close to rocks (those blue and green things in the background) the crew is standing by to take measures to ensure the safety of the ship (no, it's not the Navy, this ship will simply drop an anchor to ensure it's safety...).
Image
As soon as they find an anchor-bouy the crew can get into action to moor the ship to it.
Image
While mechanics are fitting some more parts a group of sailors below is about to arrive with even more parts.
These kind of jobs need to be closely monitored by officers.
Image
When sailing in waters as narrow as this it's not wise to steer the vessel whilst standing in the wheelhouse, so the crew at the bridge have stepped outside to steer her from the bridgewings.
Image
At the bow are also crewmembers standing by to moor her when needed.
Image
Even though this ship was build properly the lifeboats have to be checked out from time to time.
Image
Crew standing by at the bow.

Geetings Josse
Making a complete new Well Enhancer, again scale 1:75.
tweety777
Posts: 591
Joined: Fri Sep 25, 2009 6:28 am
Location: Near Veenendaal, The Netherlands
Contact:

Re: 1:75 diving support vessel Well Enhancer

Post by tweety777 »

After failing more then a month to get something to update, i'm finally back!!!
What mounting a dimmer for the lights in a room can achieve...
Image
Placed a piece of deck.
I'll need to fill some spaces up on this part.
Image
As filling and sanding the superstructure has priority at the moment I took some Milliput to fill some holes in the wheelhouse.
It went better then last time, but it still can be done way better.

Groetjes Josse
Making a complete new Well Enhancer, again scale 1:75.
User avatar
Ticonderoga
Posts: 652
Joined: Mon Feb 22, 2010 7:54 pm
Location: Mudgeeraba, Qld Australia

Re: 1:75 diving support vessel Well Enhancer

Post by Ticonderoga »

Good to see some progress Tweats...

Andrew
:wave_1: :wave_1:
Ex RAN. Anzac, Duchess, Vampire, Yarra, Betano, Bombard, Brisbane, Swan, Melbourne (Carrier), HMS Leander
User avatar
ARH
Posts: 2557
Joined: Mon Jan 10, 2005 10:52 am
Location: Land of the Cheshire cat

Re: 1:75 diving support vessel Well Enhancer

Post by ARH »

I thought the bird had gone to the grave yard in the sky, nice to see him back were he should be, nice up date by the way, :thumbs_up_1: :thumbs_up_1: :wave_1:
Simple but effective.
Post Reply

Return to “Online Scratchbuild Projects”