1:75 diving support vessel Well Enhancer

In progress online builds of Scratchbuilt ships of all scales. Remote Control and Static Display.

Moderators: MartinJQuinn, JIM BAUMANN, HMAS, Tiny69, Dave Wooley

tweety777
Posts: 591
Joined: Fri Sep 25, 2009 6:28 am
Location: Near Veenendaal, The Netherlands
Contact:

Re: 1:75 diving support vessel Well Enhancer

Post by tweety777 »

Update:
Image
Lengthened the sheer strake.
Image
Added 2 frames to fix the broken sheer strake.
Hopefully this will keep the sheer strake in place.
Image
This magnet had been fitted but turned out to be fitted to low so the metal plate wasn't pulled down so I removed the magnet and glued it back in place but now a bit higher.
Image
Put the superstructure back in place to see if the new styrene plates have helped which it did.
It's not finished yet but I'm closer to the finish line for sure.
Image
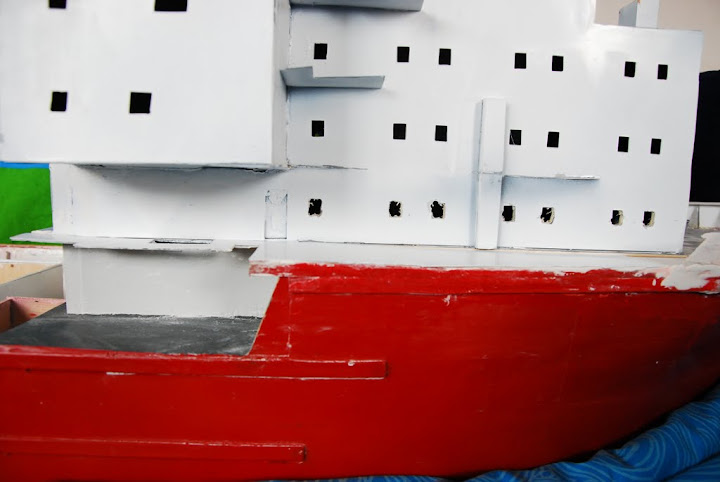
This side does need some more attention.
Image
This side is far from finished.
Image
The rear side also needs some more work.
The difference in thickness will be dealt with when the frames are added to the decks.
Image
After all the work showed above I decided to call it a day for the work on the Well Enhancer and took the crew out for some nice photo's.
It's late in the afternoon somewhere on the Atlantic Ocean where the Well Enhancer is approaching an oil rig for a job.
Image
Men with binoculars are checking the parameters.
Image
Prepare to go to DP-mode!!
Image
The sea is still pretty quite.
Image
The sea suddenly got real rough!!
Image
Rough sea!!
This is why I like these kind if ships, because of the way they fight there way through the heavy seas.
This photo was inspired by the only photo of the real ship in rough sea I could find.
Image
Although the ship is sailing into the waves, thus having the superstructure protecting the rear deck, even the rear deck isn't quite loaded with crew.
Only a few officers who are checking today's progress are out on the deck.

Greetings Josse
Making a complete new Well Enhancer, again scale 1:75.
tweety777
Posts: 591
Joined: Fri Sep 25, 2009 6:28 am
Location: Near Veenendaal, The Netherlands
Contact:

Re: 1:75 diving support vessel Well Enhancer

Post by tweety777 »

Update:
Image
I finished the construction stage!!!!!!!!!!! :woo_hoo: :woo_hoo: :woo_hoo: :woo_hoo: :woo_hoo:
Today I spent about an hour to finish the sanding and then I painted the hole model above the waterline with primer, then painted the hull red and when that paint had dried I painted the decks grey.
The grey turned out to be much, much darker grey then the cap of the can suggested.
Image

Image
Here you can see how dark the grey actually is, it's more like middle grey while the cap of the spray can is light grey...
Image

Image

Image
I had some mail contact with a friend about paint, he told me I should buy some special plastic primer for the styrene parts.
So I did, but as the gas in spray cans appears to eat the styrene I got stuck with a normal can of brush paint.
That doesn't make it quite easy to get a nicely smooth result, but I managed to keep the damage as small as possible.
Image

Image

Image
When I was finished with painting I discovered some flaws, I will deal with those when I start adjusting the decks.
Image

Image

Image

Image
Tomorrow I'll first paint the walls white (that paint only needs 2 hours to dry) then I'll paint the decks grey.

Greetings Josse
Making a complete new Well Enhancer, again scale 1:75.
tweety777
Posts: 591
Joined: Fri Sep 25, 2009 6:28 am
Location: Near Veenendaal, The Netherlands
Contact:

Re: 1:75 diving support vessel Well Enhancer

Post by tweety777 »

There are some days on which one can shoot himself.
Today is 1 of those days for me.
Yesterday I got a very nice paint result only to ruin it today.
I thought that the Tamiya paint would be as dry as it could possibly be after a whole night, but judging by the amount of paint that got loose with the masking tape that clearly isn't the case.
Or they made the paint such that only there brand masking tape can be pulled loose without taking any paint with it.
And as I didn't use the plastic primer for all the plastic parts I suddenly had a sheet of paint coming of some plastic, including the 2 layers of primer that were underneath it...
Then all sorts of things cross your mind, like I should have listened to all the advices of the people who were watching frustrated probably knowing it would go wrong some time...
For those people: I'm sorry, I might be 1 of those guys who just need to fall real hard before they start to see they're doing it wrong...
Today I fell real hard, even to the paint of thinking about starting all over again or starting with the next model...
I'll spent the rest of the day destroying digital civilizations to release my frustration and to prevent me from ruining my model for which I'm still determined to finish her to a high standard.

Greetings Josse
Making a complete new Well Enhancer, again scale 1:75.
User avatar
Richard J OMalley
Posts: 1012
Joined: Mon Jun 12, 2006 1:46 pm

Re: 1:75 diving support vessel Well Enhancer

Post by Richard J OMalley »

You are doing a fine job and everyone has set backs .Keep going .I alwys remove the masking tape before the paint dries . :wave_1:
If you are not living on the edge then you are taking up to much space
tweety777
Posts: 591
Joined: Fri Sep 25, 2009 6:28 am
Location: Near Veenendaal, The Netherlands
Contact:

Re: 1:75 diving support vessel Well Enhancer

Post by tweety777 »

Hi Richard,

Thanks for the kind words.
Now that I look at her again it all doesn't seem all too bad.
Most of the places that look bad are well covered by the removable dive-area so no-one will really be able to see it.
What I was talking about is that the paint on which the masking tape was placed (to prevent the new paint from getting in the wrong place) torn off the older and supposedly dry paint.
The newly applied paint has been applied properly.
I'll show some photo's any time soon.

Greetings Josse
Making a complete new Well Enhancer, again scale 1:75.
tweety777
Posts: 591
Joined: Fri Sep 25, 2009 6:28 am
Location: Near Veenendaal, The Netherlands
Contact:

Re: 1:75 diving support vessel Well Enhancer

Post by tweety777 »

Update:
Image
The bridge had got a little white paint, but I wanted to repaint this area anyway.
Image
Looking good so far.
Image
Here are some spots where things got bad, though it went rather well in this region mostly.
Image

Image
From a distance it looks good.
Image
This is where pretty much all the trouble occurred, mostly hidden from view by the dive-area.

Greetings Josse
Making a complete new Well Enhancer, again scale 1:75.
tweety777
Posts: 591
Joined: Fri Sep 25, 2009 6:28 am
Location: Near Veenendaal, The Netherlands
Contact:

Re: 1:75 diving support vessel Well Enhancer

Post by tweety777 »

Today I went out with the club to sail with Well Enhancer.
She sailed for about 5 hours and it all went pretty good.
The problems of the main engines working at less then half what they should be capable of and the bow thruster working twice as good was solved.
It turned out I did connect the battery wires correctly to the fuses and the last time I sailed with her I thought I've did it the other way around.
Now everything works fine again.
It did cause me to decide to attach the bow thruster to the 12V power.
That means I'll replace the ESC with that in my tugboat so that the ESC can handle 12V.
Then bow thruster engine actually can't handle 12V, only 7.6V but running it on 12V should only reduce it's usable lifetime, but as I use the bow thruster only on a few occasions that's no problem to me.

Enough talking, now some photo's:
Image

Image
Well Enhancer in her element next to an oil rig as she's build to do maintenance on oil rigs and the pipelines that are attached to those oil rigs.
Image
Some ships had an excessive amount of smoke coming out of their funnels...
Image
Here she's a bit less in her element but the owner also likes to get something to drink or to eat from time to time...
Image
The crew also seemed to be enjoying Queens day as there is no-one visible on deck...
Image
Now crew visible on the decks of model owned by someone who claims that work ships with no crew at the decks is a yacht...
Time to change that.
Image
When sitting in a lazy chair the enormous superstructure is quite a pain in the but as it makes it impossible to see the smaller models ahead of the bow.
That has resulted in more then 1 collision.
Fortunately Well Enhancer is more then tough enough to deal with these kind of collisions.
Image
Had some park assist although this model is more then manoeuvrable enough to park on her own...
Image
When the crew finally arrived at the deck it was only to find half the crew sitting on a couch enjoying the sun...
The lazy bastards...
Image
This photo shows how tough it can be to manoeuvre a big model like Well Enhancer between those tiny little boats, especially seeing the fact that those boats are controlled by younger people (they only know full speed and full rudder and aren't quite predictable...).
Image
Modern day officers seem to not share the mentality of their colleagues from years ago...
This 1 was wiped off his feet due to a collision with the shore...
Image
This is the last 1 for today.

Greetings Josse
Making a complete new Well Enhancer, again scale 1:75.
User avatar
Richard J OMalley
Posts: 1012
Joined: Mon Jun 12, 2006 1:46 pm

Re: 1:75 diving support vessel Well Enhancer

Post by Richard J OMalley »

She is a big baby . :thumbs_up_1: Can you tell us more about what these ships do and how they do it ? :huh:
If you are not living on the edge then you are taking up to much space
tweety777
Posts: 591
Joined: Fri Sep 25, 2009 6:28 am
Location: Near Veenendaal, The Netherlands
Contact:

Re: 1:75 diving support vessel Well Enhancer

Post by tweety777 »

Hi Richard,

As a diving support vessel she has 18 divers on board who can get to their working depth using a dive bell.
I think (I didn't get to ask what kind of work she would really do) that she'll be doing maintenance on pipelines (mostly using the ROV's) and maintenance on the oil rigs.
The huge tower on the rear deck can be used to lower all sorts of tools to the ocean floor to aid this work.
Unfortunately I don't know a more detailed answer then this.

Greetings Josse
Making a complete new Well Enhancer, again scale 1:75.
tweety777
Posts: 591
Joined: Fri Sep 25, 2009 6:28 am
Location: Near Veenendaal, The Netherlands
Contact:

Re: 1:75 diving support vessel Well Enhancer

Post by tweety777 »

Today I continued the work on the electronics.
The ESC in my tugboat turned out to be the exact same one as the 1 that is used to control the bow thruster.
Although that means both the ESC and engine actually aren't capable of handling 12V the short usage of the bow thruster makes me stay with my decision to give it 12V and today I re-arranged the wiring to give the bow thruster 12V.
I also adjusted the wiring coming from the batteries so I can place the batteries on the spots where they've been placed for a couple of years now.
When that was done I re-attached some wires on the fog-horn electronics and now it works properly again, as one can see in the video below (video was made using my phone, don't have anything better with video capabilities till the end of this month when I'll be buying a filming equipped DSLR, so I'm sorry for the poor quality)
http://youtu.be/tcQFrgAditk

Here are 2 photo's of some other progress:
Image
Funnel is being glued in place.
Image
Hopefully one can see here that the funnel is placed straight and level.

Greetings Josse
Making a complete new Well Enhancer, again scale 1:75.
tweety777
Posts: 591
Joined: Fri Sep 25, 2009 6:28 am
Location: Near Veenendaal, The Netherlands
Contact:

Re: 1:75 diving support vessel Well Enhancer

Post by tweety777 »

Today I've been emailing with the friend who advised me to use Arduino to control my model about using wifi as communication between transmitter and Arduino.
He had discovered some facts about wifi and it's compatibility with the used software causing wifi to be dropped as an option for communications.
My friend was kind enough to give an alternative: tare apart the existing transmitter, take the antenna and electronics out and replace it by an Arduino and 2,4GHz transmitter/ receiver system (gives 2 way communication) which is designed for Arduino.
Also add some switches and a touch screen and we have a heavily modified transmitter with virtually no limit to the amount of functions it can control.
My current transmitter is large enough to accommodate the Arduino stuff and that coupled to some other facts is quite some reason to adopt this system.

Enough talking, now some more photo's of today's progress:
Image
As the hatch in the rear deck is now covered by 2 pieces I no longer needed to remove the platform in order to get the deck out.
Therefore I decided it was time to place the platform permanently.
Image
When the glue had dried I removed the weight to get this view at the result.
Image
Proud as I am about the current progress I decided to put the boat on my bed again and prepare her for some pics in her working condition.
Here the bridge is showing clear evidence of the ship doing some complex kind of manoeuvring.
Image
Can't get enough of this kind of photo's but you guys probably didn't notice that yet, had you?
Image
Another good old view.
Image
The rear deck is also full of activity.
Not quite unexpected as placing a funnel and a platform isn't quite a smurfs job (or a job for whatever name you English folks give to small creatures)...
Image
Looks like a work ship again!

Greetings Josse
Making a complete new Well Enhancer, again scale 1:75.
tweety777
Posts: 591
Joined: Fri Sep 25, 2009 6:28 am
Location: Near Veenendaal, The Netherlands
Contact:

Re: 1:75 diving support vessel Well Enhancer

Post by tweety777 »

Update:
Image
The major disadvantage of placing the electronics after the deck has been placed is that it can be very difficult to mount the electronics later on.
Here I'm trying to tighten a screw on which I will hang a wooden plate for the central computer.
To tighten the screw I had to drill a hole (which couldn't be drilled horizontal as the Dremel didn't fit in the small room), then put the screw in from the wrong side as the electric screwdriver also didn't fit in the room behind the bulkhead and after that I could finally put the screw in place manually.
The high keel is quite a handicap in this matter and has actually not at all proved it's value so I won't use such a high keel anymore.
Image
I had placed some kind of bin to put the electronics in, but I actually prefer to place the on a wooden plate so I made 1 today.
This plate will also hold the main 2,4GHz antenna so some room at the top is no luxury.
Image
This is to give an idea of how spacious the plate has been set up.
It will hold 1 larger Arduino and to smaller Arduino's and a much smaller PCB with the 2,4GHz antenna and 5 even smaller PCBs with build-in 2,4GHz antennas for communication with the lifeboats.
That leaves quite some room for nice and clean wiring.
Image
This plate will carry 1 larger Arduino and 2 port expanders which will serve as bow computer.
Image
Made some brackets to keep the plate in place.
This has clearly been scratch build, but that applies to pretty much the entire model and it works so who cares?
Image
This is where this Arduino will be placed.
There will also be a port expander to control some on/off functions for which this Arduino doesn't have enough pins, but the cheapest Arduino which has the right amount of pins is twice as expensive and has 4 times as much pins which is a bit overkill.
Actually pretty much all the used Arduino's will be using only a small amount of their memory and capacity.
This Arduino has already got it's power supply wiring prepared (Arduino won't be placed until some proper testing with this system has been done) and the wiring for controlling the bow thruster, main engines and the steering servos have been placed as well.
When the bow computer has been placed the wires for the bow thruster will be disconnected to attach those to the bow computer, there's no point in having pulse wires running from bow to stern when a more then capable control unit is close by.

Greetings Josse
Making a complete new Well Enhancer, again scale 1:75.
User avatar
Richard J OMalley
Posts: 1012
Joined: Mon Jun 12, 2006 1:46 pm

Re: 1:75 diving support vessel Well Enhancer

Post by Richard J OMalley »

Josse
I hope Tweety knows which wire is which ! :doh_1:
If you are not living on the edge then you are taking up to much space
tweety777
Posts: 591
Joined: Fri Sep 25, 2009 6:28 am
Location: Near Veenendaal, The Netherlands
Contact:

Re: 1:75 diving support vessel Well Enhancer

Post by tweety777 »

No build-update this time.
Since last Monday I'm working full time at Akerboom (a company that builds superstructures for mega yachts like those Bill Gates owns).
That means getting out of bed early and being back home just in time for dinner whilst being tired.
I expect that this will cause modelbuilding to be done quite a bit less then I used to do so if your wondering where the updates are you'll know now why I'm not busy with modelbuilding.
Fortunately I really like my job and I'm in a great team so that might help to keep modelbuilding.
This week I've been more busy with designing my own mega yacht...

Greetings Josse
Making a complete new Well Enhancer, again scale 1:75.
tweety777
Posts: 591
Joined: Fri Sep 25, 2009 6:28 am
Location: Near Veenendaal, The Netherlands
Contact:

Re: 1:75 diving support vessel Well Enhancer

Post by tweety777 »

Despite my new job I managed to get to an update!!!!
Image
As the detailing stage has now begun I started working on another platform on the rear deck.
On the drawing I saw that it seemed to be build out of 2 parts so I decided to take advantage of that fact by building mine also out of 2 parts though I forgot that 15/2 is 7,5.
I made 1 piece 10m long (when scaled back to the real ship) causing the second piece to be 1/3 to short...
Image
Mounted the first supports.
This platform will be twice as wide but that means it's partly above the secured part of the deck and partly above the removable hatch.
Therefore I will build the platform in 2 pieces, hopefully this won't cause all too much damage to it.
Image
Likes tight doesn't it?
Image
For the last months now I've been thinking about a way to mount the main crane in such a way that it's weight is being carried properly whilst it's also properly turning around.
Today I seem to have found the solution so I started working on it.
Image
The servo is screwed in the smaller tube, having the wider outer tube carrying the weight of the crane.
Under the crane house I will add a sturdy brass plate which can be attached to the servo to make the crane turn.
Image
Added some frames.
Image
Dry fit.
Image
The platform turned out to be a little wider then I planned but that turns out to not be quite a bad thing as it now stays more clear of the bollards which I use often when I moor this vessel (don't like getting this beast out of the water just so I can get some lunch).

Greetings Josse
Making a complete new Well Enhancer, again scale 1:75.
tweety777
Posts: 591
Joined: Fri Sep 25, 2009 6:28 am
Location: Near Veenendaal, The Netherlands
Contact:

Re: 1:75 diving support vessel Well Enhancer

Post by tweety777 »

Here are some mood photo's off last night:
Image
Bridge full of crew members doing there job (and some just chitchatting...).
Image
Full speed ahead!
Image
Also quite some activity at the deck.
Image

Image
Here is happening a lot more.
Image
Last one for now.

Greetings Josse
Making a complete new Well Enhancer, again scale 1:75.
tweety777
Posts: 591
Joined: Fri Sep 25, 2009 6:28 am
Location: Near Veenendaal, The Netherlands
Contact:

Re: 1:75 diving support vessel Well Enhancer

Post by tweety777 »

Haven't done much work due to work.
I did mail quite often with my personal advisor for Arduino about how I want to control my boat using Arduino.
It turns out that my current radio won't be up to the job, it would need a good touch screen which will make things quite hard and the available touch screens aren't anywhere near big enough.
That brings me back to using my laptop to control the boat, this time not using WiFi but by putting an Arduino (for translation) and an 2,4GHz transceiver into the USB port.
Both parts will be placed inside a special build box which will also contain 2 sticks from my current radios so I can use the trusted sticks to control the boat.
I have ordered the needed parts and the first part should arrive within a few days.
Part of the order is the first Arduino Mega, which will be used to control the communications between the laptop and the Arduino's in the boat.
It will make sure that the correct Arduino receives the order.

In thus controlling my model using Arduino is coming closer every day!!

Greetings Josse
Making a complete new Well Enhancer, again scale 1:75.
tweety777
Posts: 591
Joined: Fri Sep 25, 2009 6:28 am
Location: Near Veenendaal, The Netherlands
Contact:

Re: 1:75 diving support vessel Well Enhancer

Post by tweety777 »

Finally a real update again:
Image
Placed the 7W amplifier, but it still needs to be connected.
Image
I decided to make the new platform out of 1 piece, probably requiring myself to first remove the platform before being able to take the removable deck off.
The new part has now been attached to the first part.
Image
This is what it will look like aboard Well Enhancer.
Image
Placed the still under construction container on the platform.
Image
First Arduino ready for programming and use.
Image
These are the first wires that will be connected to the ordered Arduino which will be the central computer which will control all the communications between the shore (laptop), lifeboats and other small craft and the Well Enhancer herself (including the different computers).
Orange and green wires are data wires.
Image
As the soldering iron was already hot I also attached the wires for the bow computer which has not yet been ordered.
The wires have now been taped to the wooden plates to prevent shorts from occurring.
Next Sunday I hope to go sailing with the model building club so I might have some photo's and also some footage of her sailing as my new camera can record films in HD quality!

Greetings Josse
Making a complete new Well Enhancer, again scale 1:75.
tweety777
Posts: 591
Joined: Fri Sep 25, 2009 6:28 am
Location: Near Veenendaal, The Netherlands
Contact:

Re: 1:75 diving support vessel Well Enhancer

Post by tweety777 »

Update:
Image
As I had been busy soldering I also connected the amplifier.
The drawings that were supplied with the kit showed the use of a potmeter as volume control so I also added that to the circuit.
Here is my first HD youtube movie ever showing the test of the foghorn (It's not quite as loud as I had expected...):
http://www.youtube.com/watch?v=tk9nTqGUgaM

Image
Even more soldering has been done.
Tonight I hope to be able to get the other side done so I can place the deck.

Greetings Josse
Making a complete new Well Enhancer, again scale 1:75.
tweety777
Posts: 591
Joined: Fri Sep 25, 2009 6:28 am
Location: Near Veenendaal, The Netherlands
Contact:

Re: 1:75 diving support vessel Well Enhancer

Post by tweety777 »

Update:
Image
Second side of the support of the helopad has been finished as well.
Image
As the thin deck plate tends to bend under the heat pretty quickly I took some weight to keep things within limits.
Image
First helo has landed!!
Image
Ship is in DP mode somewhere at sea.
Only very few crew is required at the bridge now.
Image
When 2 legs have been shortened I have a huge model with a nice helopad!!
Image

Image
This gives a better view at the helo.
Image
If your imagination puts a stair in this picture this could well be a scene of Well Enhancer while on voyage (and if you replace the current storage things with containers).

Greetings Josse
Making a complete new Well Enhancer, again scale 1:75.
Post Reply

Return to “Online Scratchbuild Projects”